Blender 5.0 is coming to save us from the spaghetti hell!
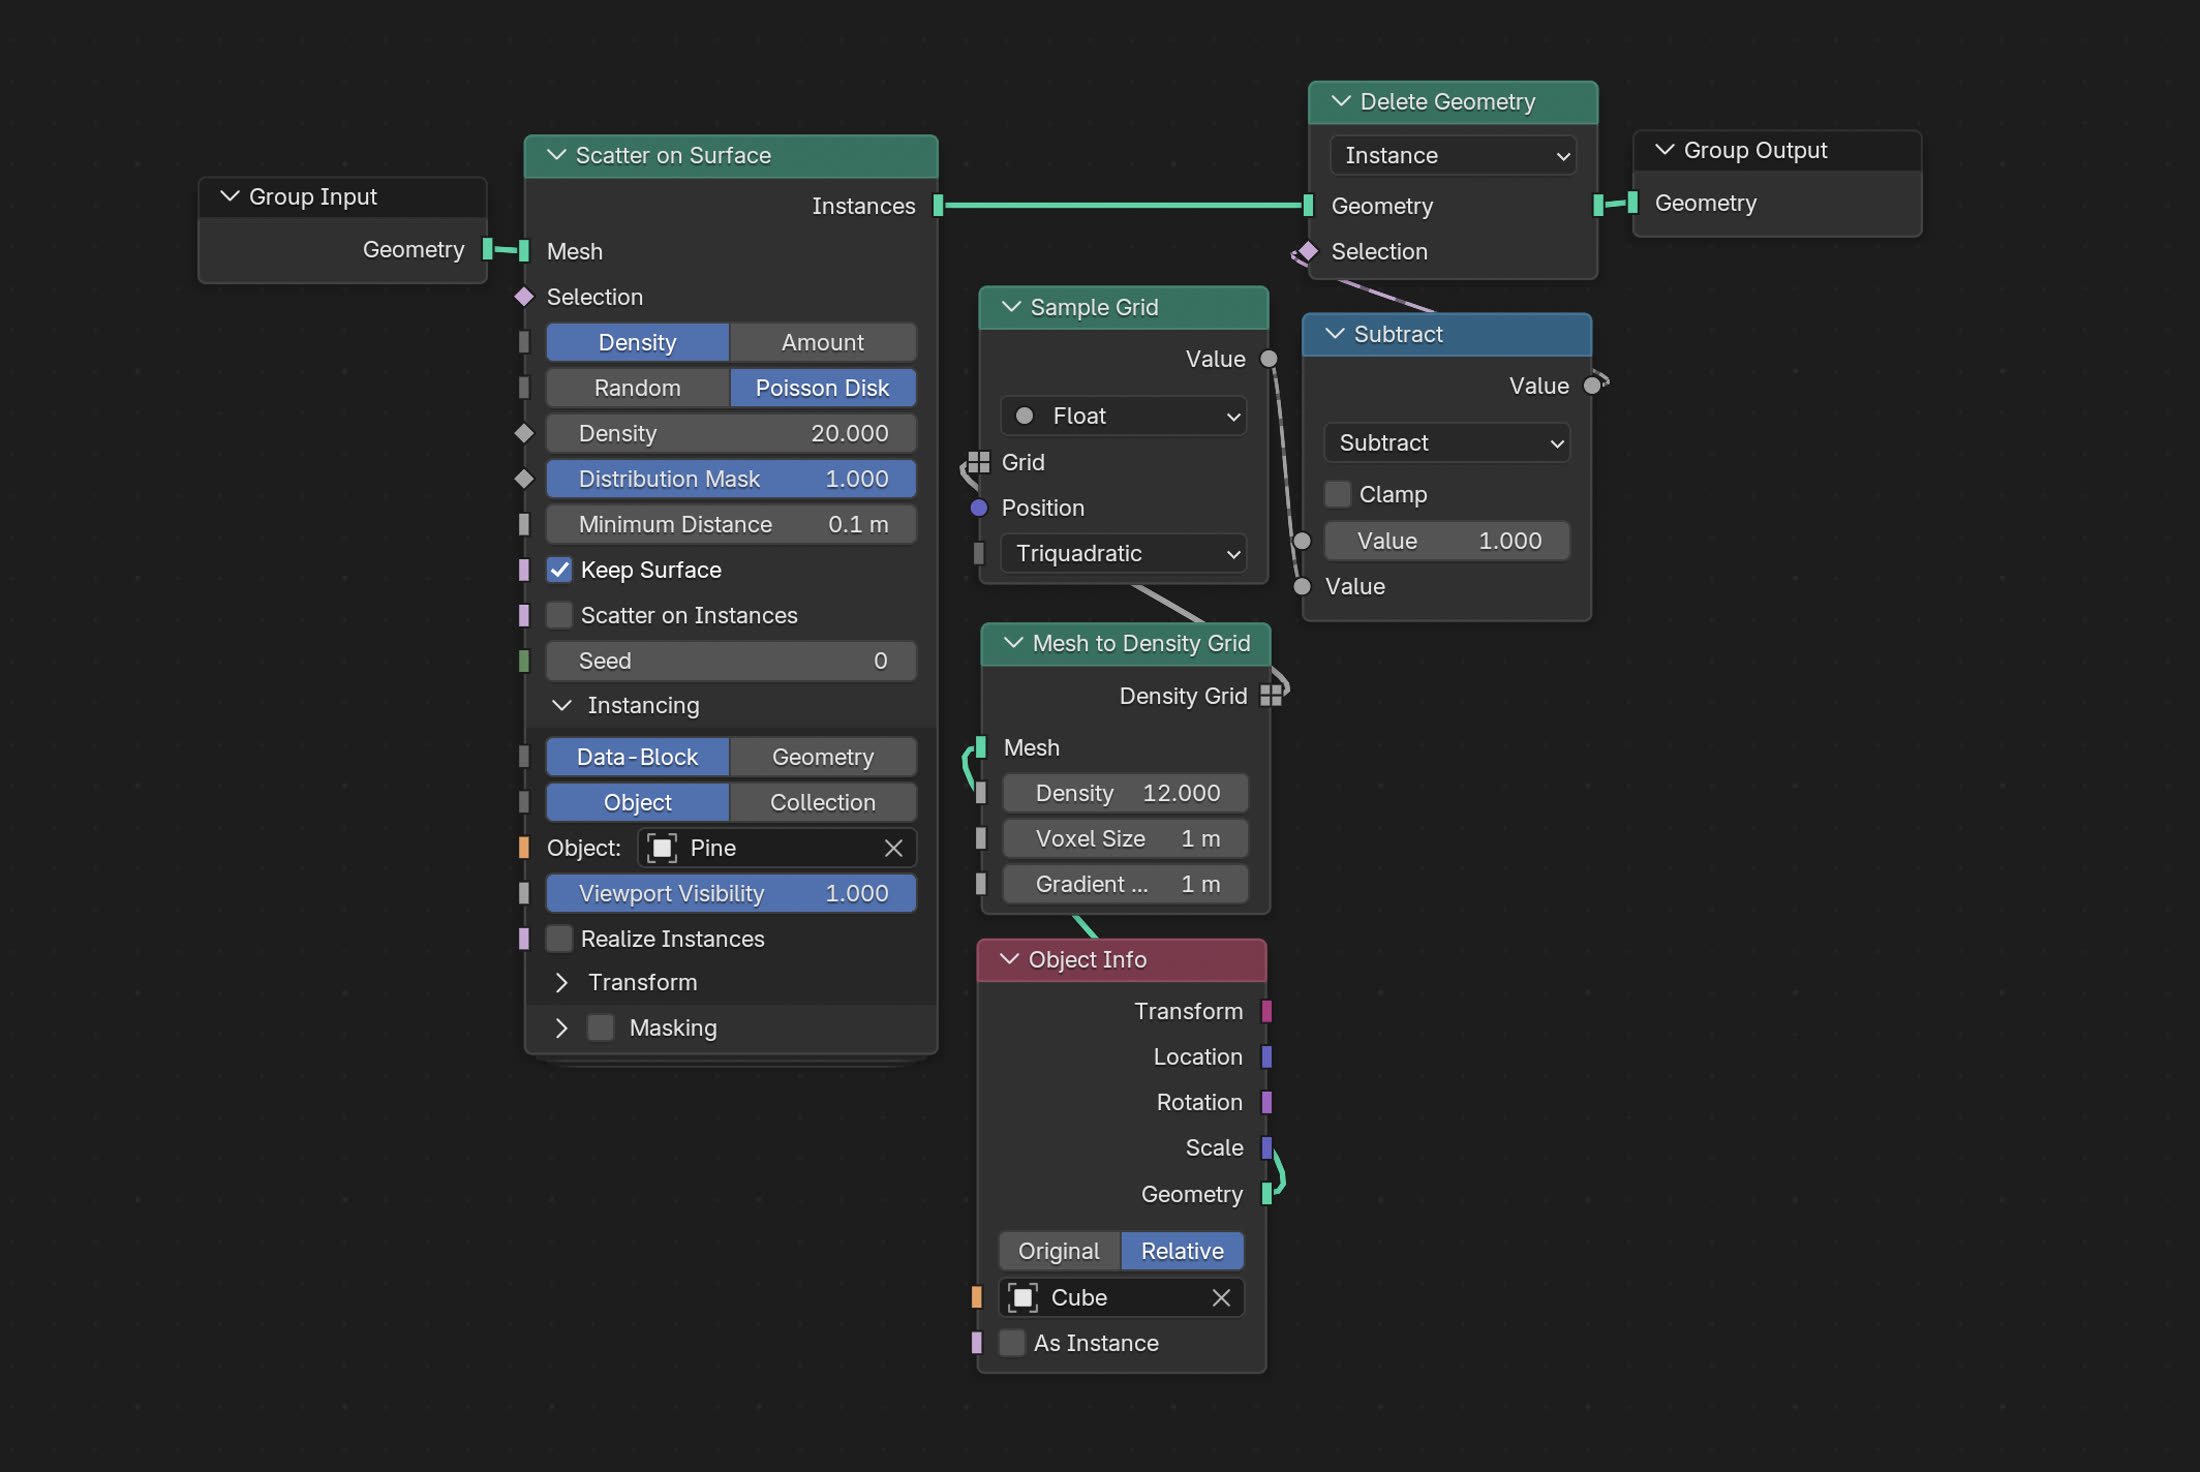
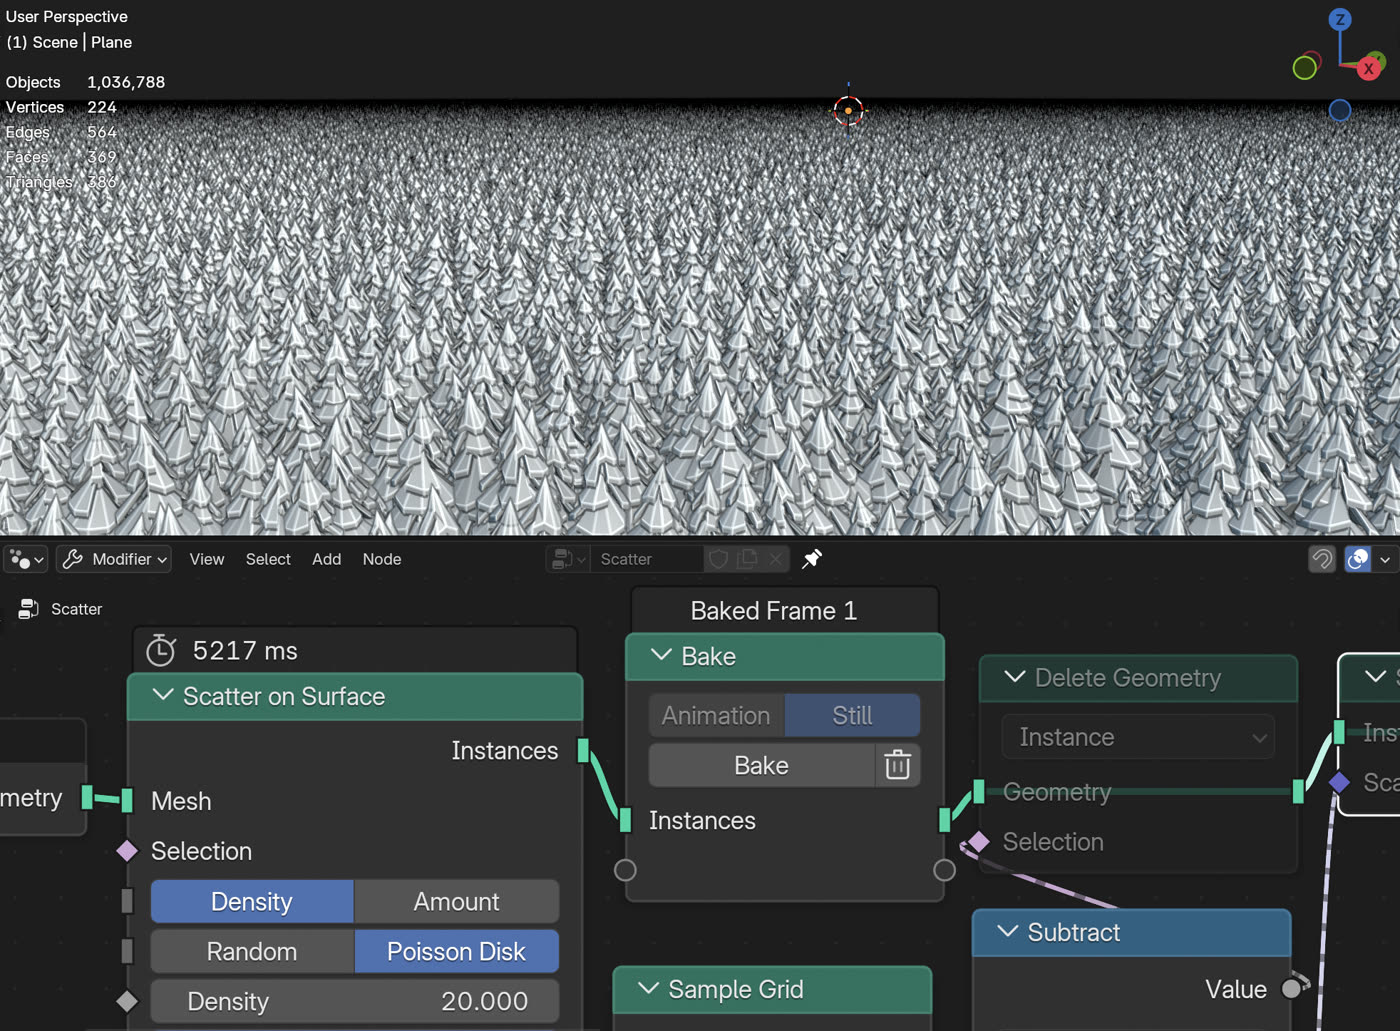
Here’s a ridiculously simple blender 5.0 node setup that scatters objects on the surface of a mesh inside of the volume of some other mesh:
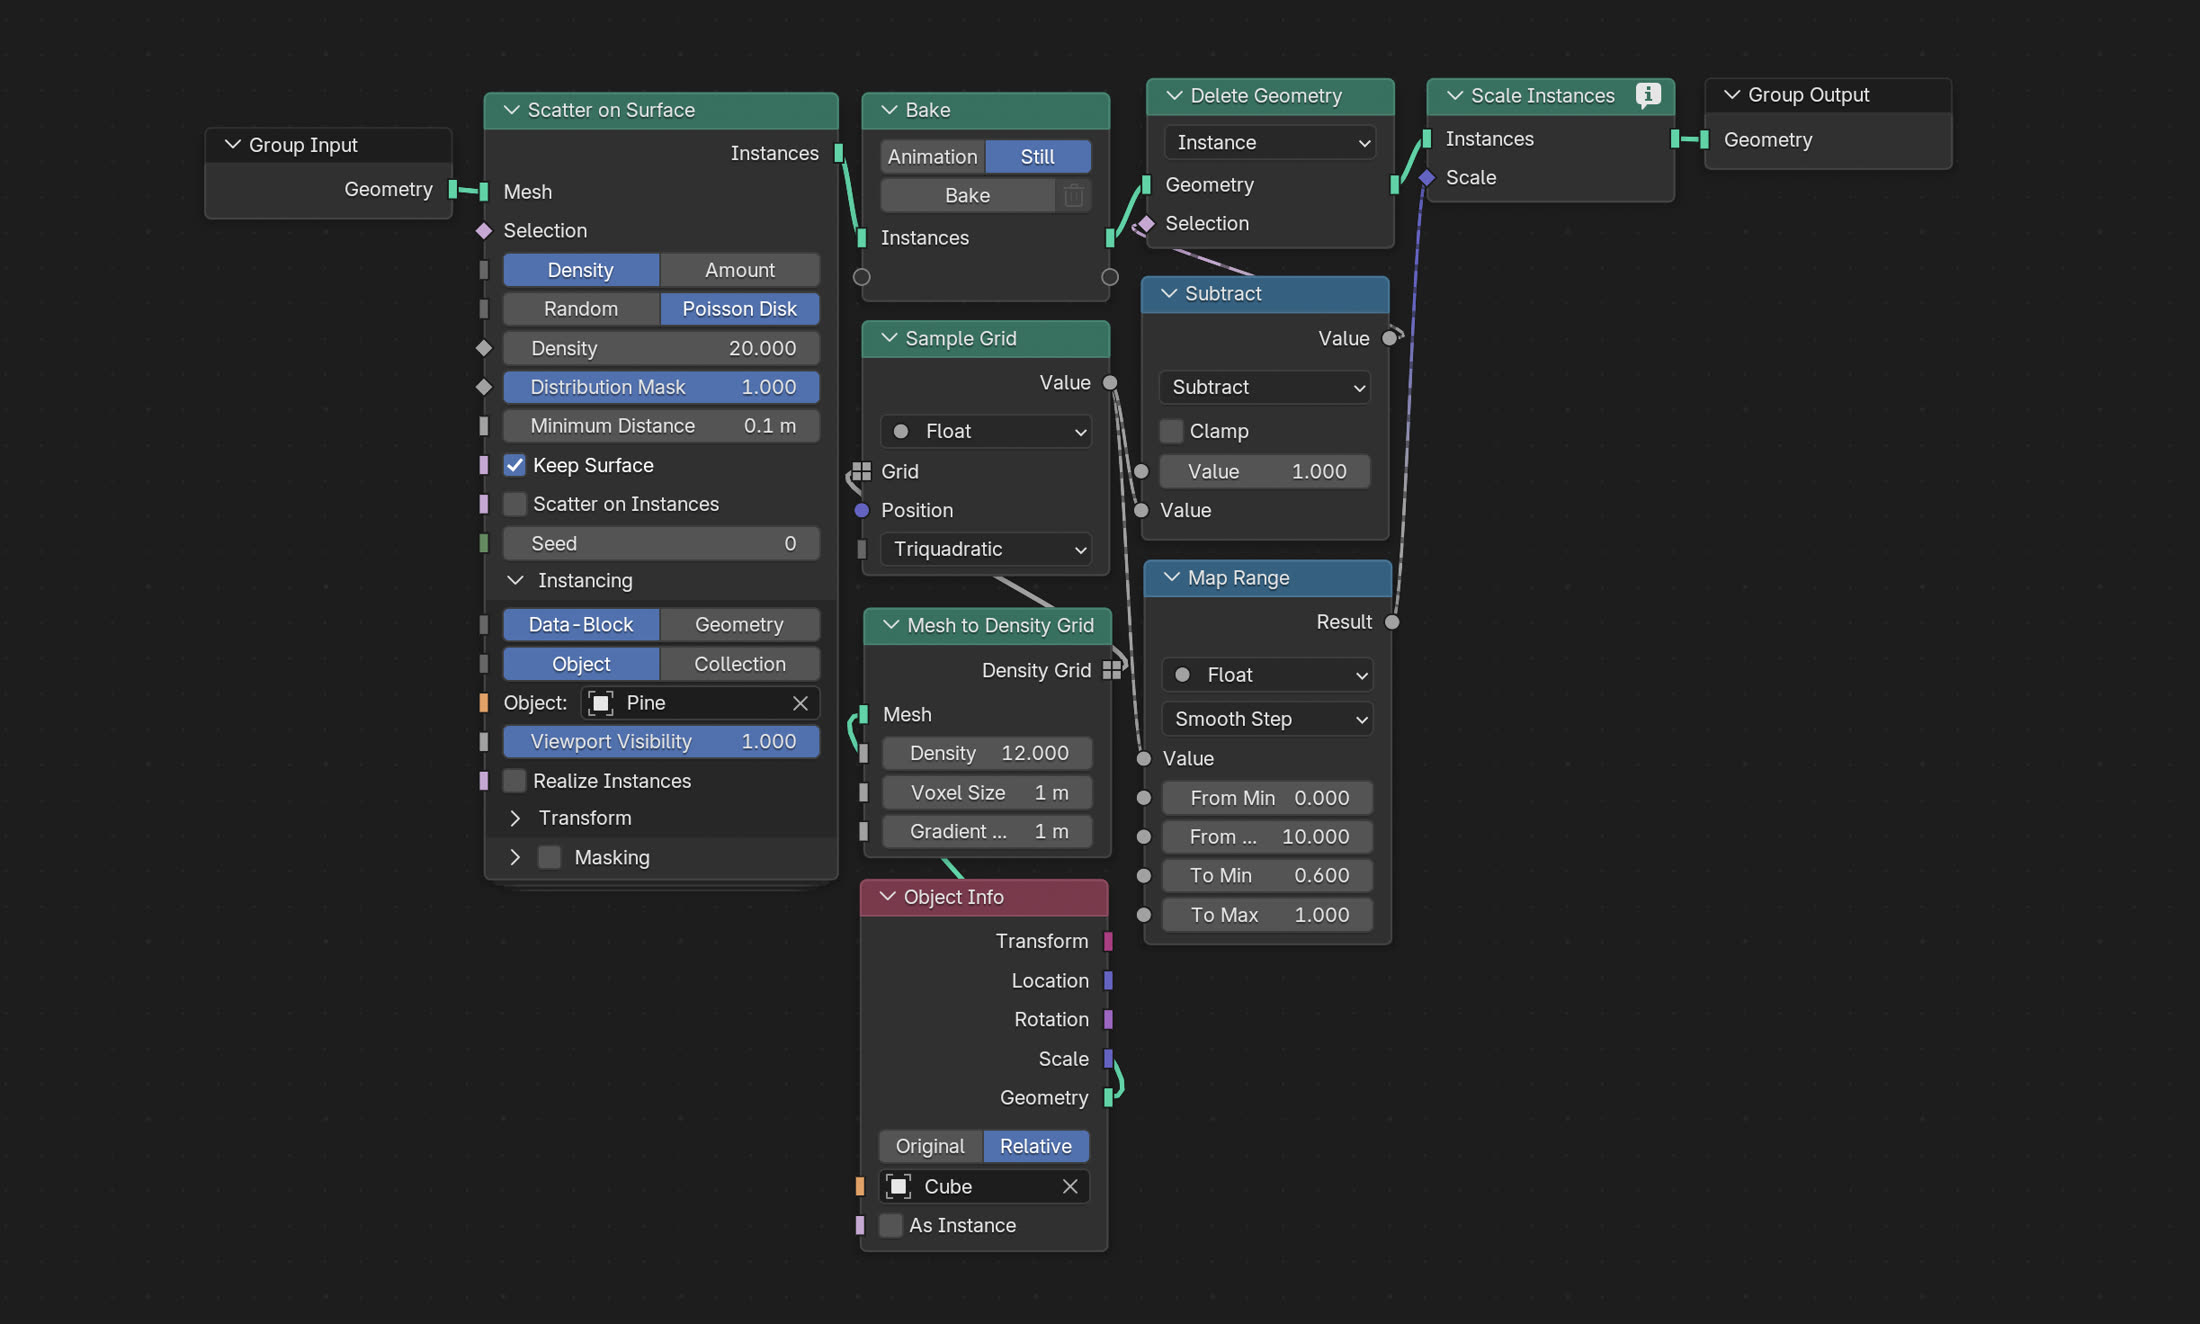
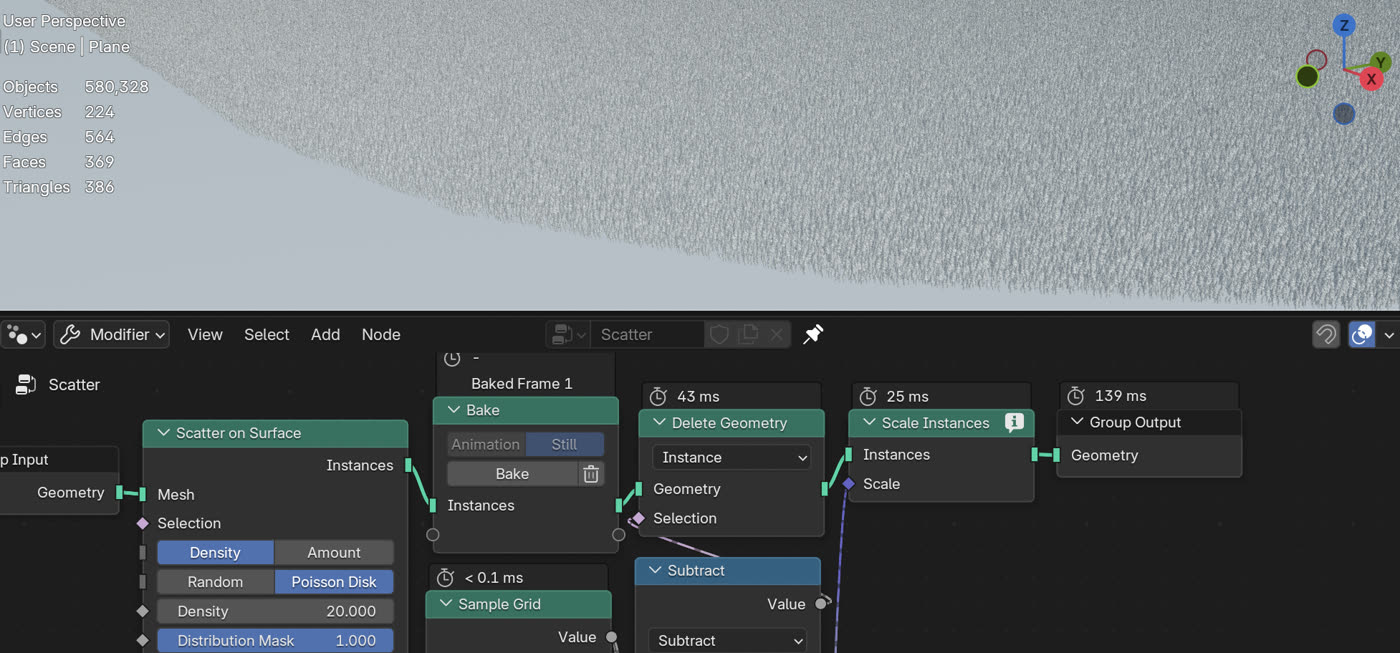
And here’s a cooler version that also scales instances near the edges and allows baking instance distribution before culling and scaling (we’ll get into all that in a sec):
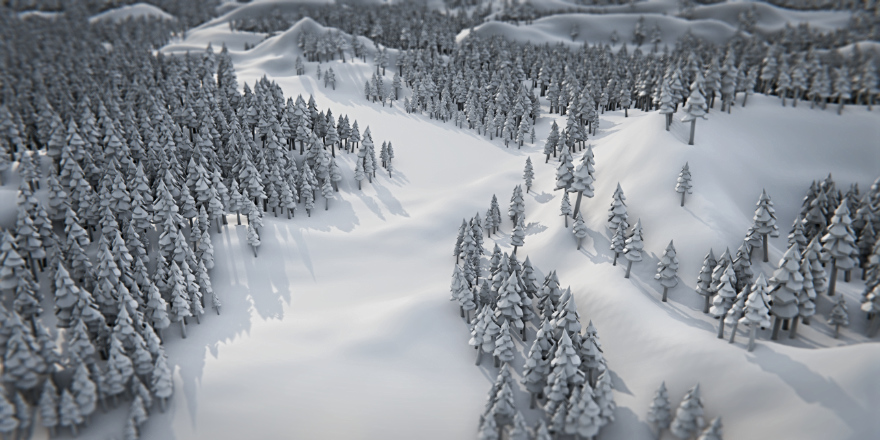
Here’s what that setup looks like in action:
What’s cool about that node setup is that there are no custom nodes in it. Those nodes all ship with blender 5.0! That’s huge if you don’t wanna spend hours in the node editor and just want to get results on your screen. I know I do because I already spend way too much time making tools.
Previously I used raycasts for that sort of thing, but that required more nodes!
This node setup will work with any manifold geometry for those “volumes”. You can copy the meshes inside of the same object. If you prefer multiple objects you can also do that, you’d just need to join the objects of a collection and use that as a density grid.
What I like about this setup is that it gives you a lot of control without much hassle, you can quickly scatter a lot of stuff around just by copying a bunch of volumes.
It can be used for gamedev!
If you use blender as a level editor this setup can be used to scatter vegetation, rocks or any other random shit in game levels. Instances can be imported into game engines via either regular instancing (if you enable geonode instance export in blender) or gltf gpu instancing:
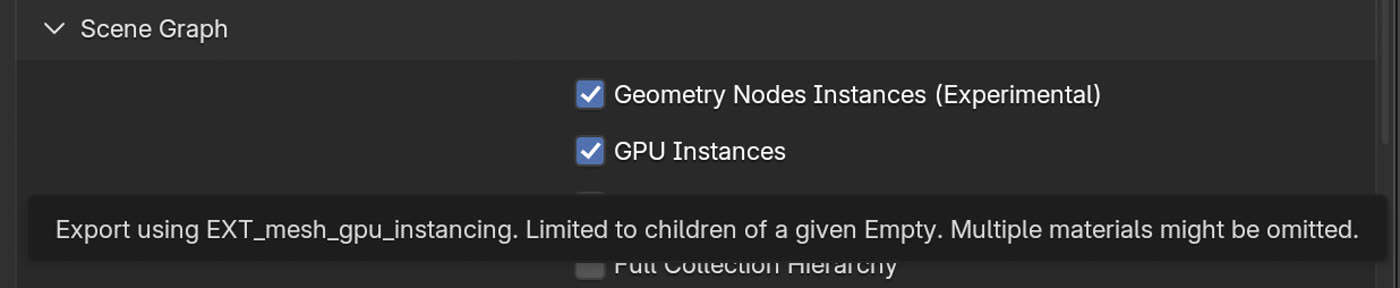
Gltf gpu instancing is not yet natively supported by godot, but it may be in the future if this PR gets merged. You can also use this addon now. Unlike regular gltf instancing, with EXT_mesh_gpu_instancing the transform data for those instances is stored in .bin rather than .gltf, which is very fast to read from in a game engine!
That would create MultiMeshInstance3D in godot, so without additional import processing that would be mostly useful for trash, grass and other simple stuff that doesn’t need colliders or other internal nodes and just does some shader logic maybe. For trees (if you want colliders on them) you’d need to make an import script that swaps imported instances for assets (aka prefabs, aka scenes in godot), either by iterating over gpu instances or regular instances.
But I’m getting off topic now, let’s talk a bit about scattering instances!
The node graph
There are a few things that are worth mentioning about that graph:
Density Grid
Blender 5 added a bunch of 3d grid related nodes, including SDF grids, which are super awesome and I can’t stop playing with those, but as you can see here we’re converting meshes to a Density Grid instead.
Technically both density and sdf grids can be used for this but density grid gives us a bit more control here, i.e we have an additional Gradient Width float to control how the density falls off near the edge of the culler mesh:
Density grid is exactly what it sounds like - a 3d volume of cells that hold values representing how dense the volume is at different points in space. We use that density to cull and scale tree instances! It’s super simple!
Triquadratic interpolation
When we’re sampling from the grid we’re using the Triquadratic voxel interpolation. This gives you a lot of precision and allows to keep the voxel size high for the sake of performance. Sampling from the grid is super fast regardless of the type of interpolation, but having small voxels may become slow if the volume is very big.
Here’s a comparison between triquadratic and nearest neighbor so that you could see the size of the actual unfiltered voxels:
Trilinear (the default) can also give decent results but not quite as magical as triquadratic and the cost is negligible, so I couldn’t see any reason not to use it. It makes it possible to keep the voxels really big, which is great for performance!
Culling instances
Instances that fall outside of the volume of the culler mesh need to be deleted. This way we actually get artistic control over it instead of covering the entire object with trees.
It’s possible to plug the grid density directly into the density input of the Scatter on Surface node, but that would sample the grid density per mesh vertex, which means your level geometry would need subdivisions for that instance scatter to work. This may work for some cases but not the other. This is very limiting! Ideally we shouldn’t have to worry about subdivisions at all!
So instead of doing that, we just scatter instances on the entire surface and then delete instances outside of the volume with the Delete Geometry node in Instance mode. This way, we check the culler density per distributed instance rather than per geometry vertex. This will work on any geometry, even if it consists of just two triangles. The downside of scattering on the entire surface and then deleting is of course that it’s slower, especially if you’re using the Poisson Disk distribution. But this is where baking comes in!
The good news is that you don’t need to scatter in real time. You can scatter, bake, and then add any masks on top of it (including volume culling) and it will be fast! As graphs get more complex you will most likely need to add a few baking steps in there anyway if you’re trying to generate the next Far Cry!
Here’s a very big stress test. It takes 5 seconds to distribute a million trees in Poisson Disk mode on my M1 Max:
Not good for realtime, but not a problem at all for a press on a Bake button! You only need to rebake when the terrain changes. After the distribution is baked, it only takes 40 and 20 ms to cull and scale:
There are other things that you can do like raycasting from the culler onto the surface or boolean-ing the meshes to try to reduce the distribution surface. But if you use boolean, even when it succeeds, you won’t get stable distribution since the underlying mesh will change when you move the cullers. Instances will flicker in and out of existence at different positions. Which is why so far distributing everywhere before culling seems like the best option overall.
Another upside of that method is that it can be taken further and you can potentially reuse the same point cloud for all entities in the map. You would just bake it once and then spawn different instances on different parts of it depending on some masks. But this is out of scope of this post and you will also need to give up on the built-in Scatter on Surface node and scatter raw points instead.
Then the terrain itself will also need to be split into chunks so that it could be culled in engine, so optimizing point scattering won’t even be the trickiest problem to solve in that scenario.
But I’m getting carried away! This was supposed to be a short post celebrating new blender 5.0 artist-friendly nodes. Let’s get to that!
More node magic
Great thing about blender adding some high-level nodes is that we don’t get stuck in spaghetti hell trying to do basic things, which leaves us mental capacity to add extra features and make something that is actually useful.
Noise Mask
Do you want to add a noise mask? No problem, just multiply the density by a built-in noise:
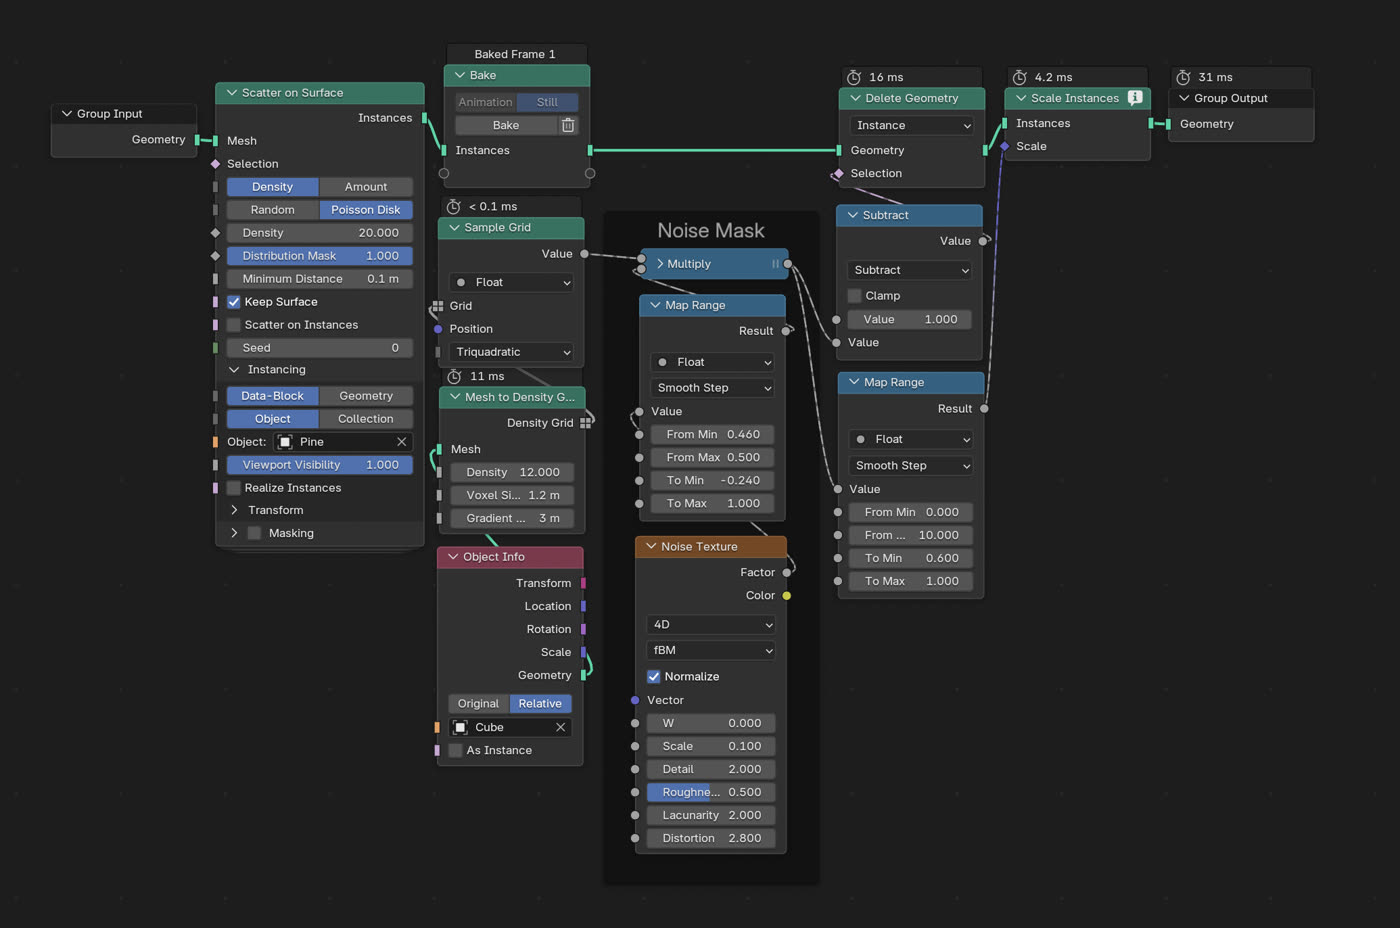
The map range node is used to isolate a specific range of values where low density turns into high density. As you can see From Min and From Max are very close because we want a sharp transition. The W parameter of 4D noise can be used to control the phase of the noise in 3D:
Curve mask
We can also add a curve mask that will remove trees near curves so that we can make space for roads, rivers or other long stuffs:
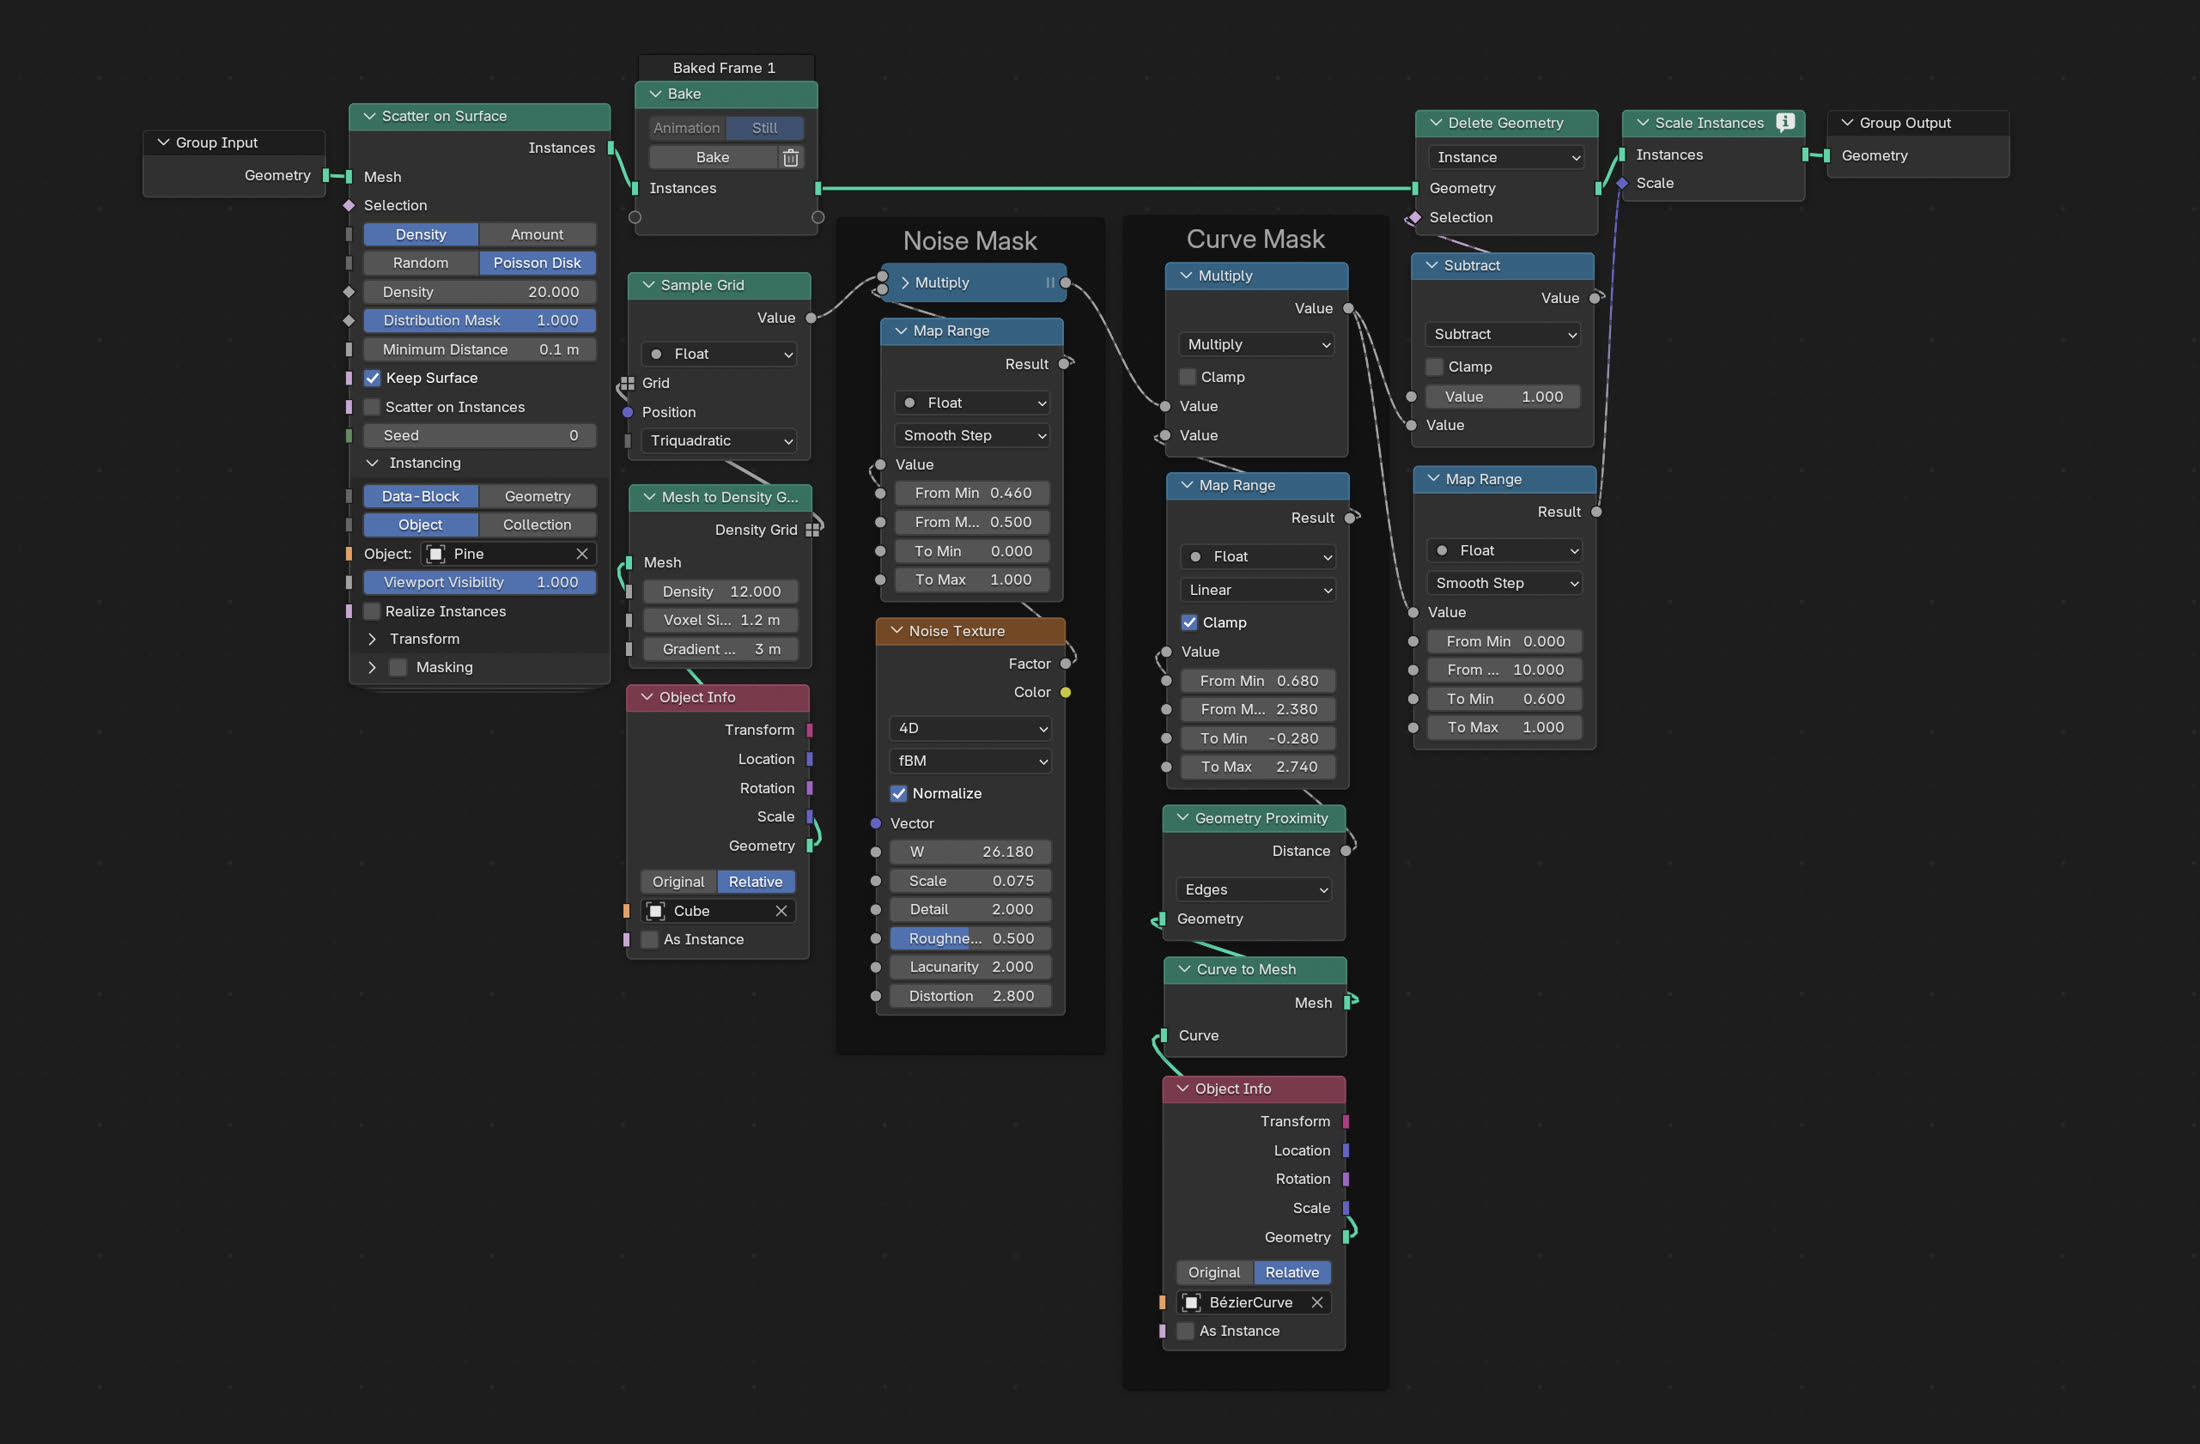
We can then draw curves to remove forest and use the map range node to control the mask:
Slope mask
Another thing you can add super easily is slope mask with the new Normal Selection node:
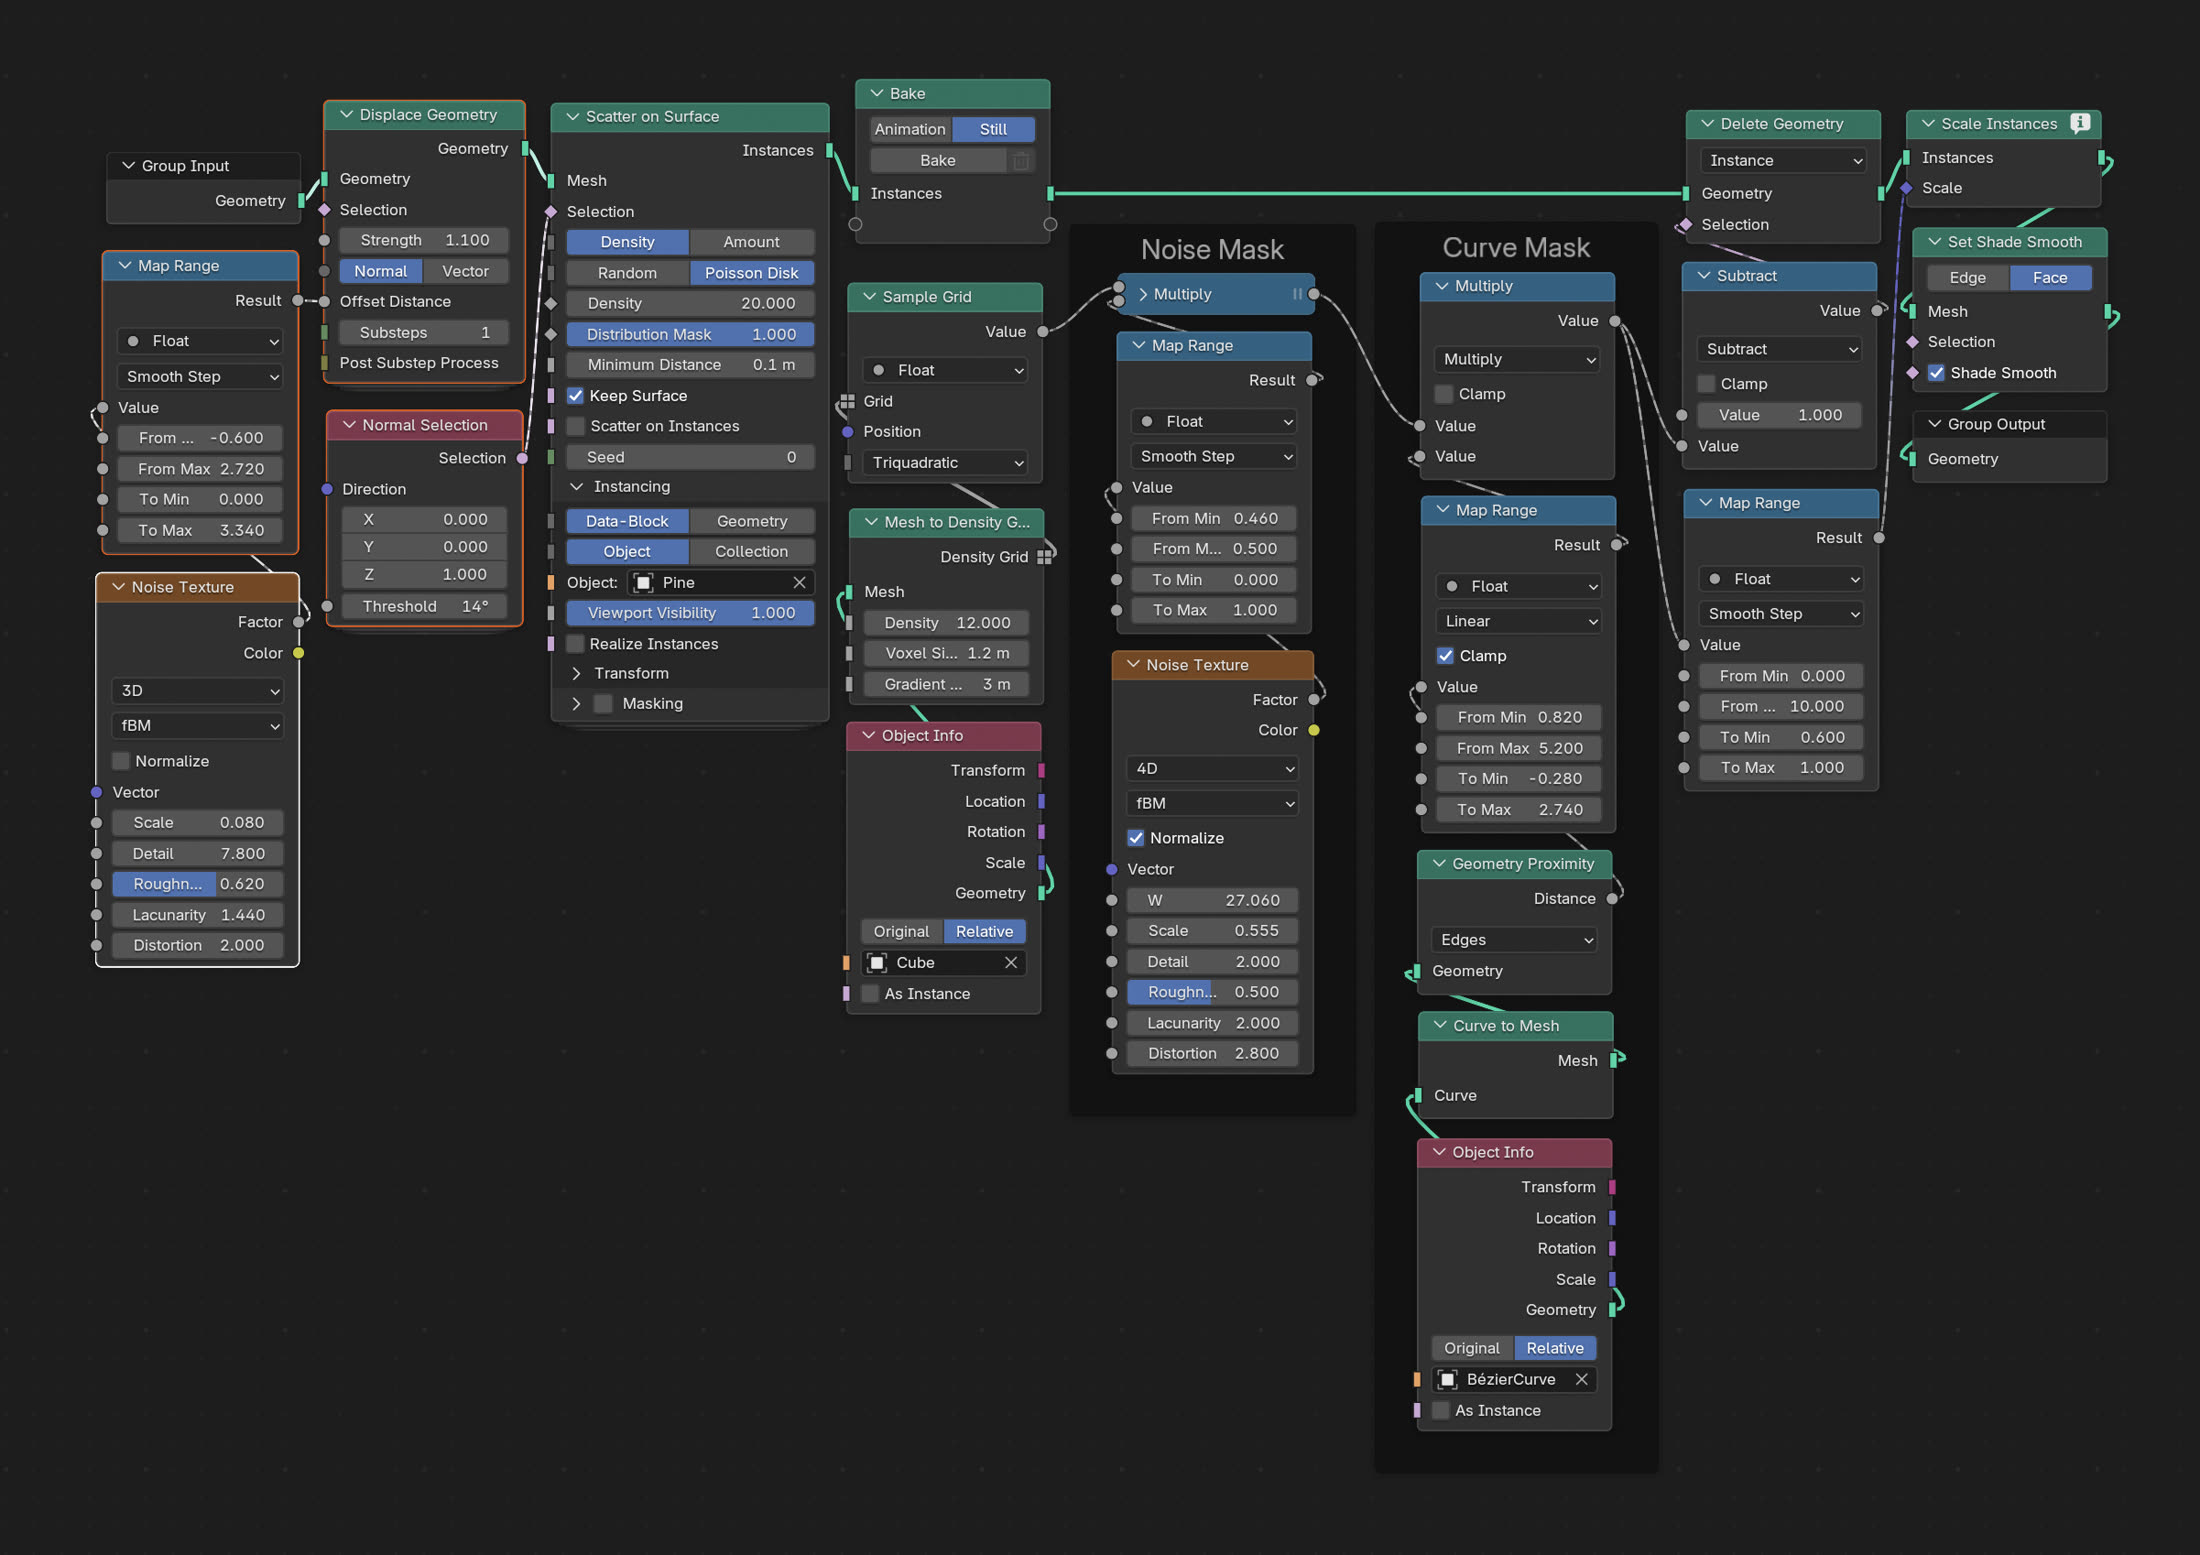
Actually I’m using two new nodes here, Normal Selection and Displace Geometry to actually create a simple terrain by displacing the mesh with a noise texture (I pre-subdivided the mesh for that).
Both of those nodes are trivial to implement yourself, but thanks to blender 5 we don’t have to, which saves us some time and allows to do more with less effort!
Outro
These are just a few quick examples! Even with three masks the graph is still very simple. It consists entirely out of built-in nodes and fits on one screen! And so we can easily continue adding features to it. Maybe you want to spawn different assets where the forest ends, like bushes. Maybe you want to add bodies of water with their own type of grass around them, etc etc
For the most part all of this was of course possible before blender 5.0. It just required more work and wasn’t quite as fun. So whatever it is that you want to make it’s now much easier to start!