What is ucupaint?
Ucupaint is a free and open-source layering and baking addon for blender. It abstracts away the shader graph into a layer stack to allow texturing with layers rather than nodes:
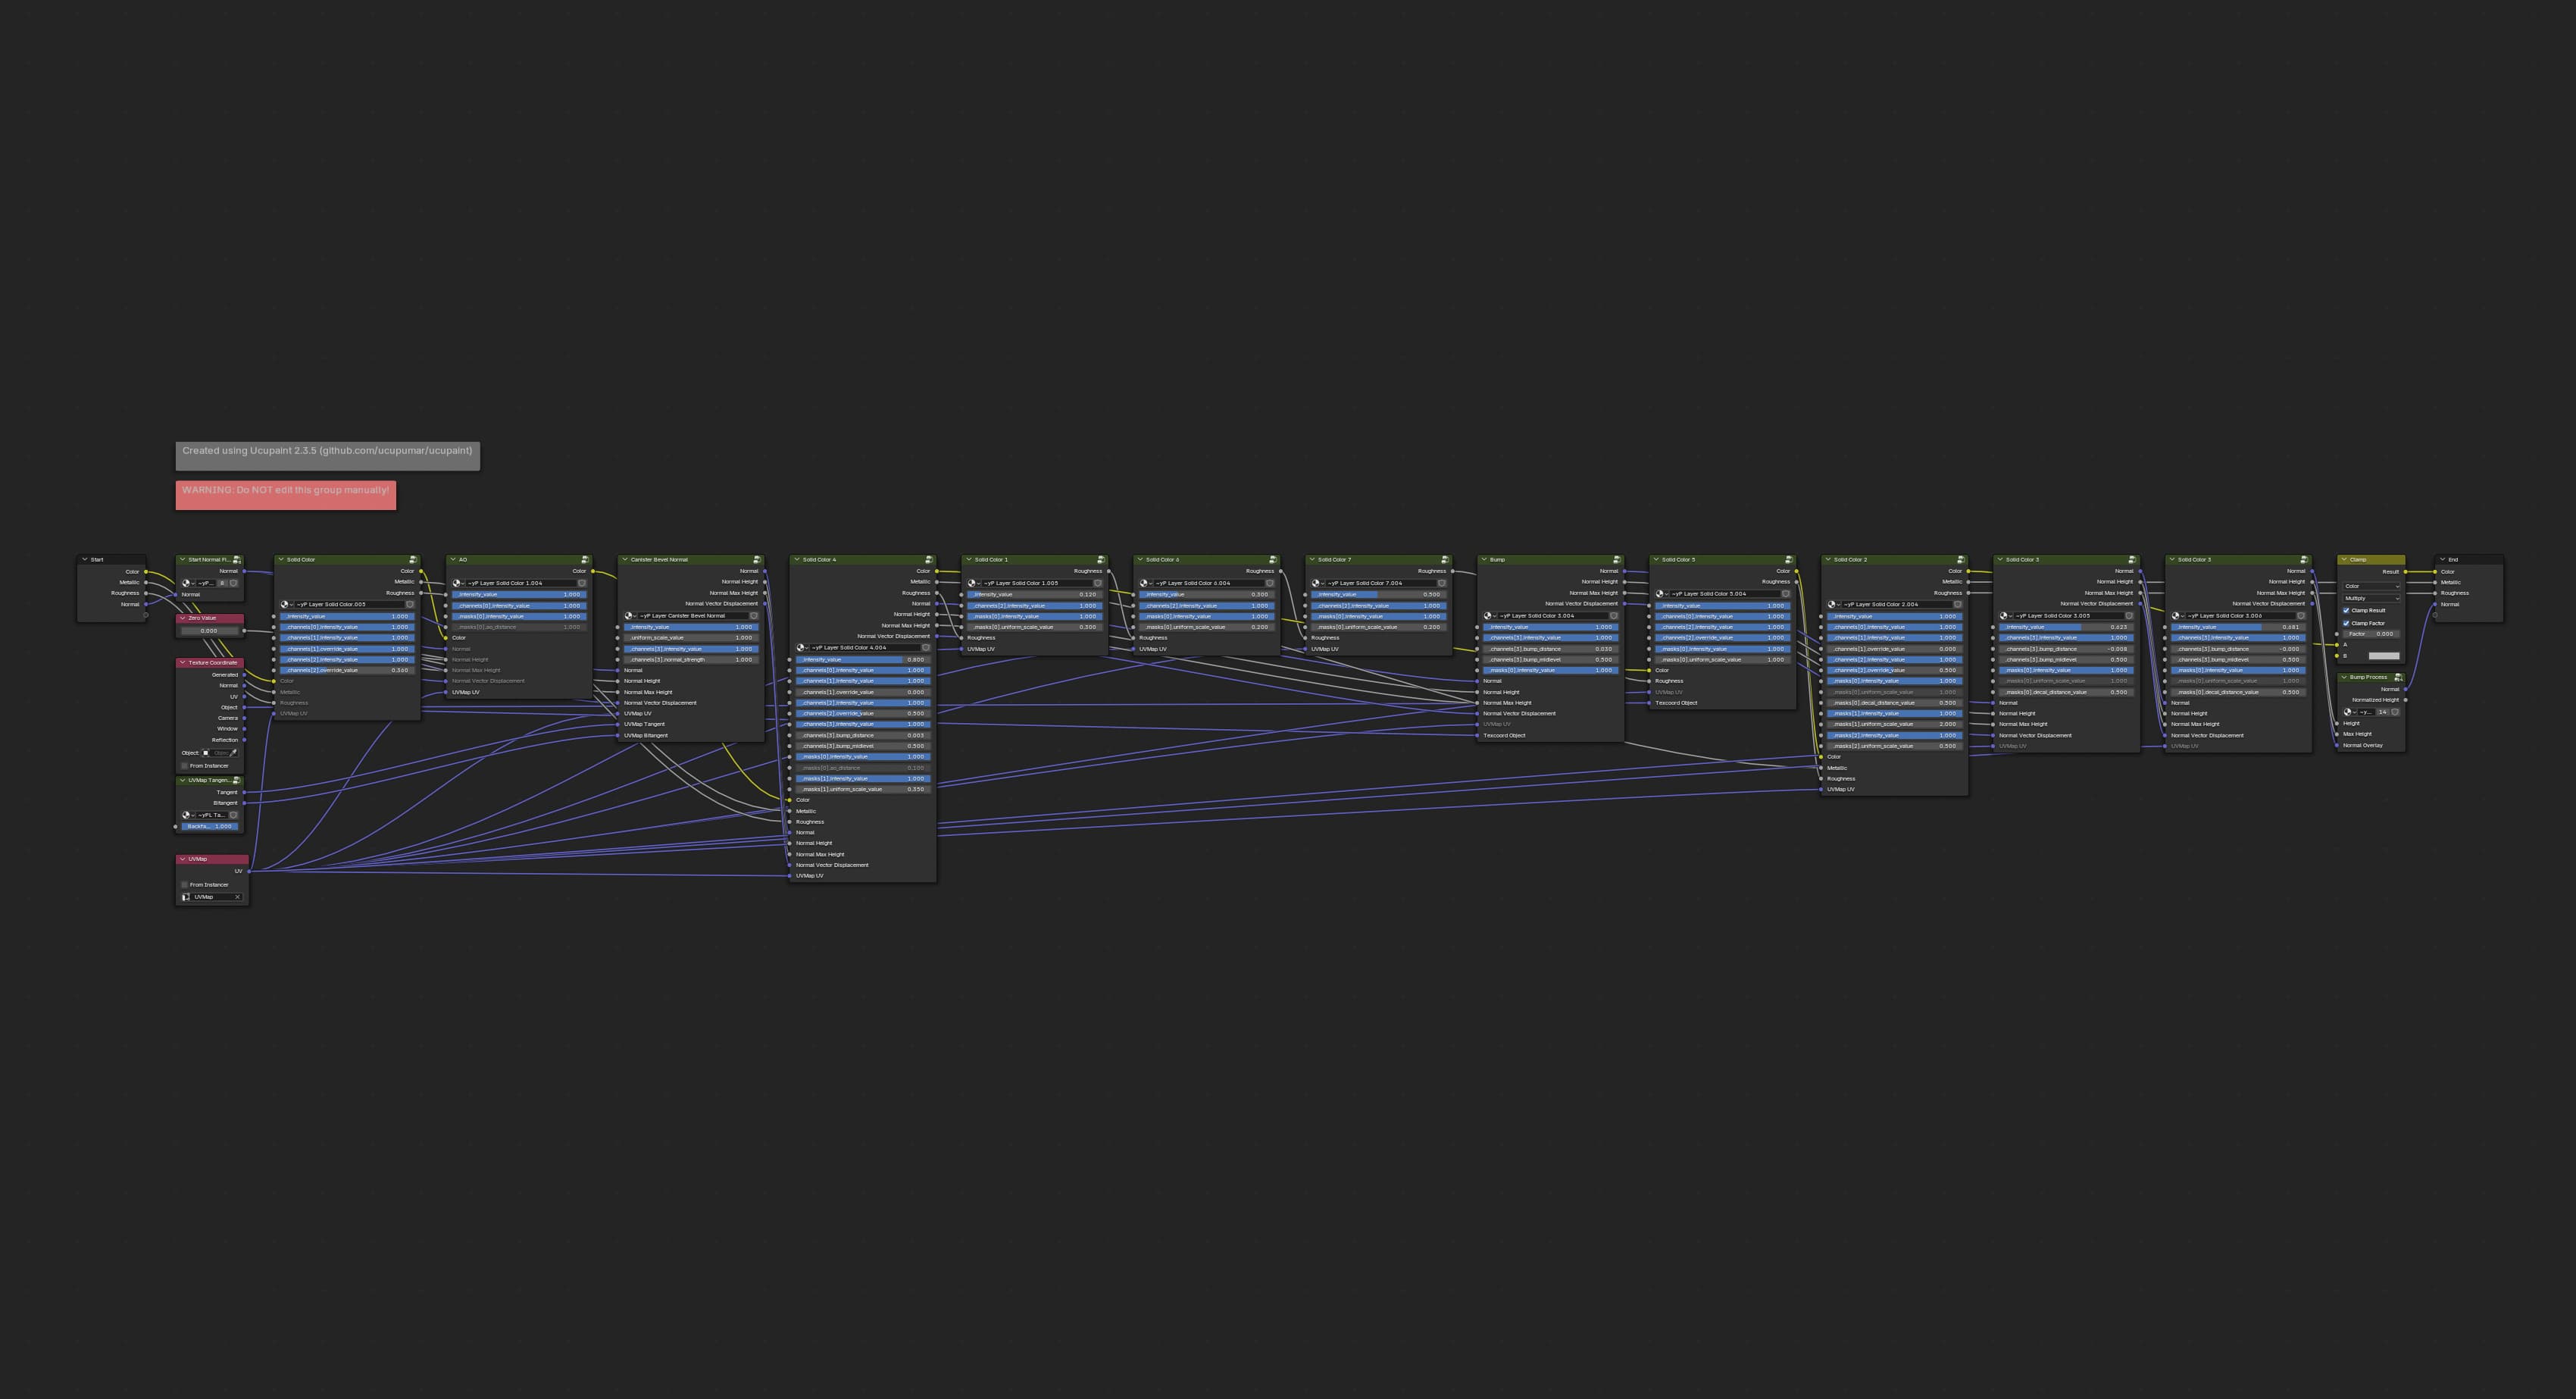
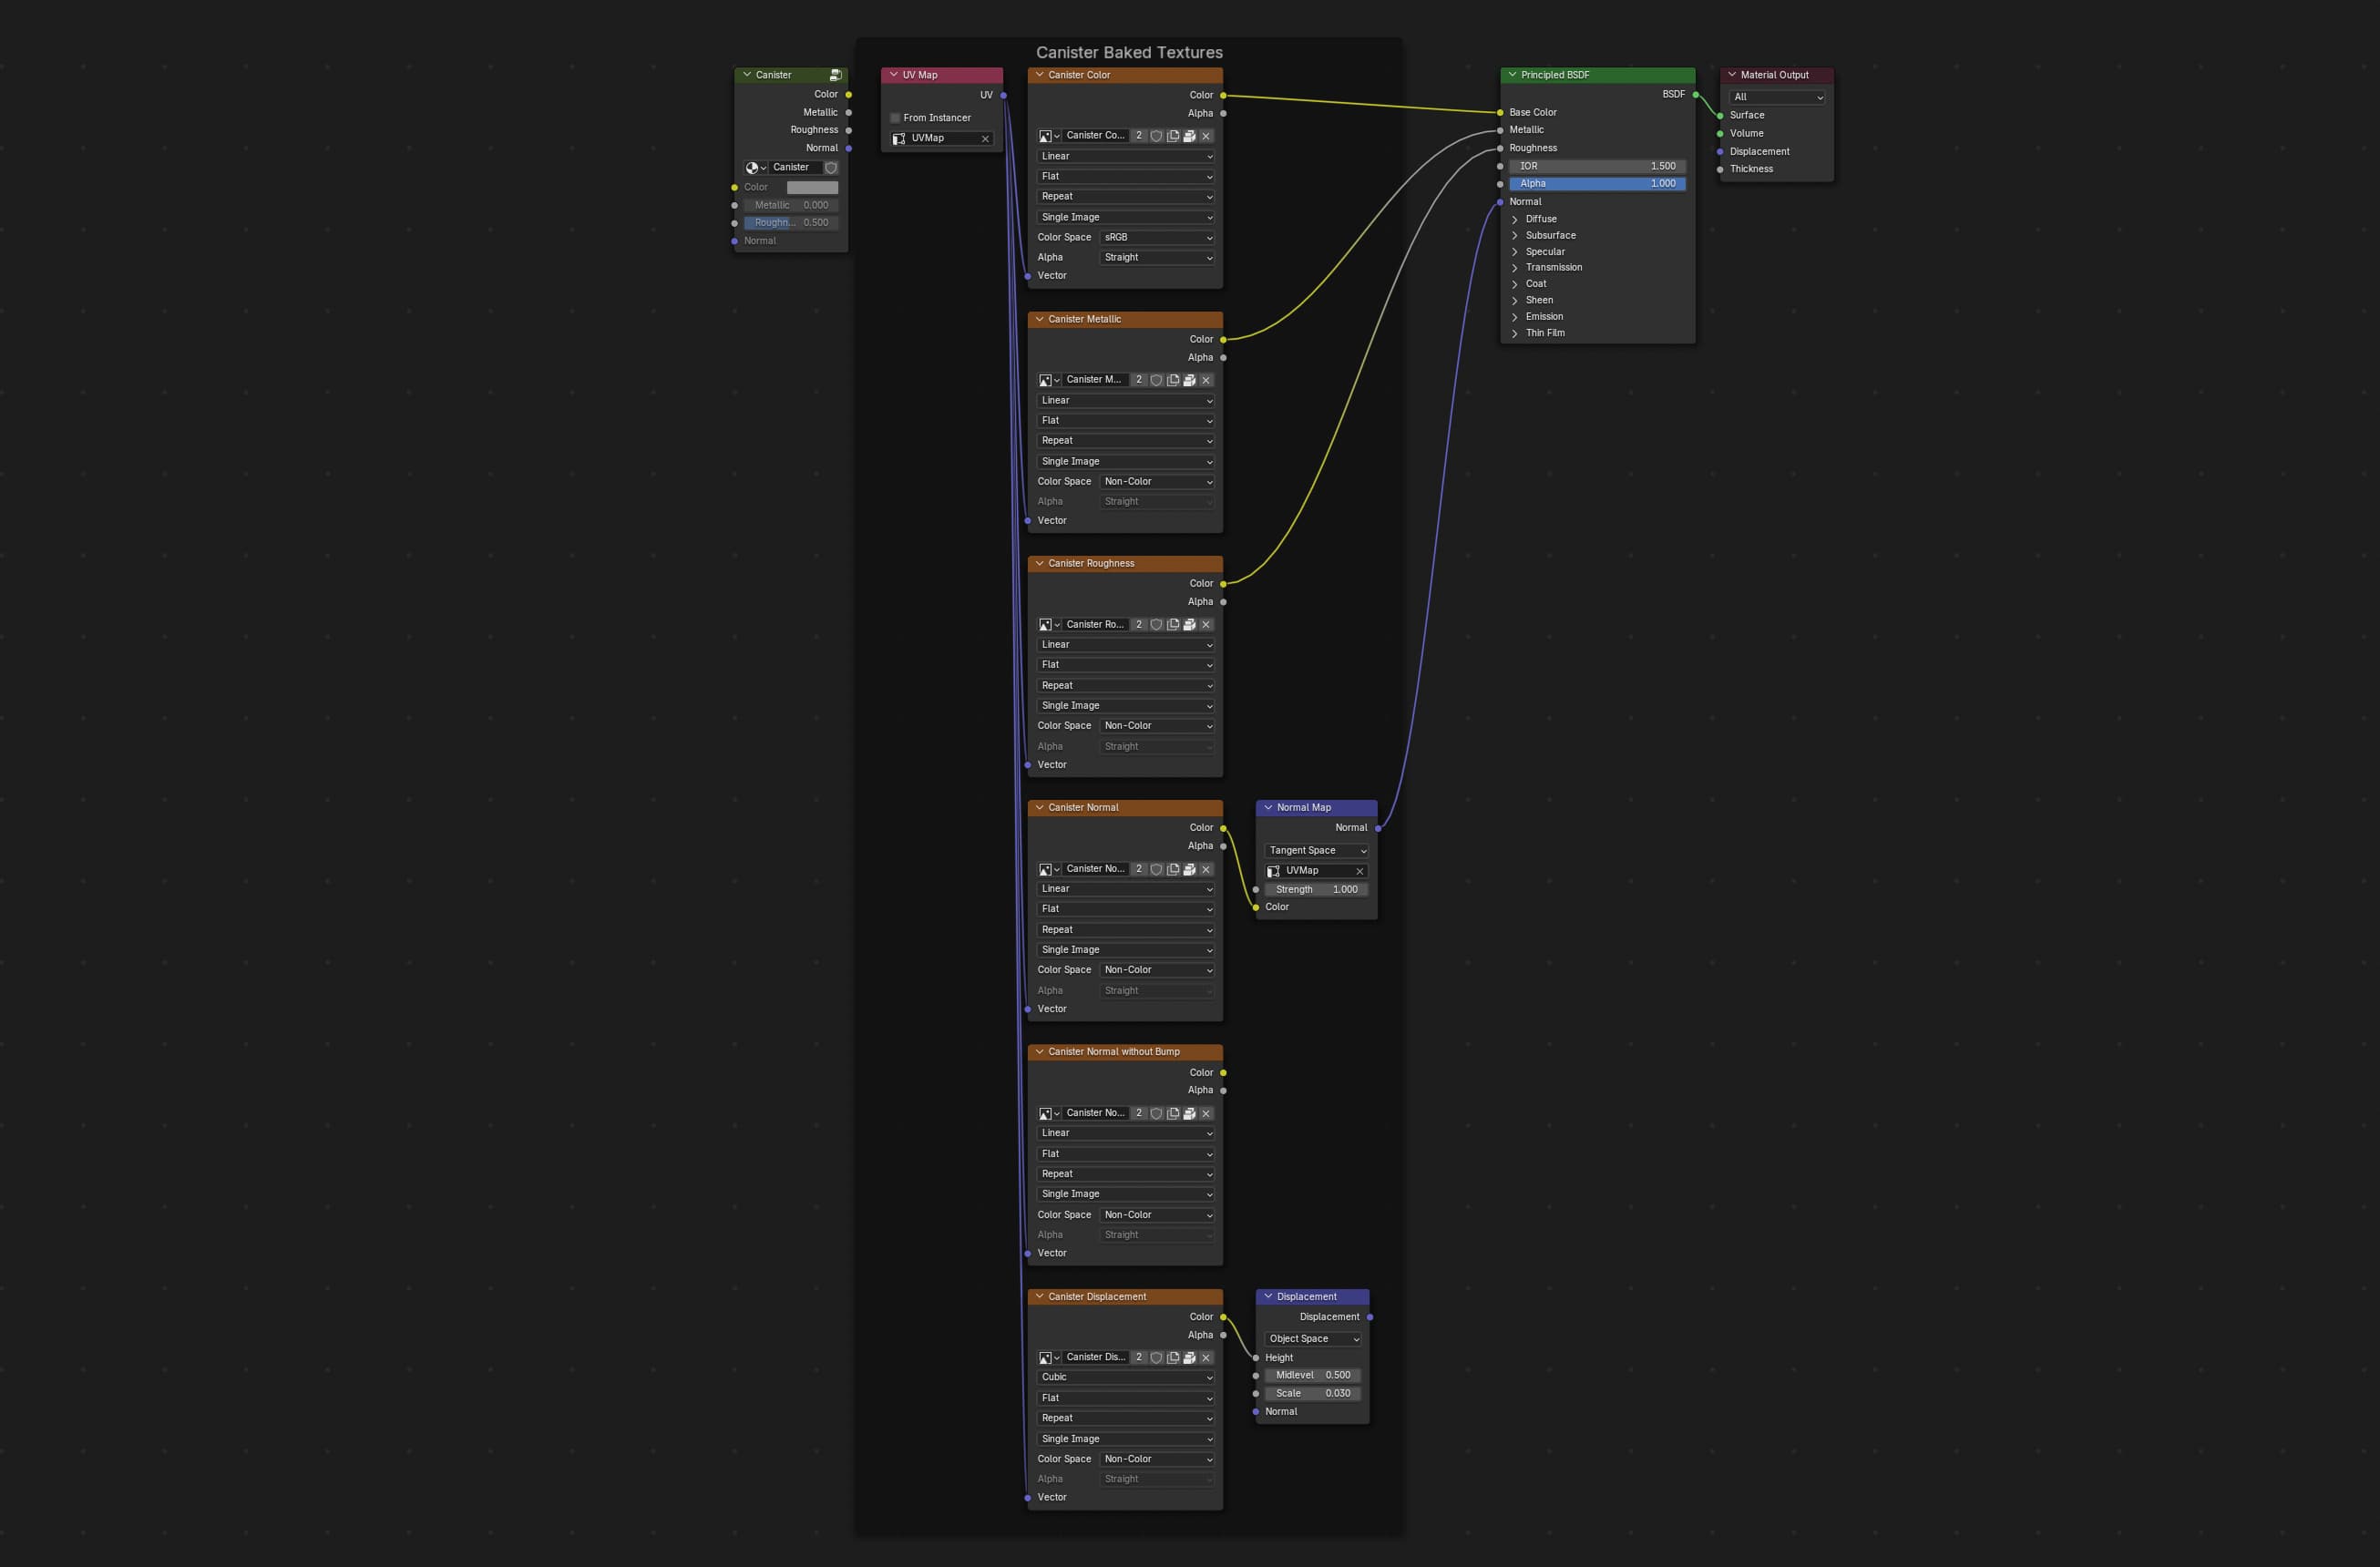
The obvious advantage of layers over nodes when texturing in blender is you don’t need to manually connect channels between layers, which would be a nightmare with PBR materials where you have albedo, metallic, roughness, normal, displacement, etc. For example this is what the shader graph for that material looks like:
A simple operation of swapping the order of two layers would be tedious in such graph, but with ucupaint you can do it in one click.
Apart from giving you the layer stack it also has a lot of features that are helpful when doing texturing, like baking, modifiers, channel packing, decals and more. The addon has also been very stable in my experience, and not just for a free addon, but for any addon. I use it all the time and it just works!
You can install ucupaint right from inside of blender because it’s on the extensions platform.
Before we start
One thing that you’ll notice when you get into ucupaint is that unlike i.e substance painter you don’t get any textures or procedural noises with it, except for blender’s built-in nodes that you can see here when you add a new layer or mask:
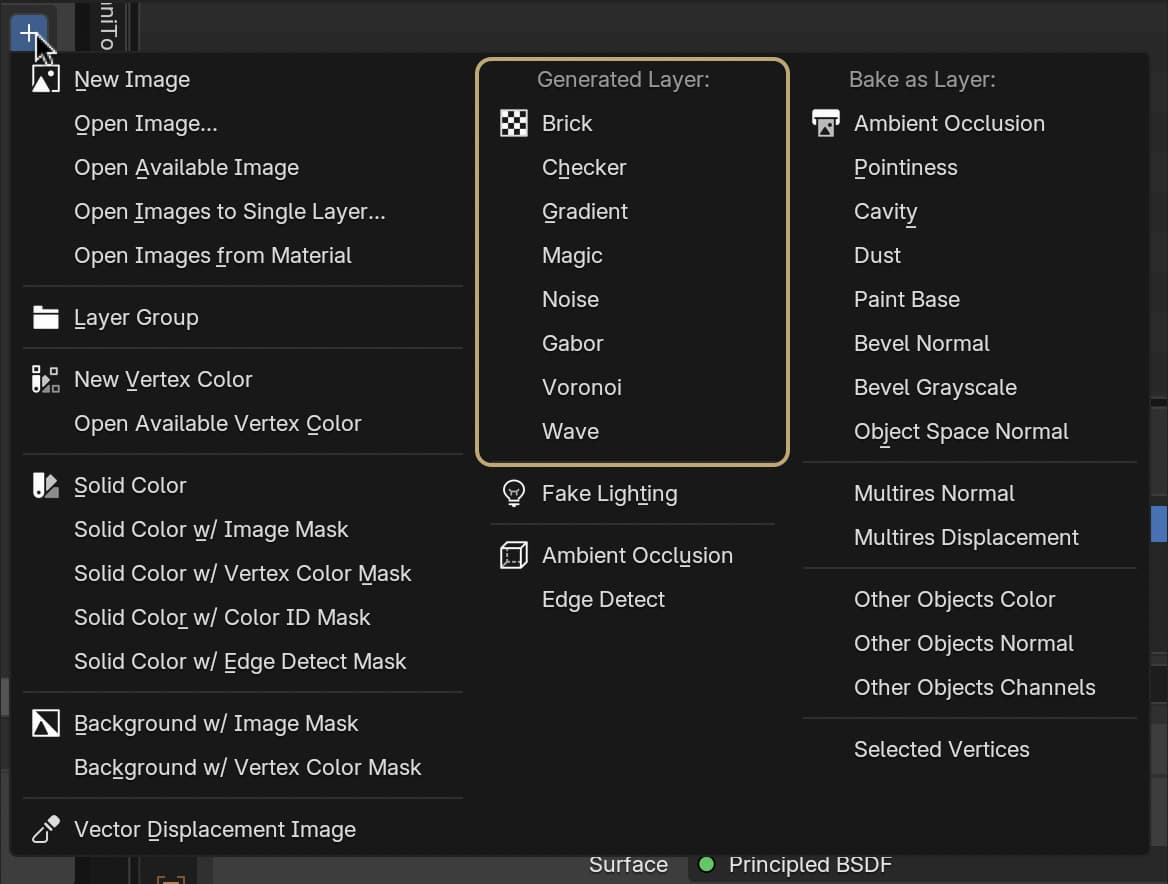
If you’re texturing for a videogame with simple or retro style you may find that those are enough, and you may also be able to make some complex masks by mixing a bunch of them.
However if you’re going for realistic materials in a regular production scenario where you can’t afford to spend time on making procedural materials entirely from scratch, you’ll need to gather a library of noise images and existing PBR texture sets. When you have those, you can layer and modify them to get the look you want.
This semi-procedural workflow offers, in my opinion, the best of both worlds because you still have infinite control over the final look of the material by combining masks or materials in any way you like, take any values from them in any proportion by mapping them through curves on any channel or do any other modifications you want.
At the same time you don’t need to go too deep into the rabbit hole and get into the low-level math of how a grunge map is generated.
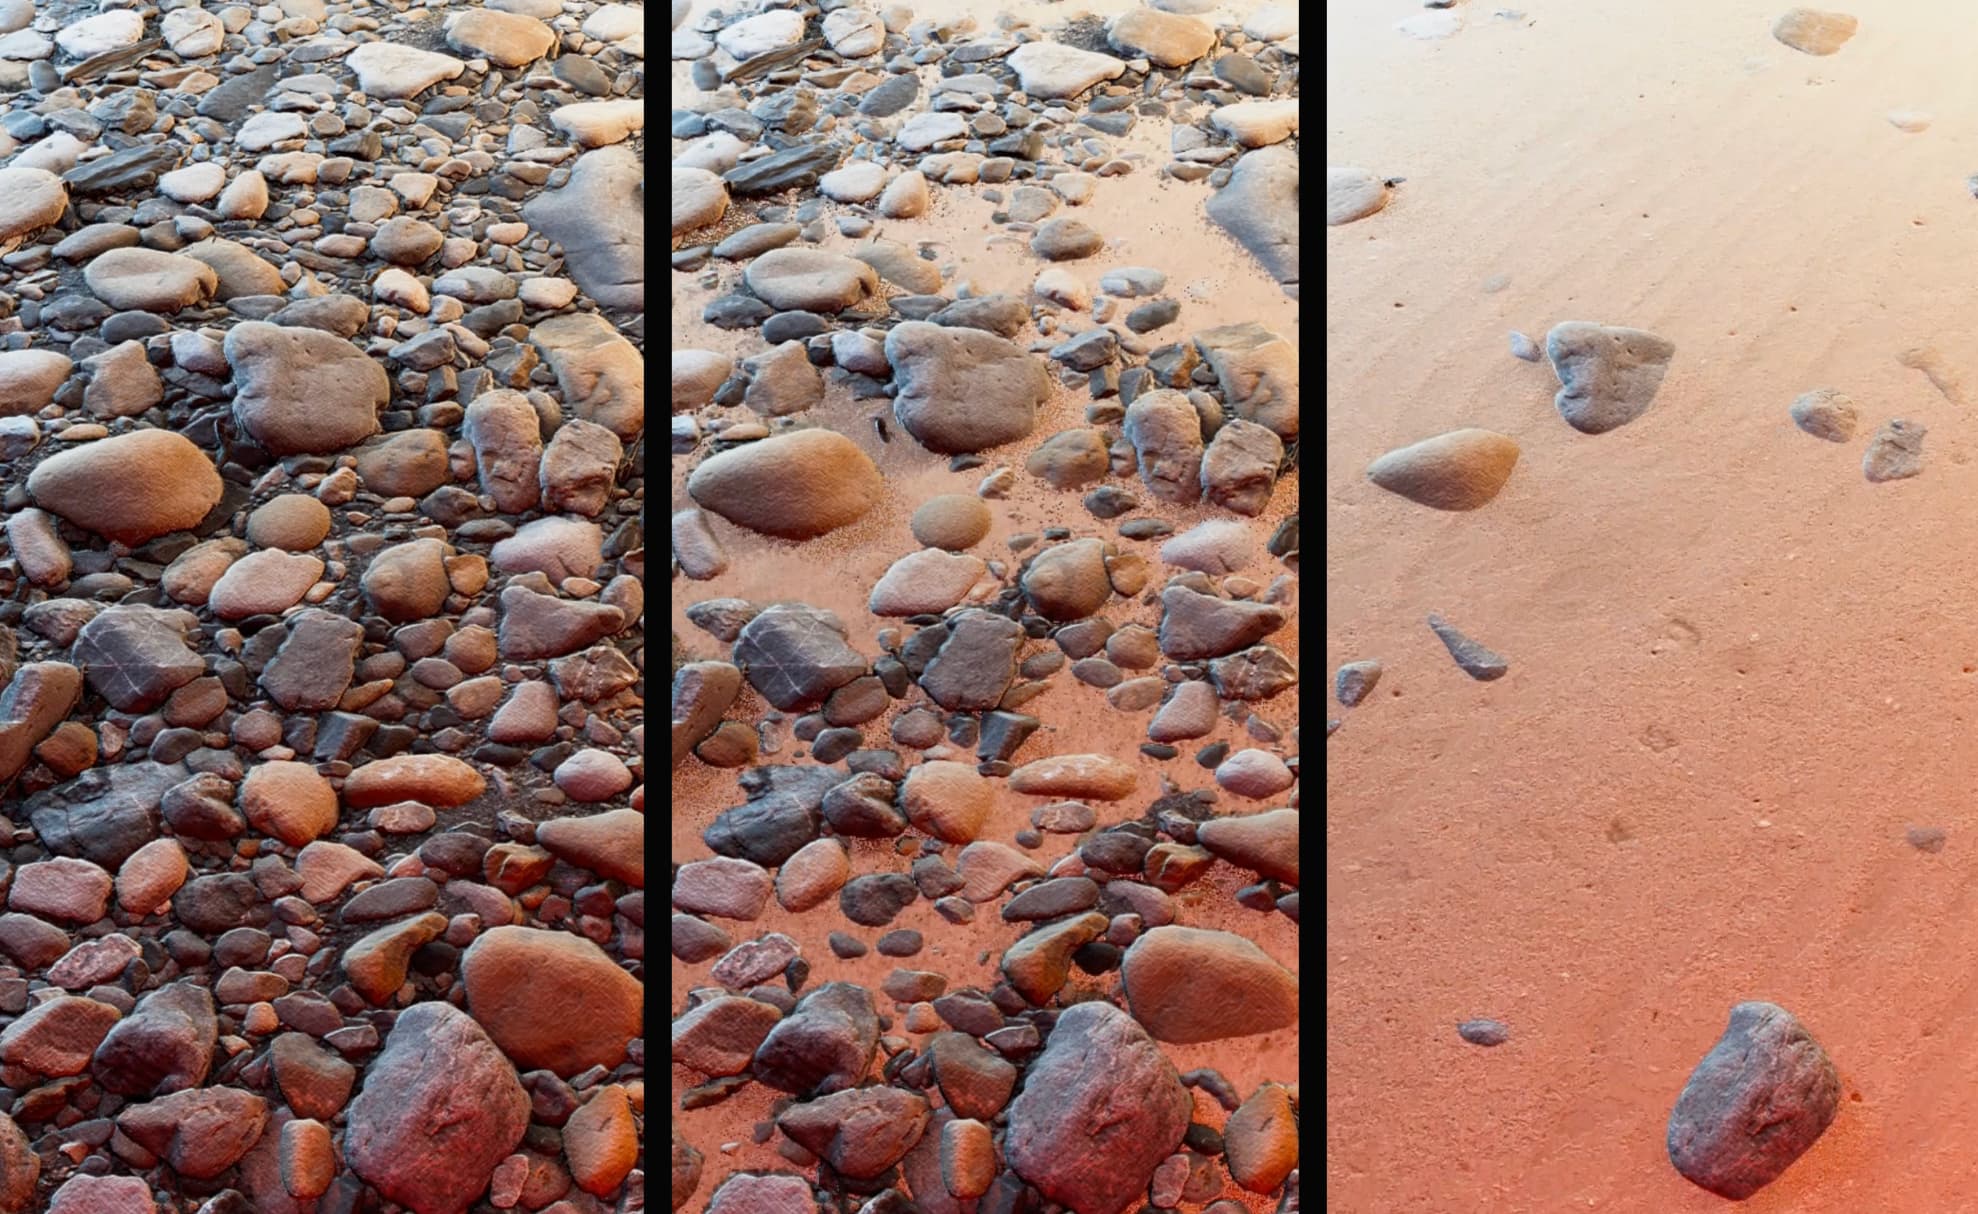
You can also height-blend different PBR texture sets to make virtually infinite amount of material combinations from PBR sets available online:
I wish I had a neat list of CC0 alphas and masks for you to use for texturing, but I couldn’t find any (pls share in the comments if you know some)! Most of the noises that I have came from paid gumroad packs that I hoarded in absurd quantities over the years.
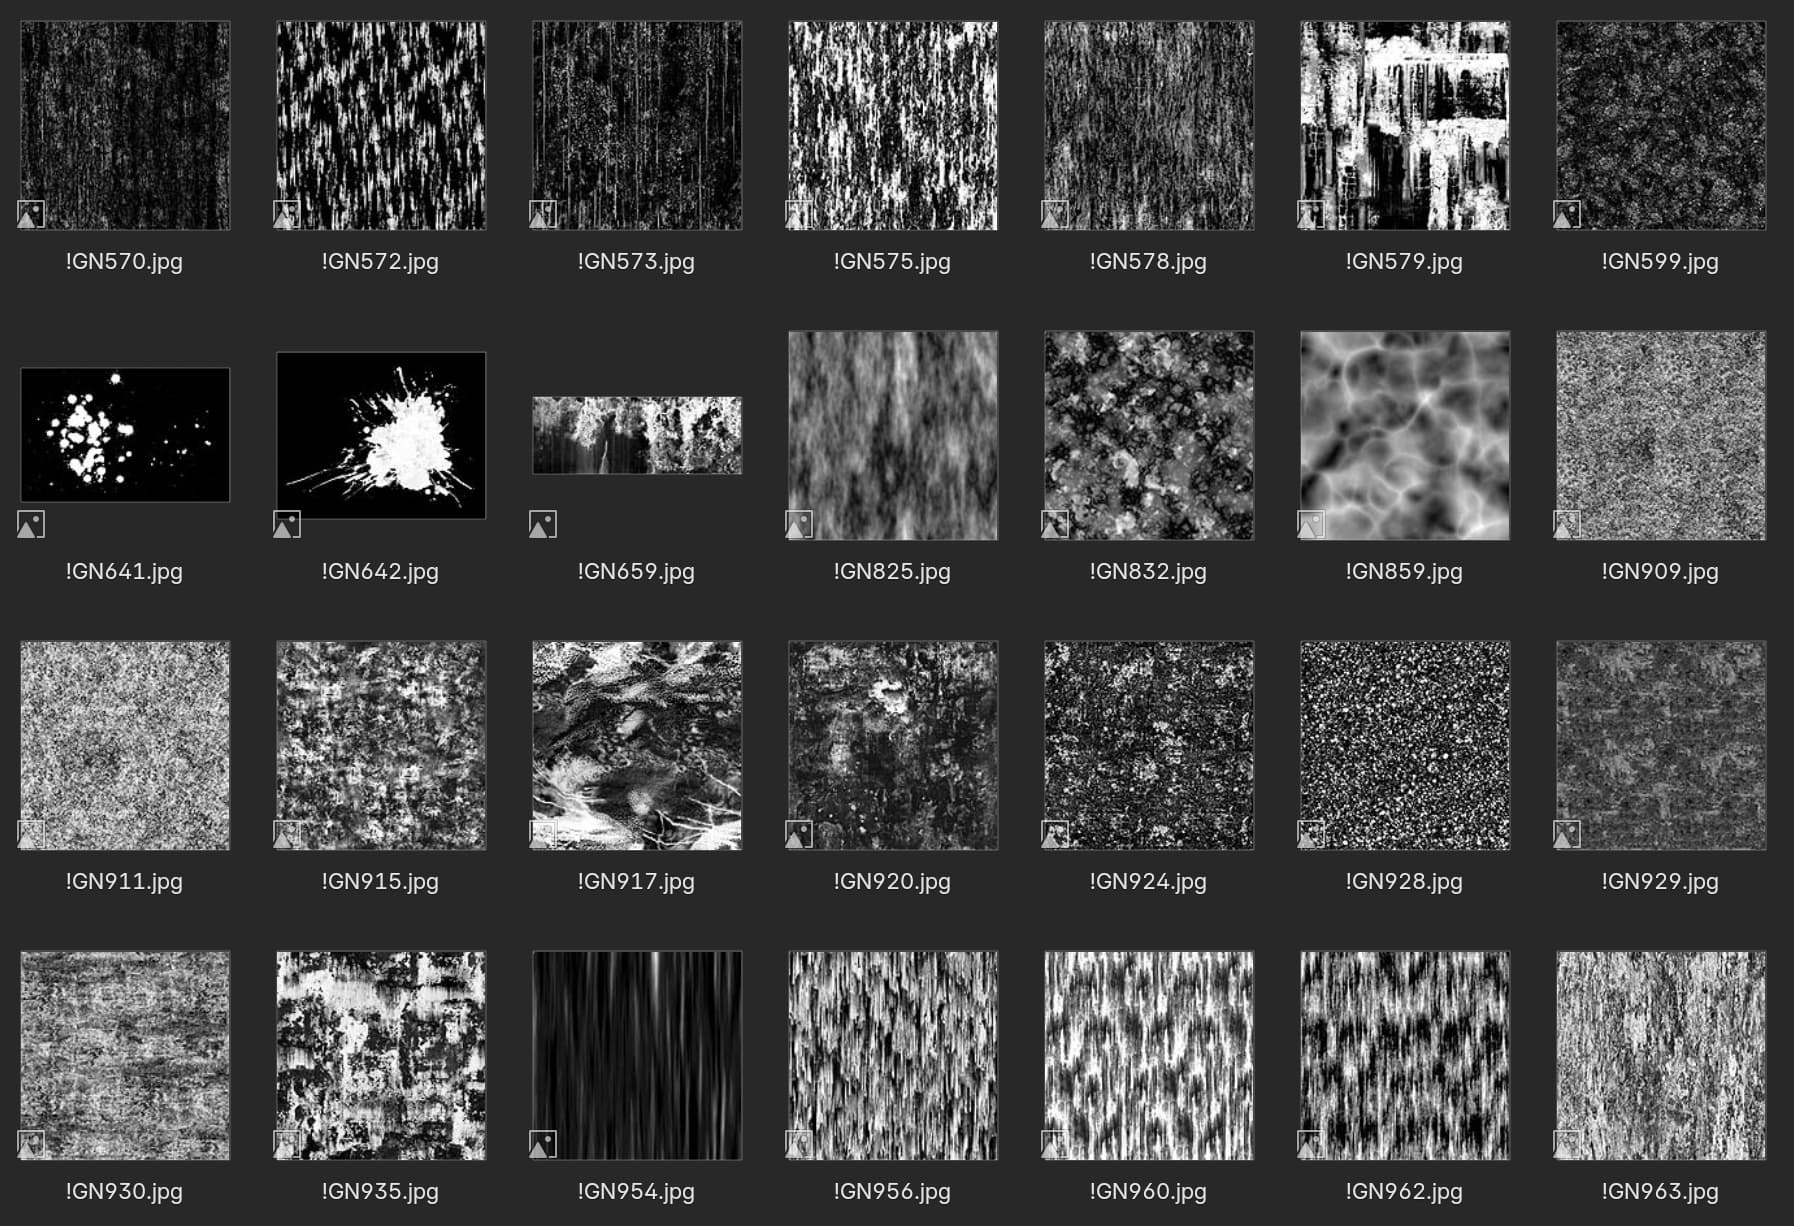
The amount of full CC0 PBR texture sets online is quite big (polyhaven, ambientcg, etc), but surprisingly that’s not the case for simple alphas and noises. Of course you can make some black and white textures from those PBR sets yourself, but it might take you a lot of time. Best advice I can give today is to invest into some packs. There are a lot of them on gumroad.
Hopefully in the future we’ll see more free grunge maps online.
Texturing a gas canister
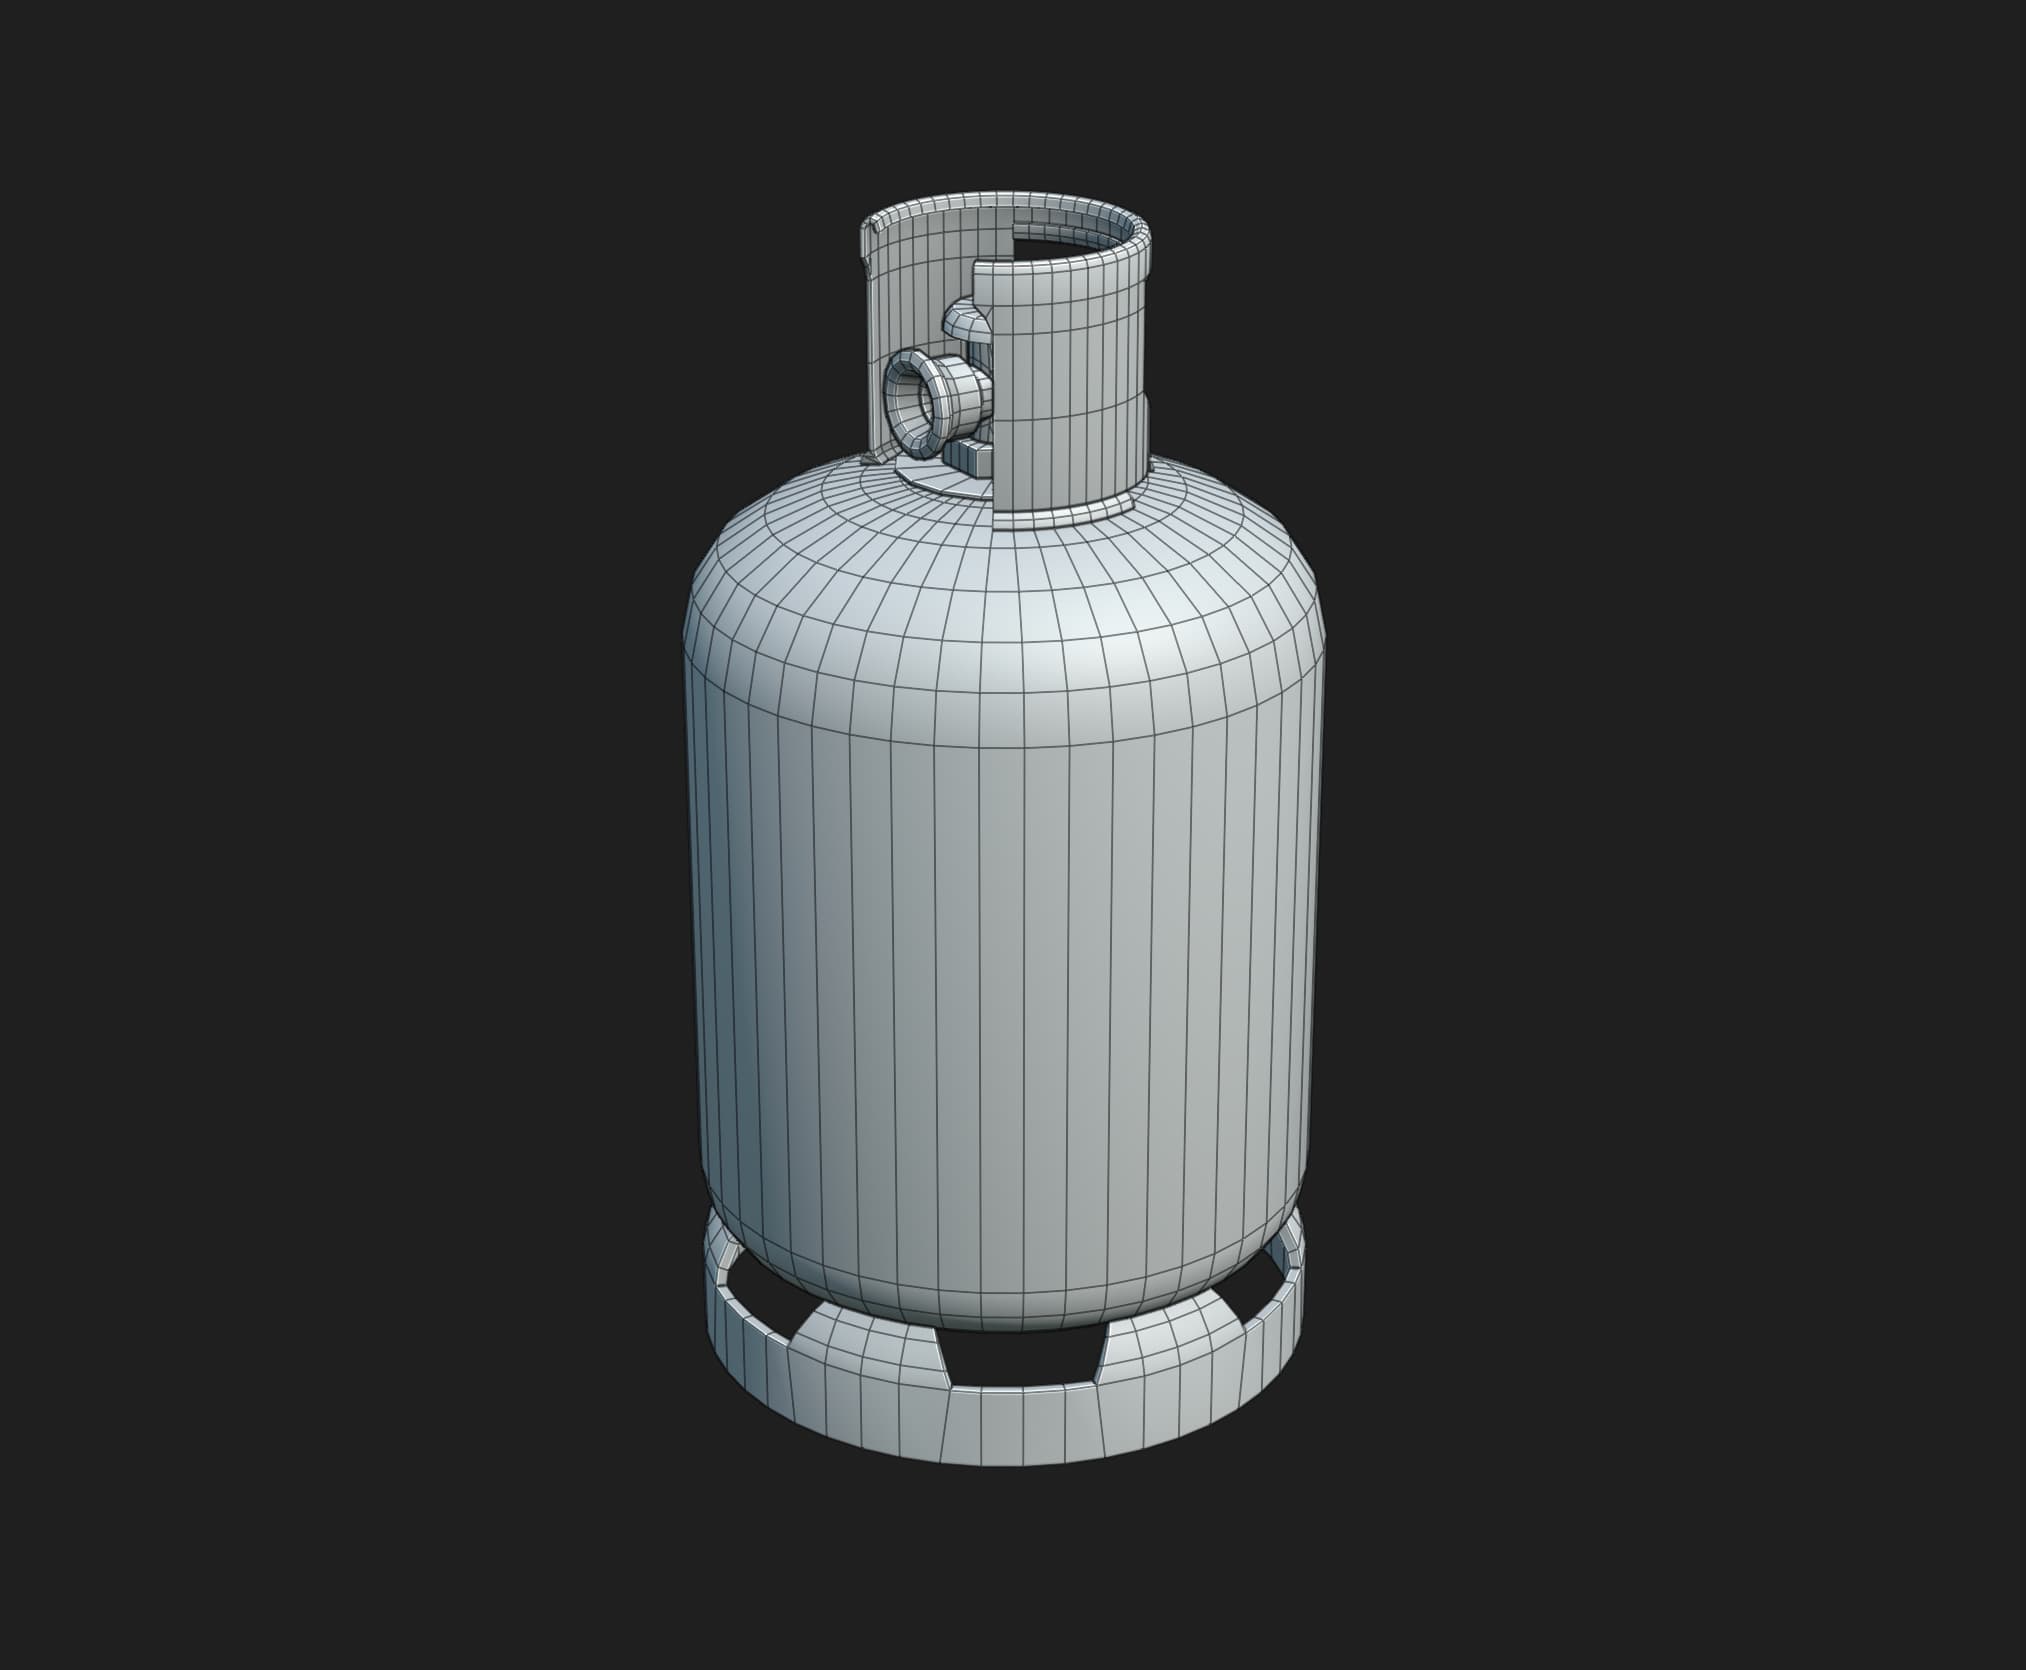
In this guide I’ll take you through the entire process of texturing a gas canister that I got from thebasemesh.com:
In this guide we’ll only use B/W textures rather than full PBR materials because metal is pretty simple to make.
I’ll be going for a realistic look, but everything that you’ll learn here will be applicable to stylized materials as well, to a large degree.
Models from basemesh come UV-unwrapped, so we can jump straight into texturing!
Making the base
Ucupaint UI resides entirely in the N-panel on the right in the viewport. Select the object and click on the “Quick Ucupaint Node Setup” button:
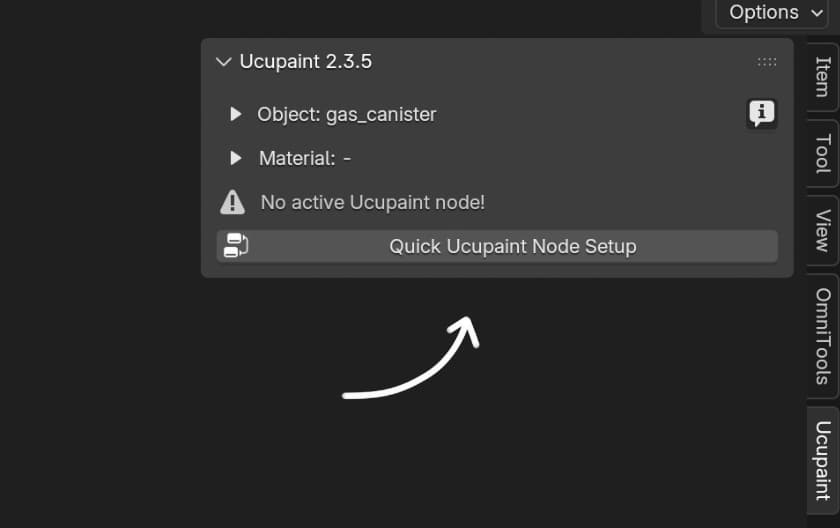
This will create a new material (if there’s no material) and a ucupaint node inside of it.
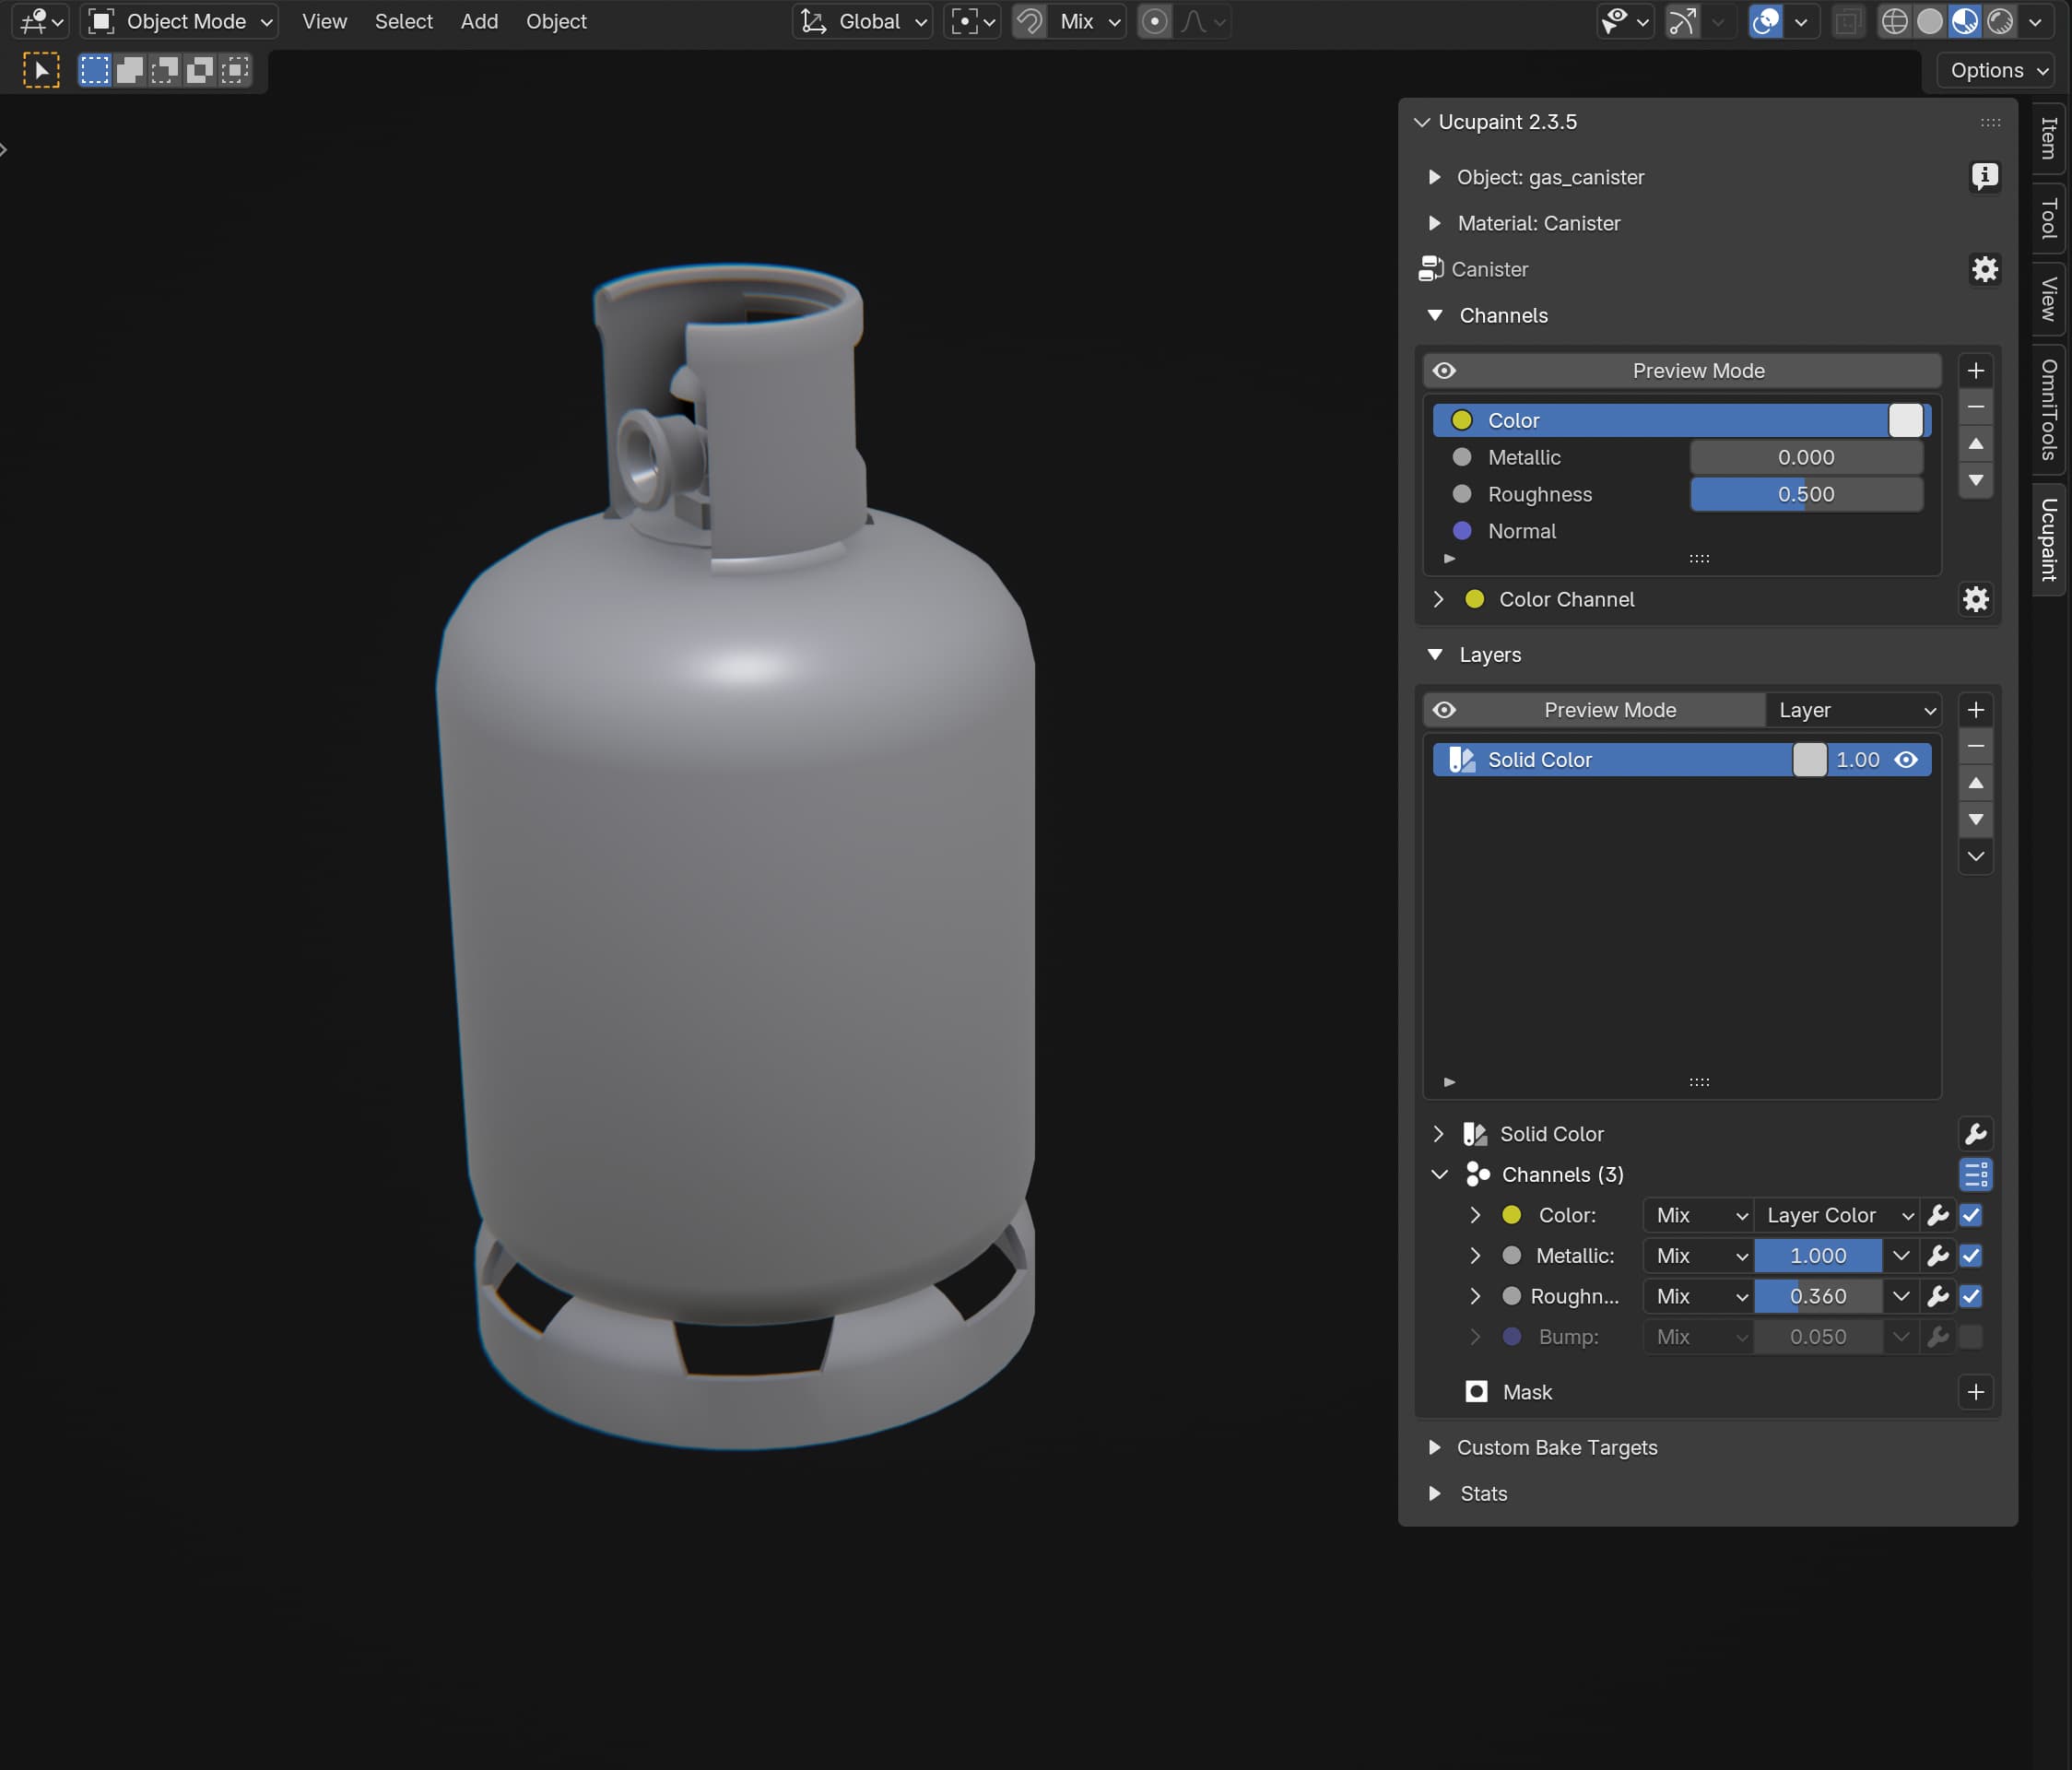
This will get us a white material with standard metallic and roughness values and an empty layer stack that we can start adding layers to:

You may notice that there’s some AO on the model. It comes from my personal compositor setup that I have saved in my blender startup file. I usually find it convenient to have some AO when I work on things. It’s not part of the material (yet).
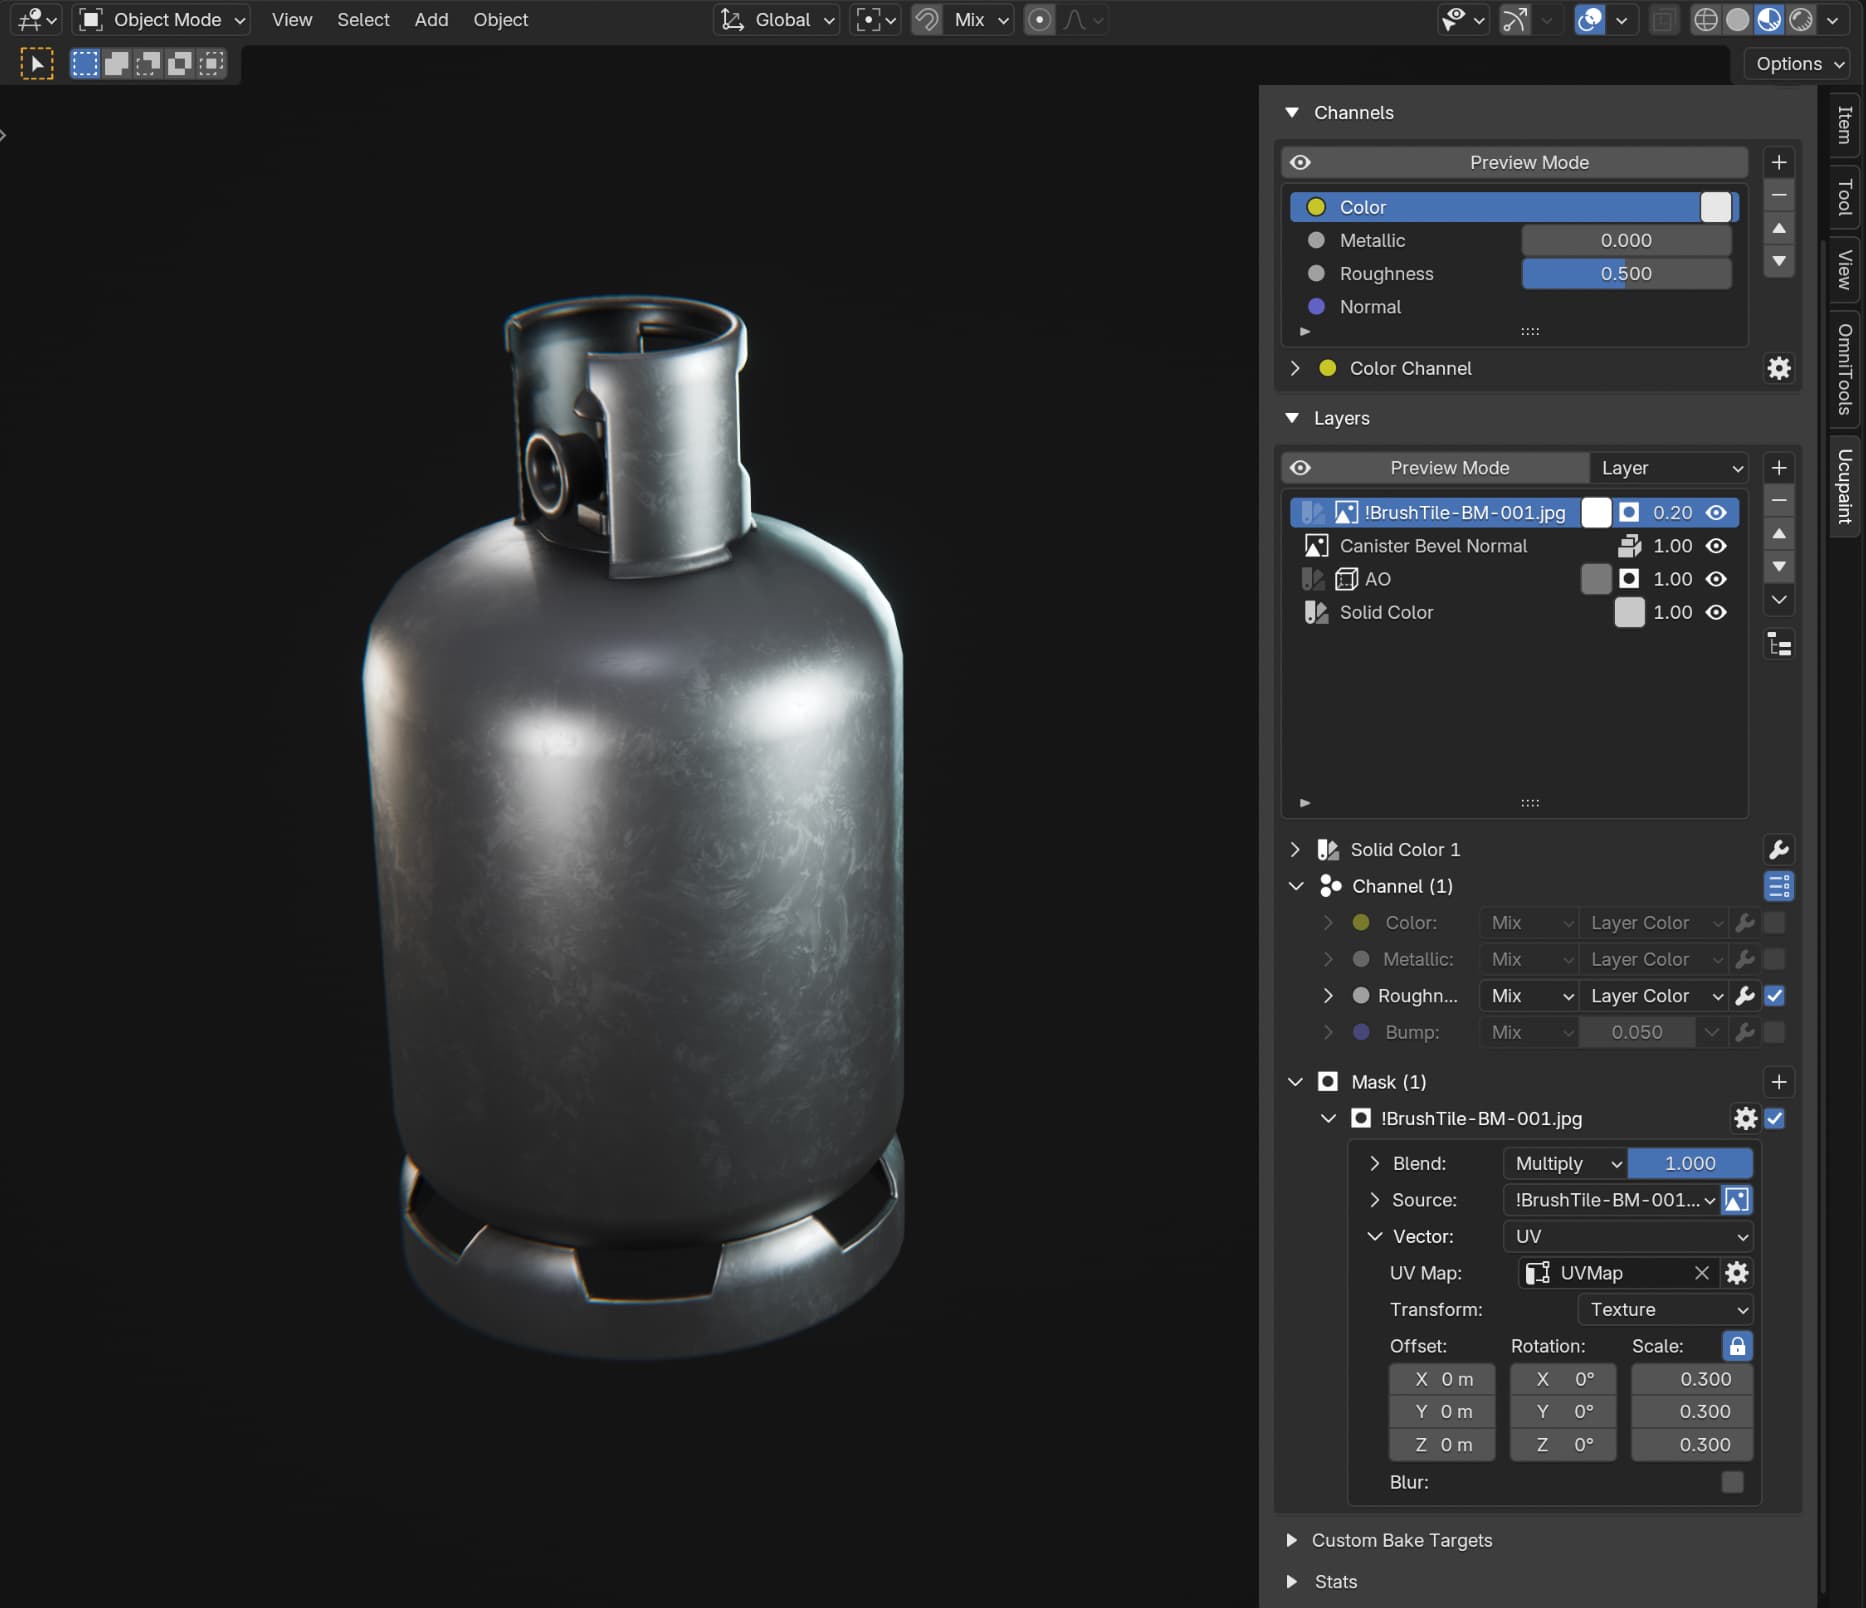
Create a new layer by clicking the + button on the right of the layer stack and clicking Solid Color. This will be our base material. For the color channel we’ll use gray color (which you can change by clicking the colored square in the layer stack), I used the value of 0.58 for it, and for metallic and roughness we’ll use values of 1.0 and 0.36. You can set metallic and roughness individually by changing Layer Color to Custom Value on them.
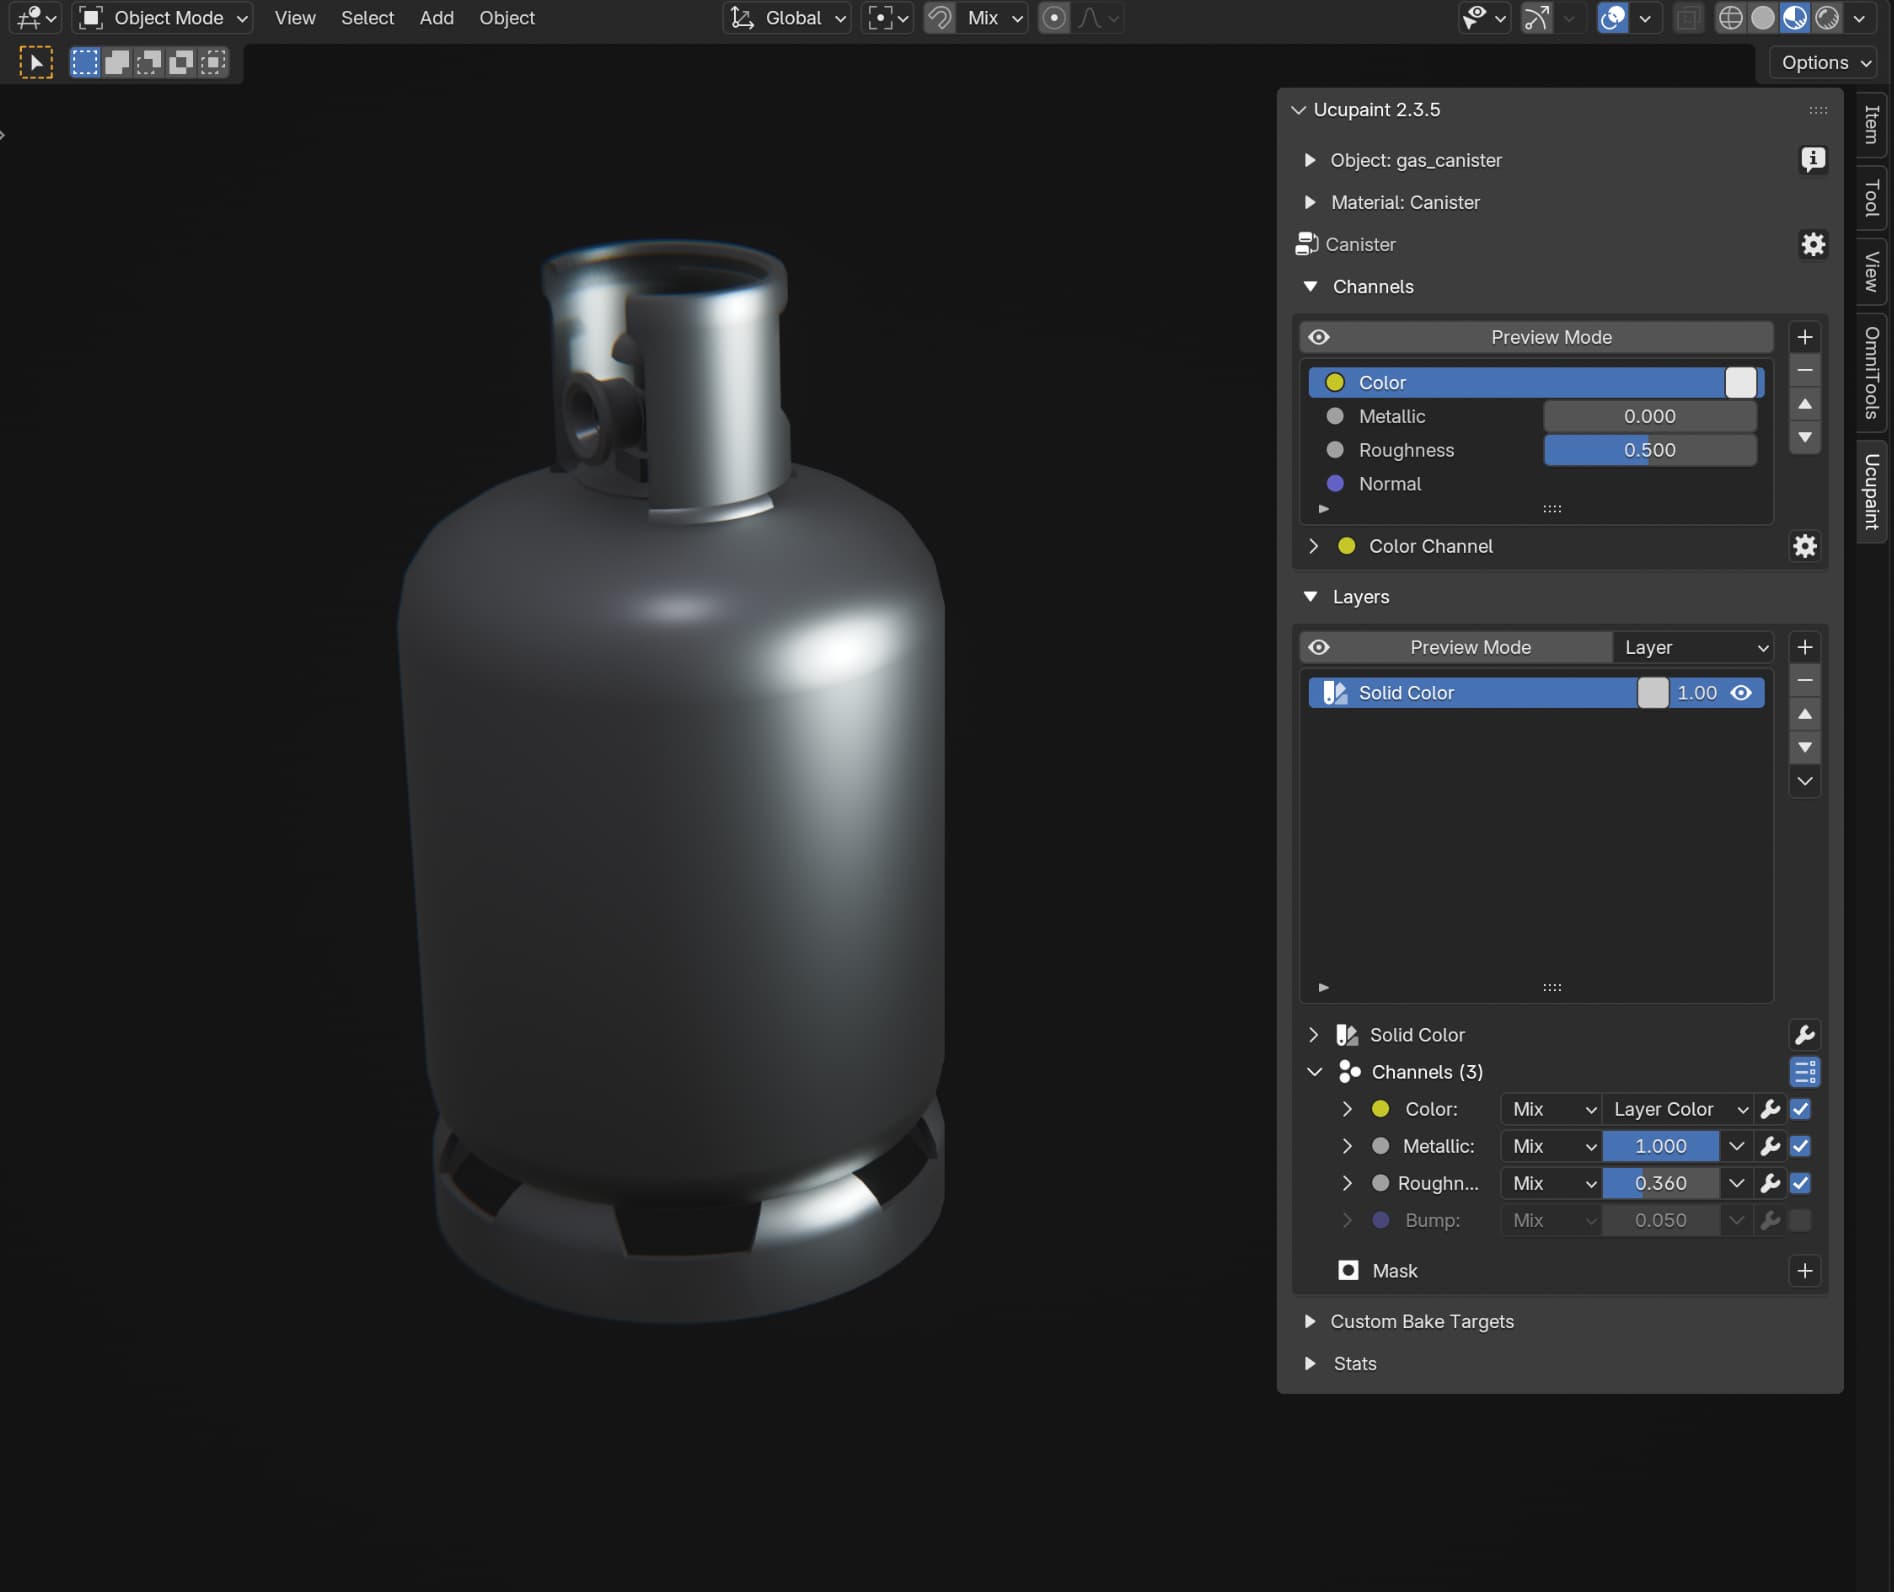
After doing all that you may notice that even though we set metallic to 1.0 our material looks nothing like metal! This is a clear indication that we have no talent and should quit 3D art immediately:
Unless…
Unless that’s because it’s hard to judge materials in vacuum when there’s nothing for them to reflect and no lights to react to. Especially with metals, because metals are often shiny.
To fix that let’s drop the strength of the viewport HDRI (you can do it by clicking viewport shading dropdown on the top right of viewport) (I use material preview viewport mode throughout this guide) and also add an omni light:
That looks better, but we need more lights!
Let’s add a few more:
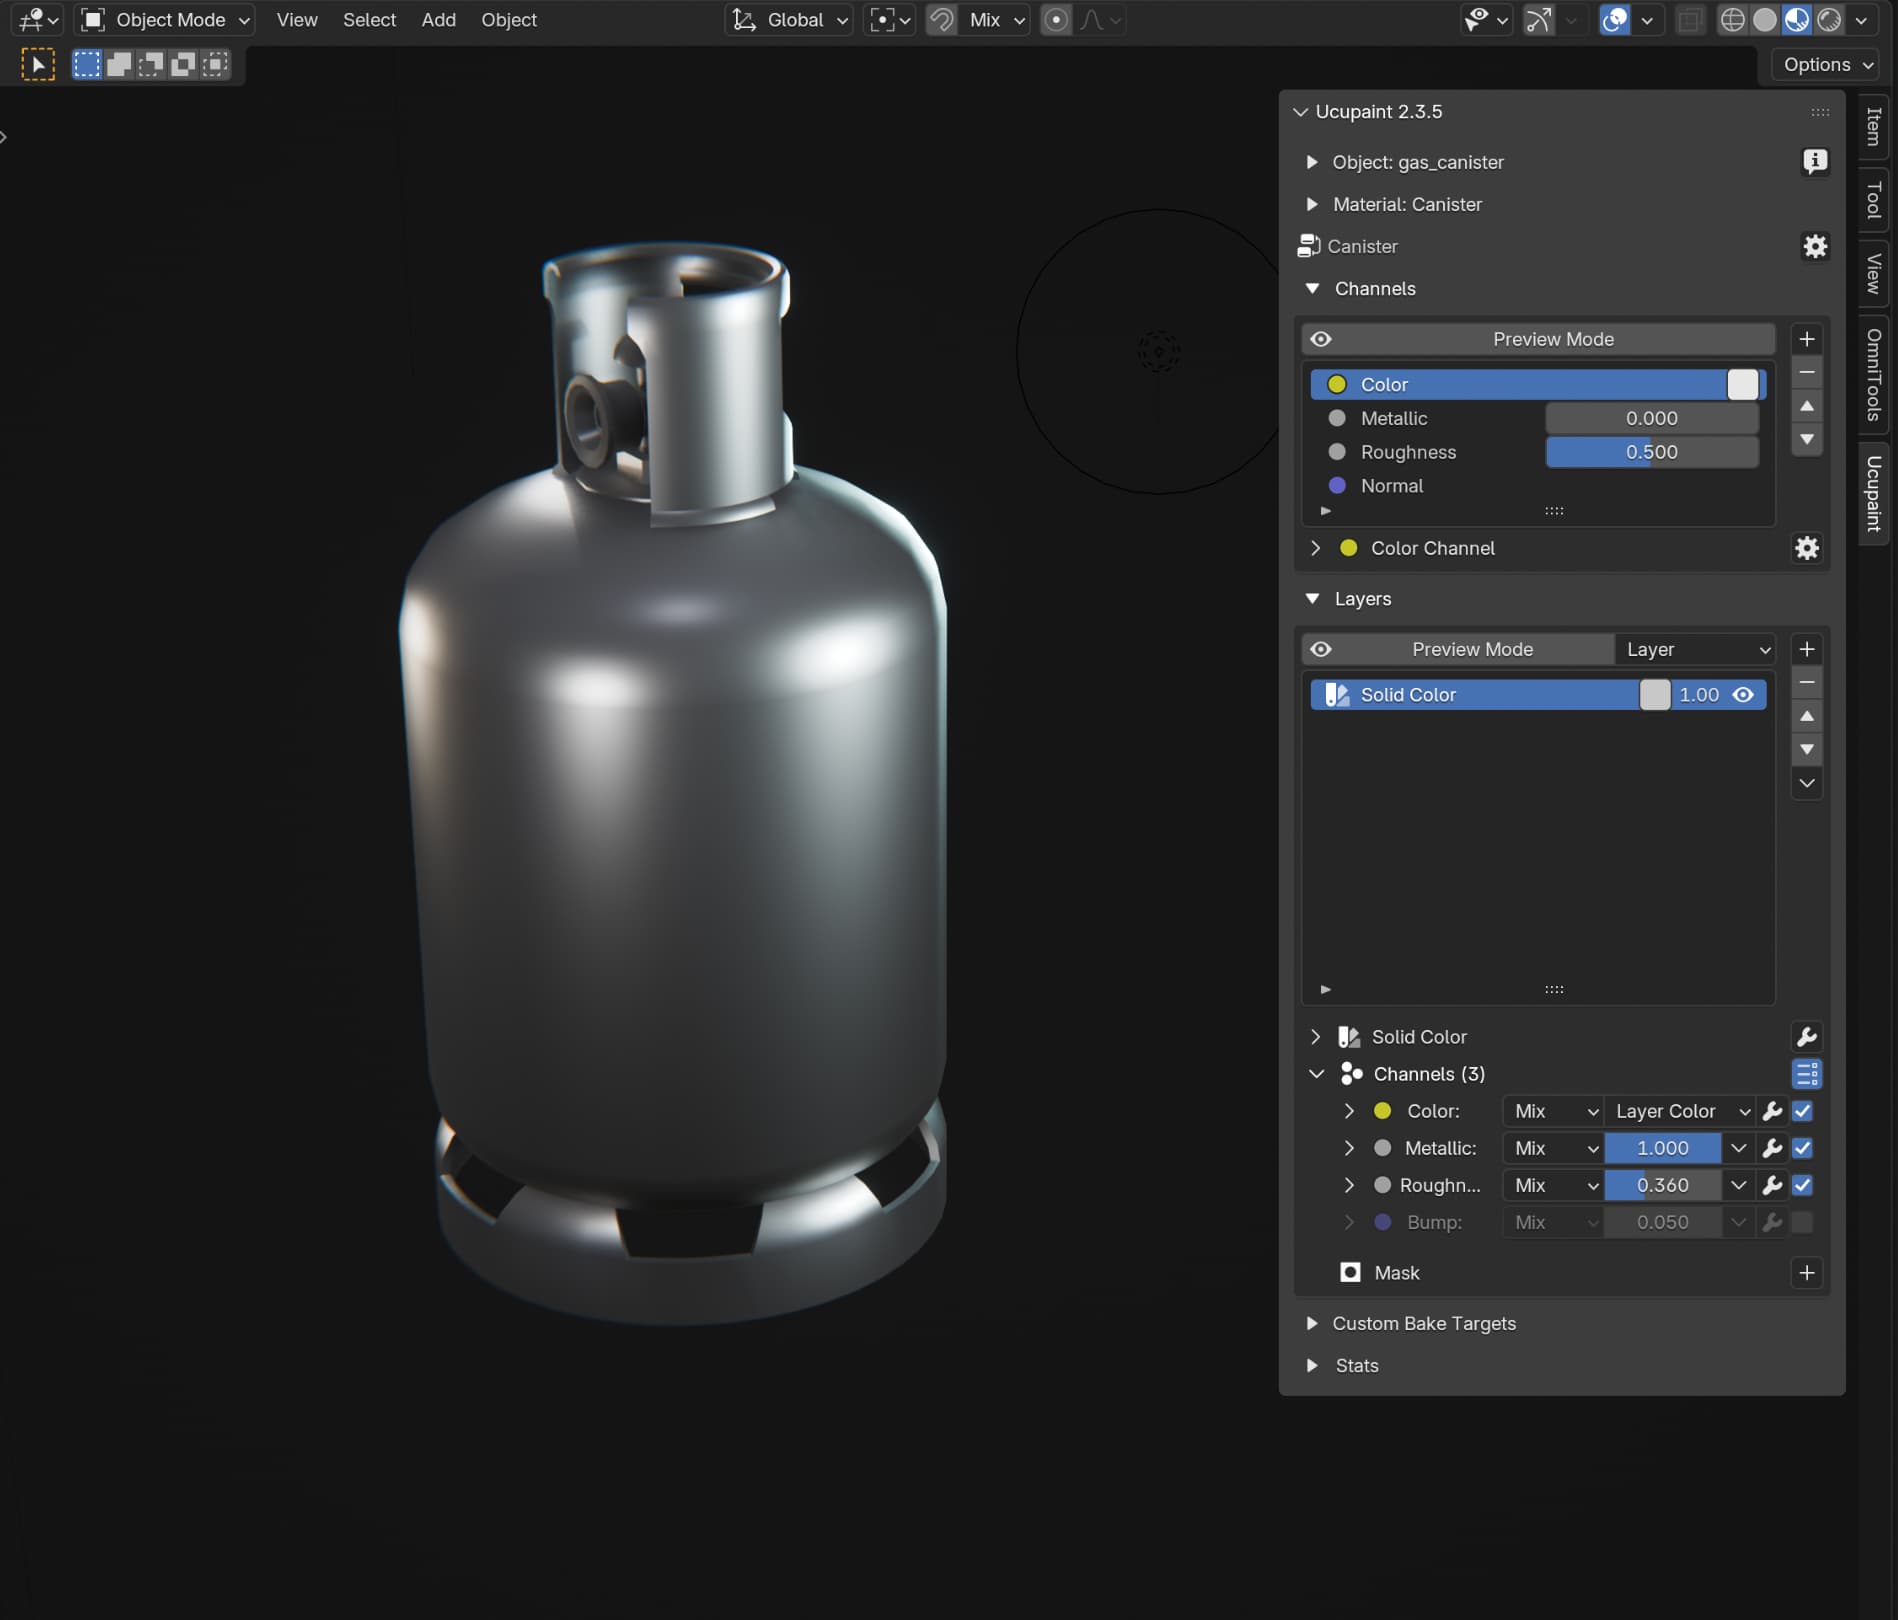
Now it’s starting to look like metal! When setting up lights I usually just tweak them until I like the overall look. I don’t have any favorite setups, I just try to match the light setup to the model I’m lighting. In this case I ended up with 5 omnis of different colors and intensities:
It’s sorta like some kind of a studio environment, except I did it with omnis instead of searching for a studio HDRI. That way I get full control over where specular lobes land and can basically “draw” them onto the model like a 2d artist would, but by moving lights around, if it makes sense.
Adding some necessary base layers
Now that we have our lights set up I’m gonna add a layer of AO to add some nice contrast to the asset.
To do that I’m adding a new Solid Color layer and a mask to it that’s called Ambient Occlusion. To add a mask you just need to click on + next to Mask on the bottom!
When you do that you’ll find that AO is inverted when you use it as a mask. To make it usable as a mask we need to invert its colors. There’s a separate Invert modifier, but I often invert just by drawing an inverted curve with a Curve modifier because I often need the curve anyway, so I just do both things in one modifier.
I use curves in almost all masks. In this case I used it to change AO contrast a little bit:
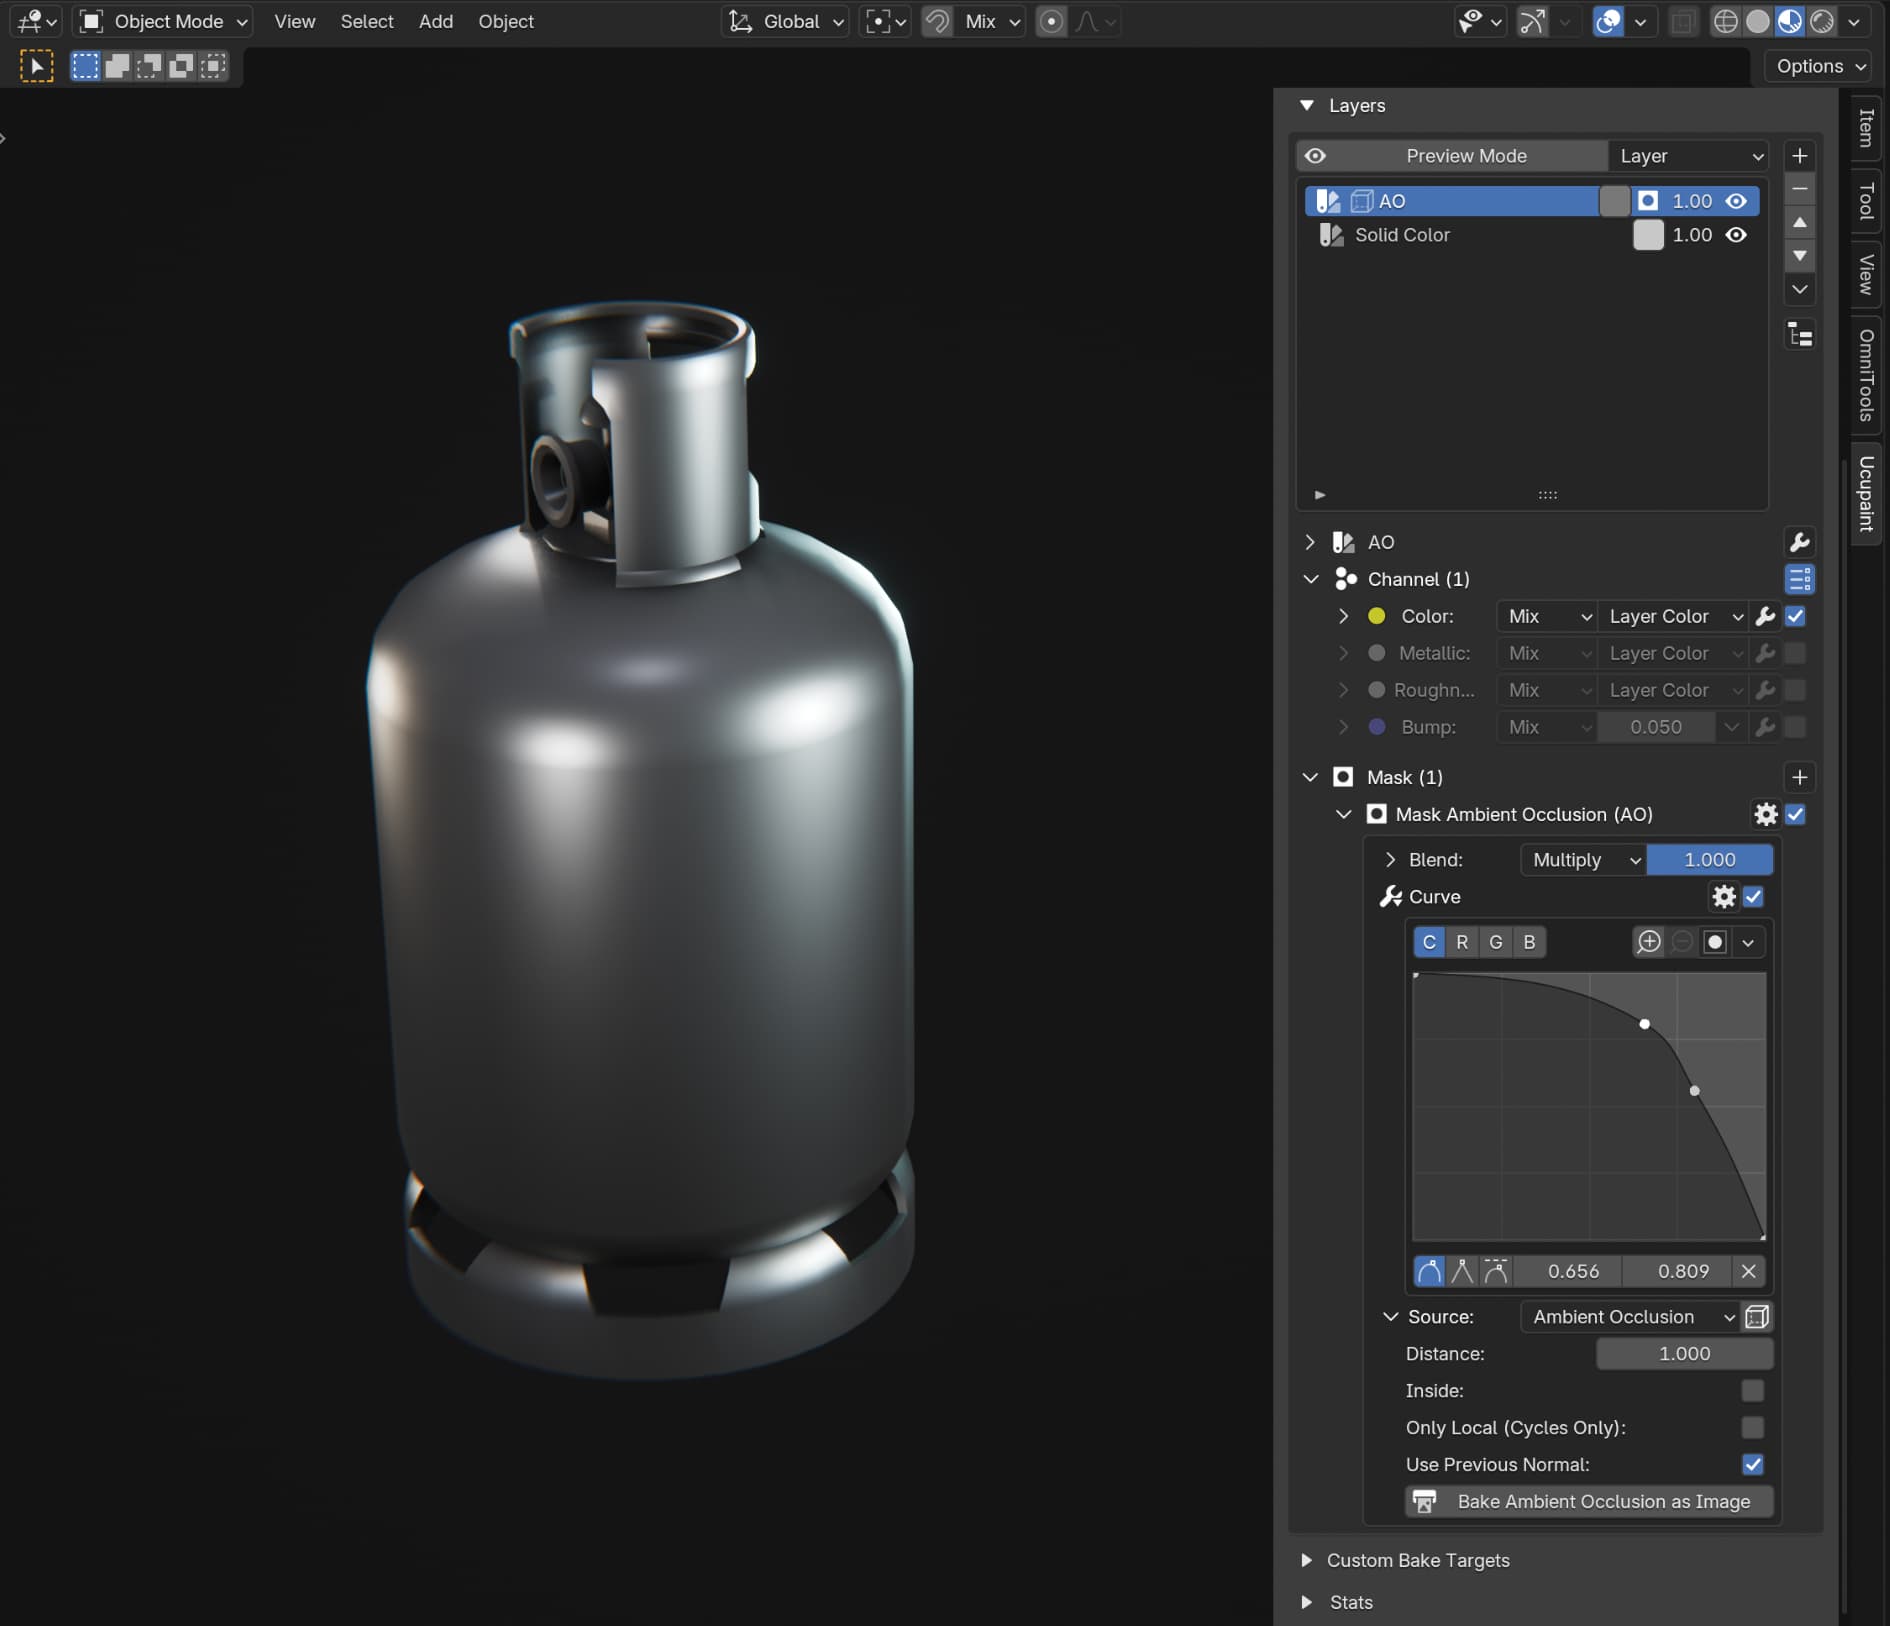
Why are we doing AO as a mask on a Solid Color layer rather than just adding AO as its own layer? Because this gives us control over the color of AO. We can change it by changing the color of the Solid Color layer. I have a habit of doing that because for stylized assets it often looks nice when AO is not monochrome. Here however we will be using monochrome AO, it’s just a shade of gray.
Here’s a side-by-side of no AO vs AO, as you can see it makes a noticeable difference by grounding the top part of the canister:

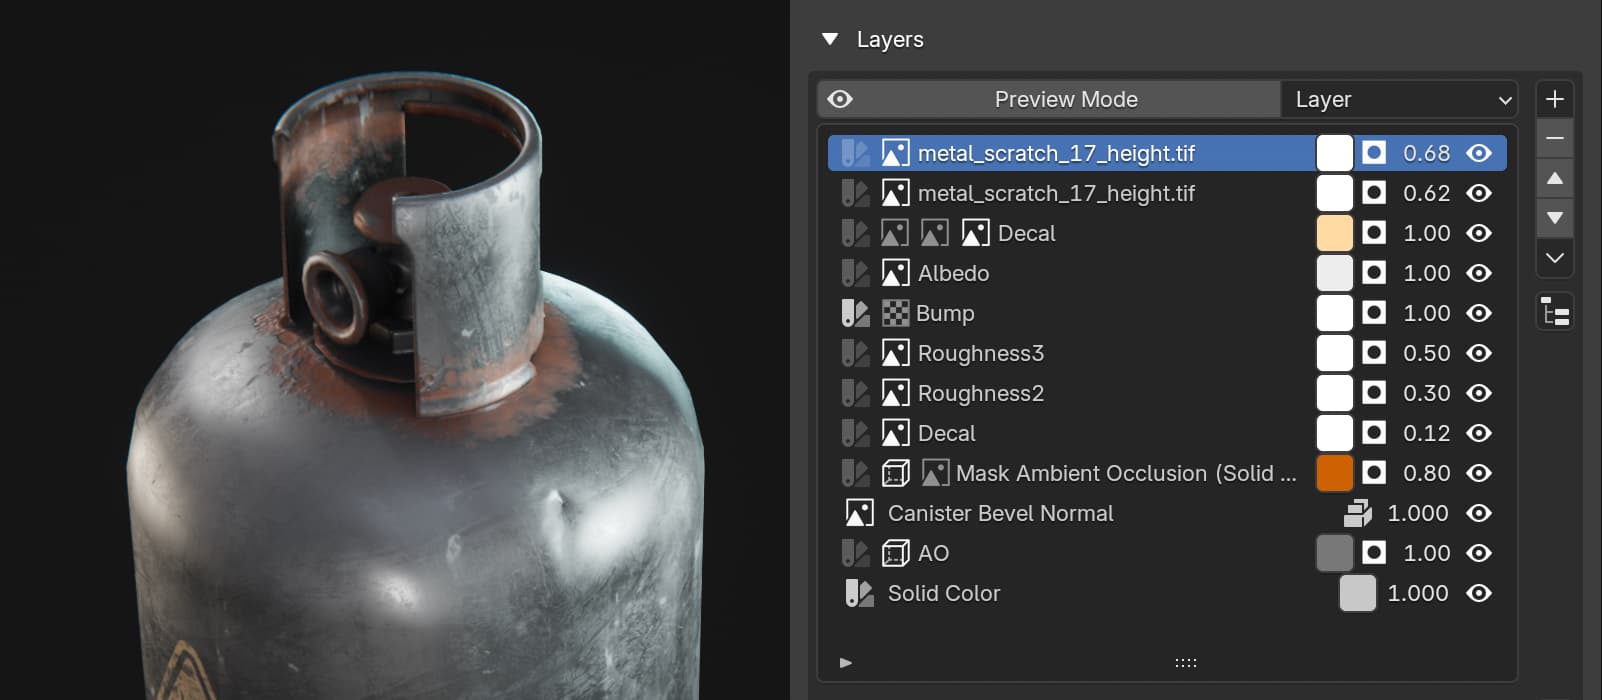
Another important thing to do at this stage is to bake bevels. This one we bake straight into its own layer by making a new layer of type Bevel Normal. I’m baking it with a radius of 0.005, which I believe is 5 millimeters:
This makes a huge difference for shiny materials because those edges can now catch light for free without any additional geometry, making the model look higher quality than its geometry allows!
As you can probably imagine this is invaluable for games, which is why it’s used often in game assets.
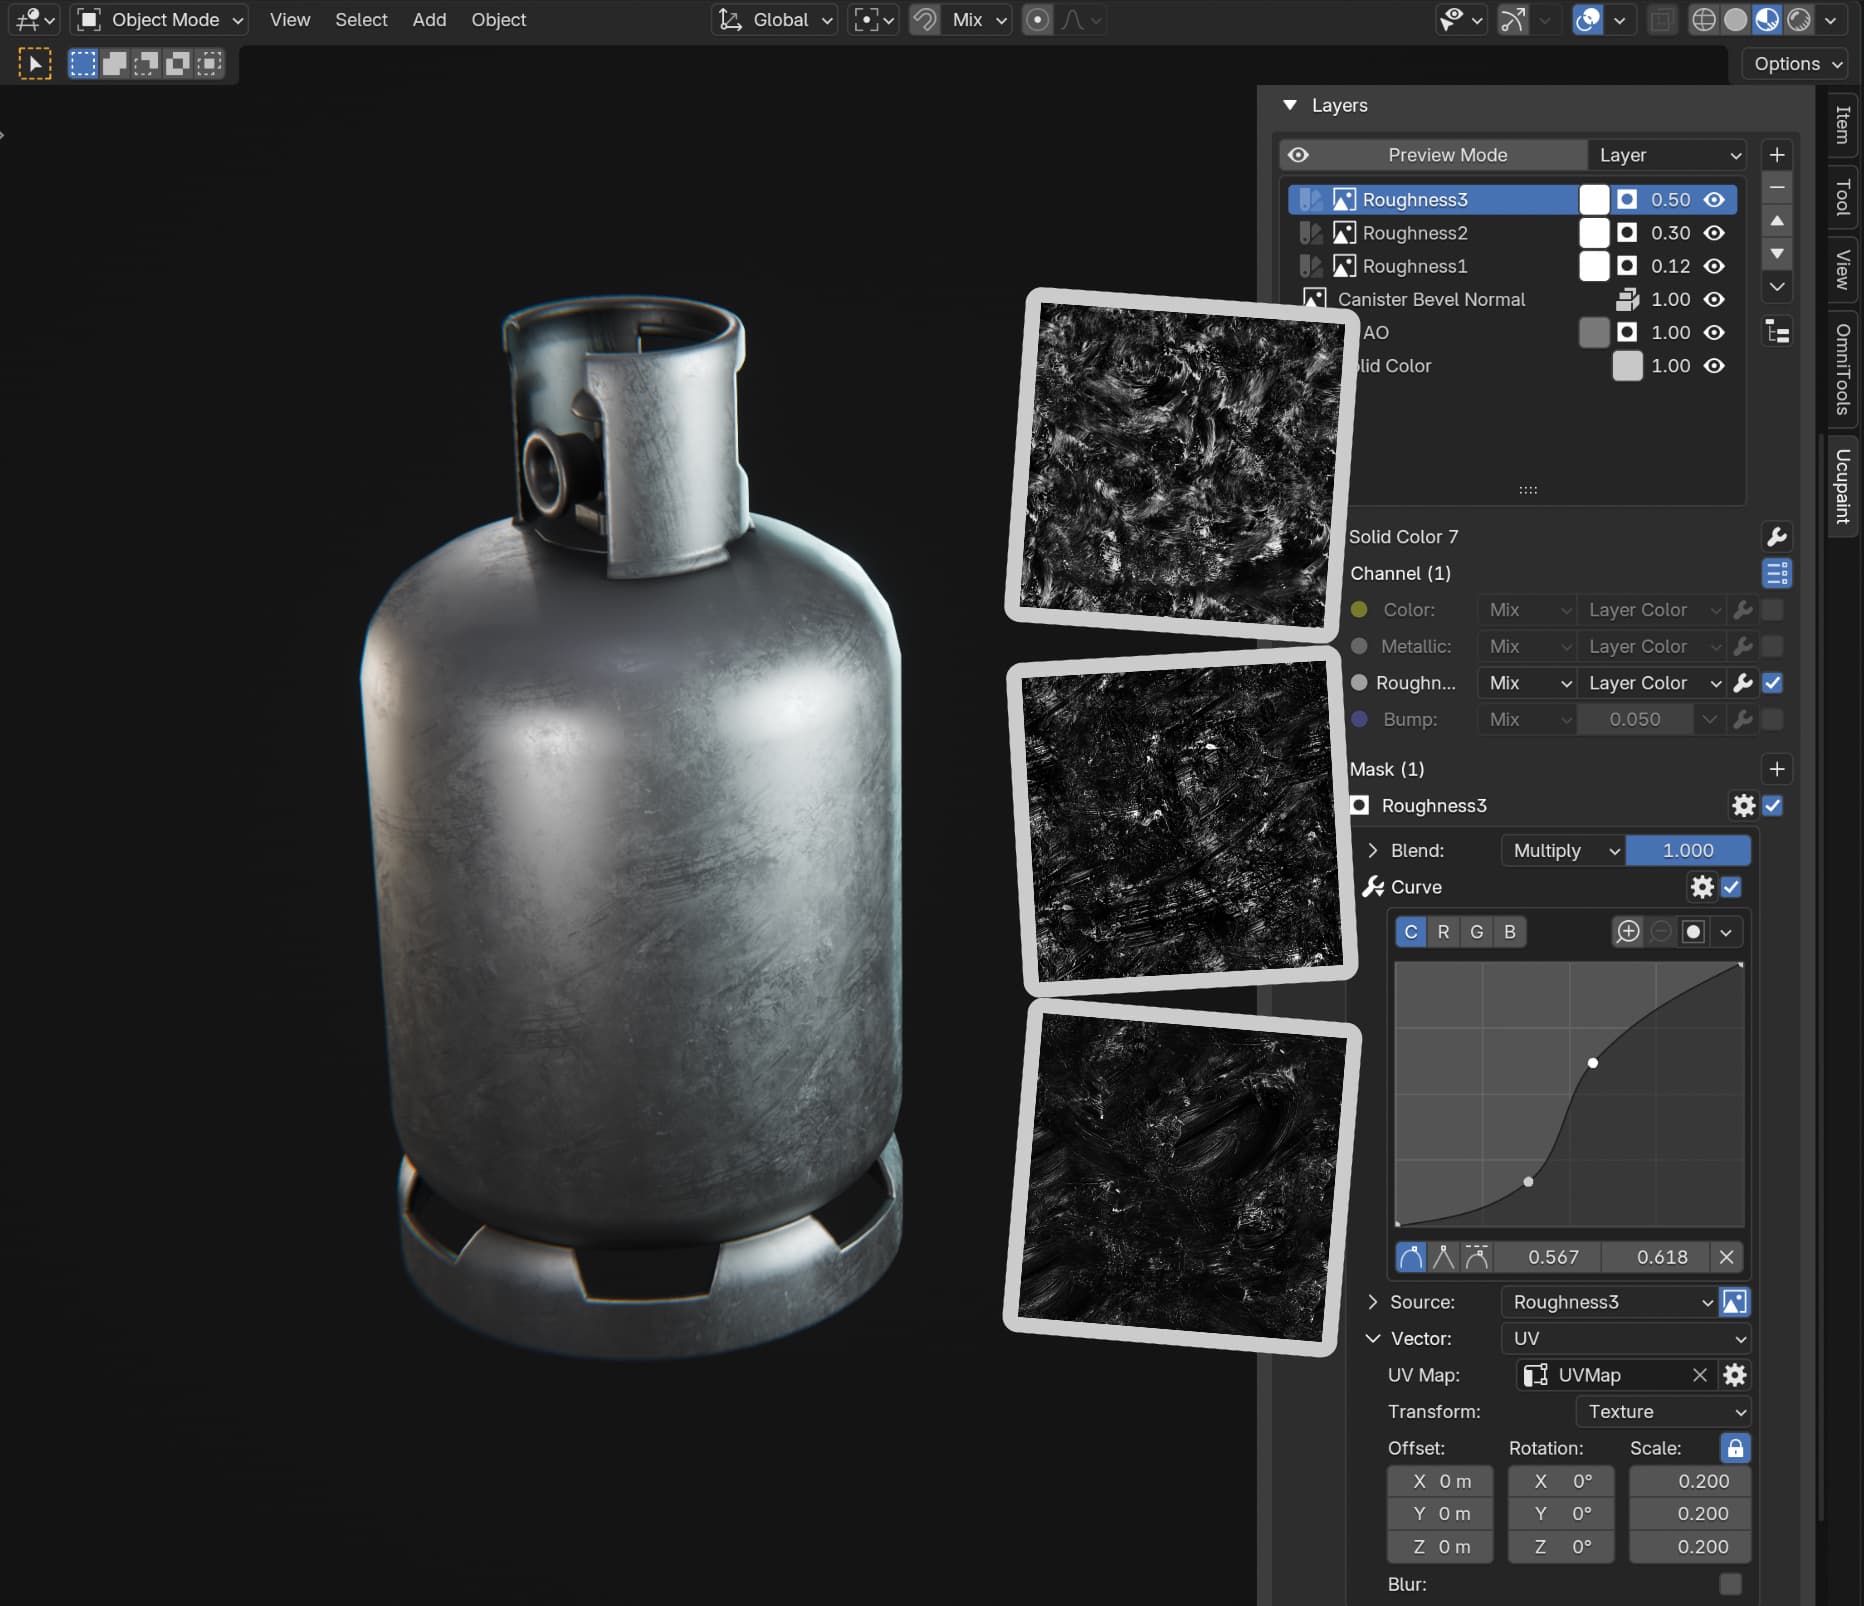
Adding roughness layers
By now we already have a surface that’s recognizable as metal. It is however flawlessly smooth. Even very clean surfaces would usually have some imperfections. We’ll achieve that by adding some grunge textures into the roughness channel to make it look a bit rough.
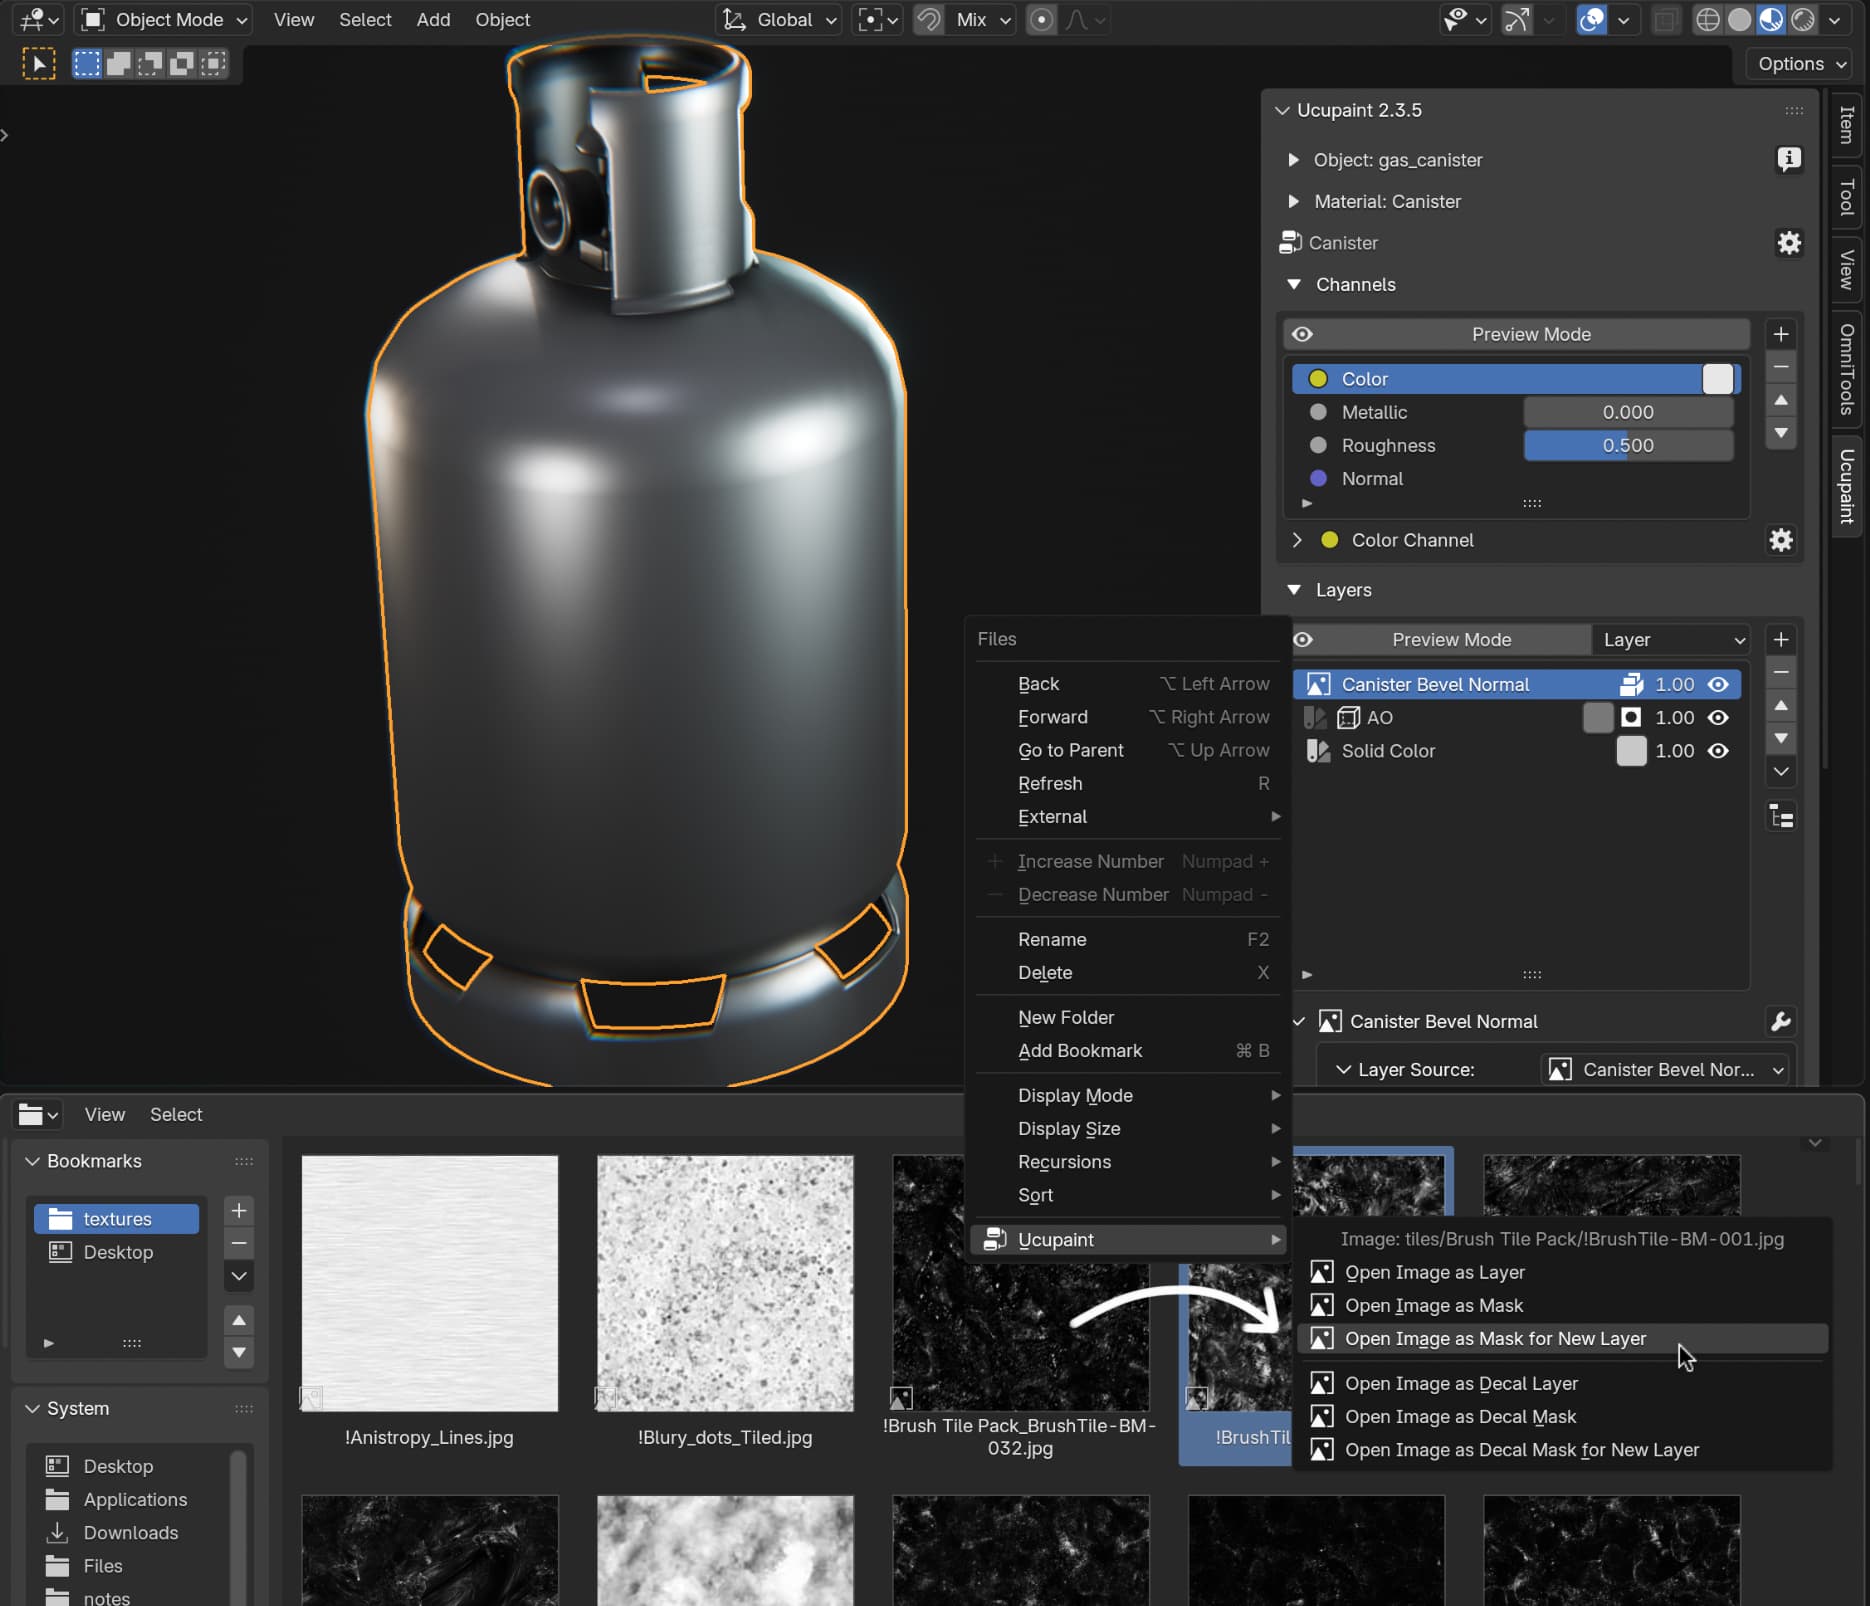
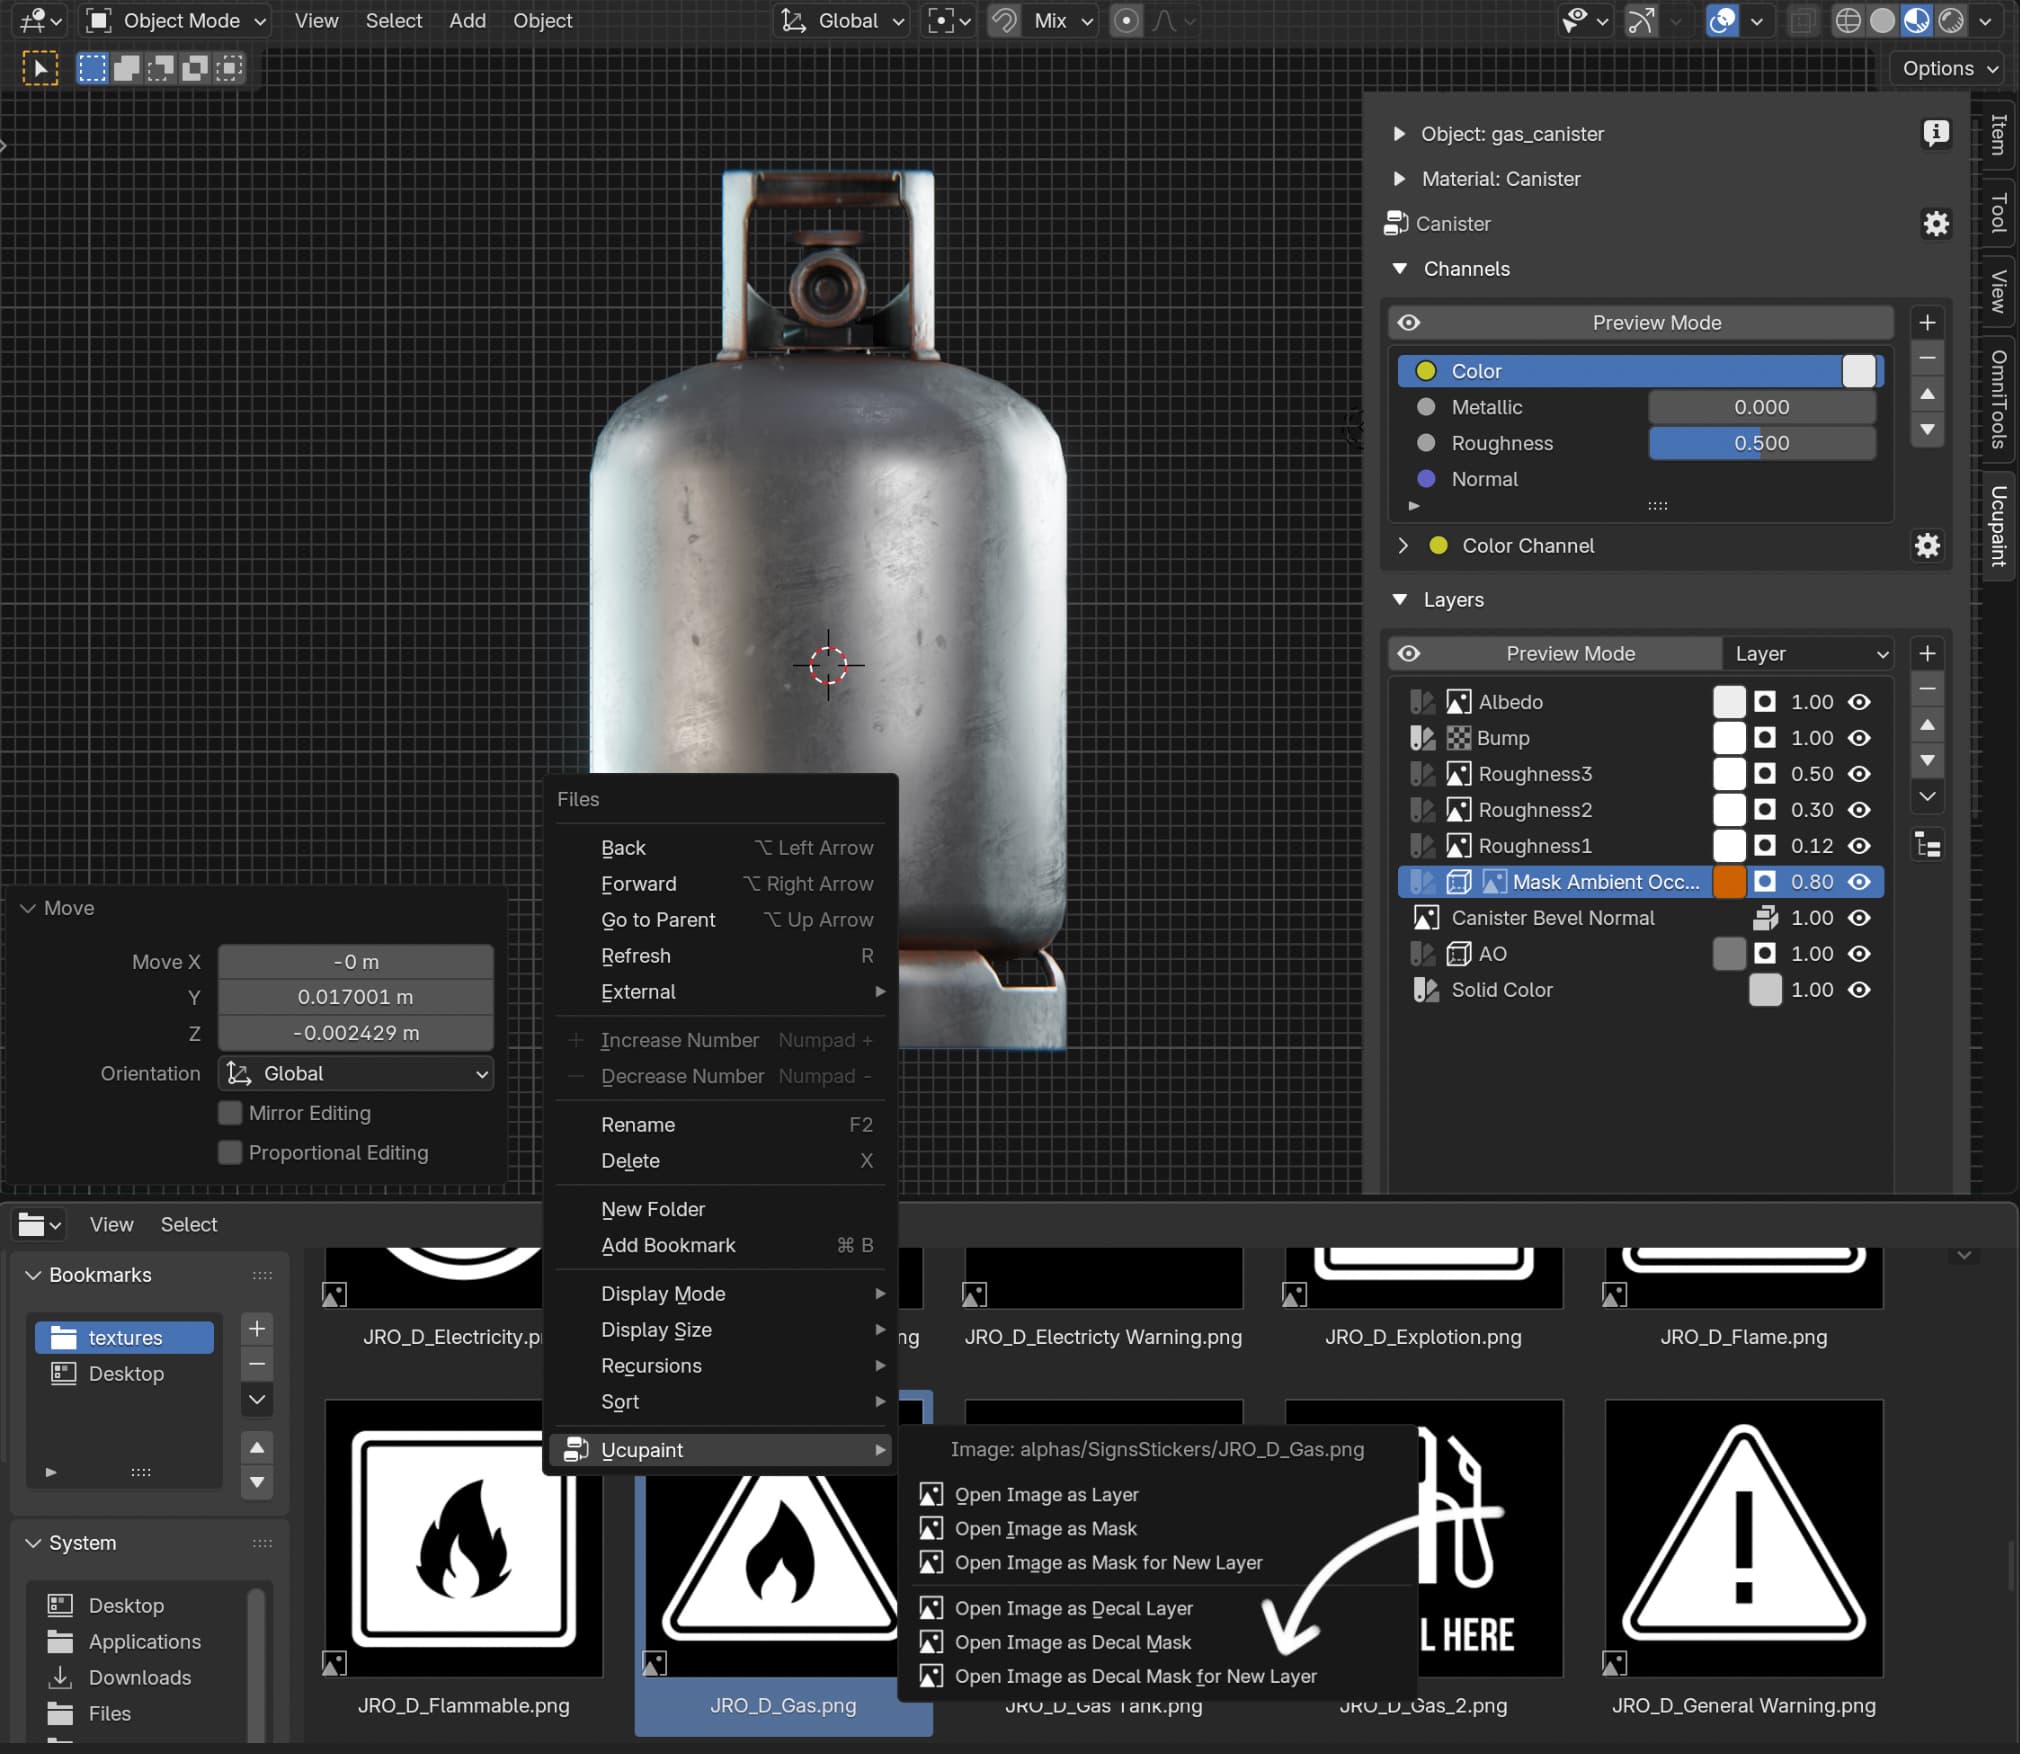
In blender’s file browser you can right click on an image and click Ucupaint -> Open Image as Mask for New Layer to create a new Solid Color layer with that texture as a mask. Convenient, innit?
To make it affect only roughness uncheck the Color channel and check the Roughness channel in the channel list. Since this layer exclusively affects roughness we don’t need to switch the roughness channel to Custom Value and we can just change that value by changing the layer color in the layer stack itself.
In this case however I chose to tweak opacity instead of changing the color to make it more subtle. You can tweak layer’s opacity straight from the layer list itself, it’s on the left of the eye icon and it affects all channels of the layer.
Here I’m also changing the scale to 0.3, but that depends on what your grunge texture looks like of course.
I’m also repeating that process with 2 more roughness textures, overlaying them with different scales, different opacities and remapping their values with Curve modifiers until I get the look I like.
Adding details and imperfections
At this point we have a solid material for a gas canister that’s in a very good condition. In real life things are often not in such a good condition, so for the sake of this guide I’ll show how to make it look a little scuffed.
First we can make the surface imperfect by worbling it with a noise texture. To do that we add another Solid Color channel that affects only the Bump channel. The noise itself is just the regular built-in Noise generator:
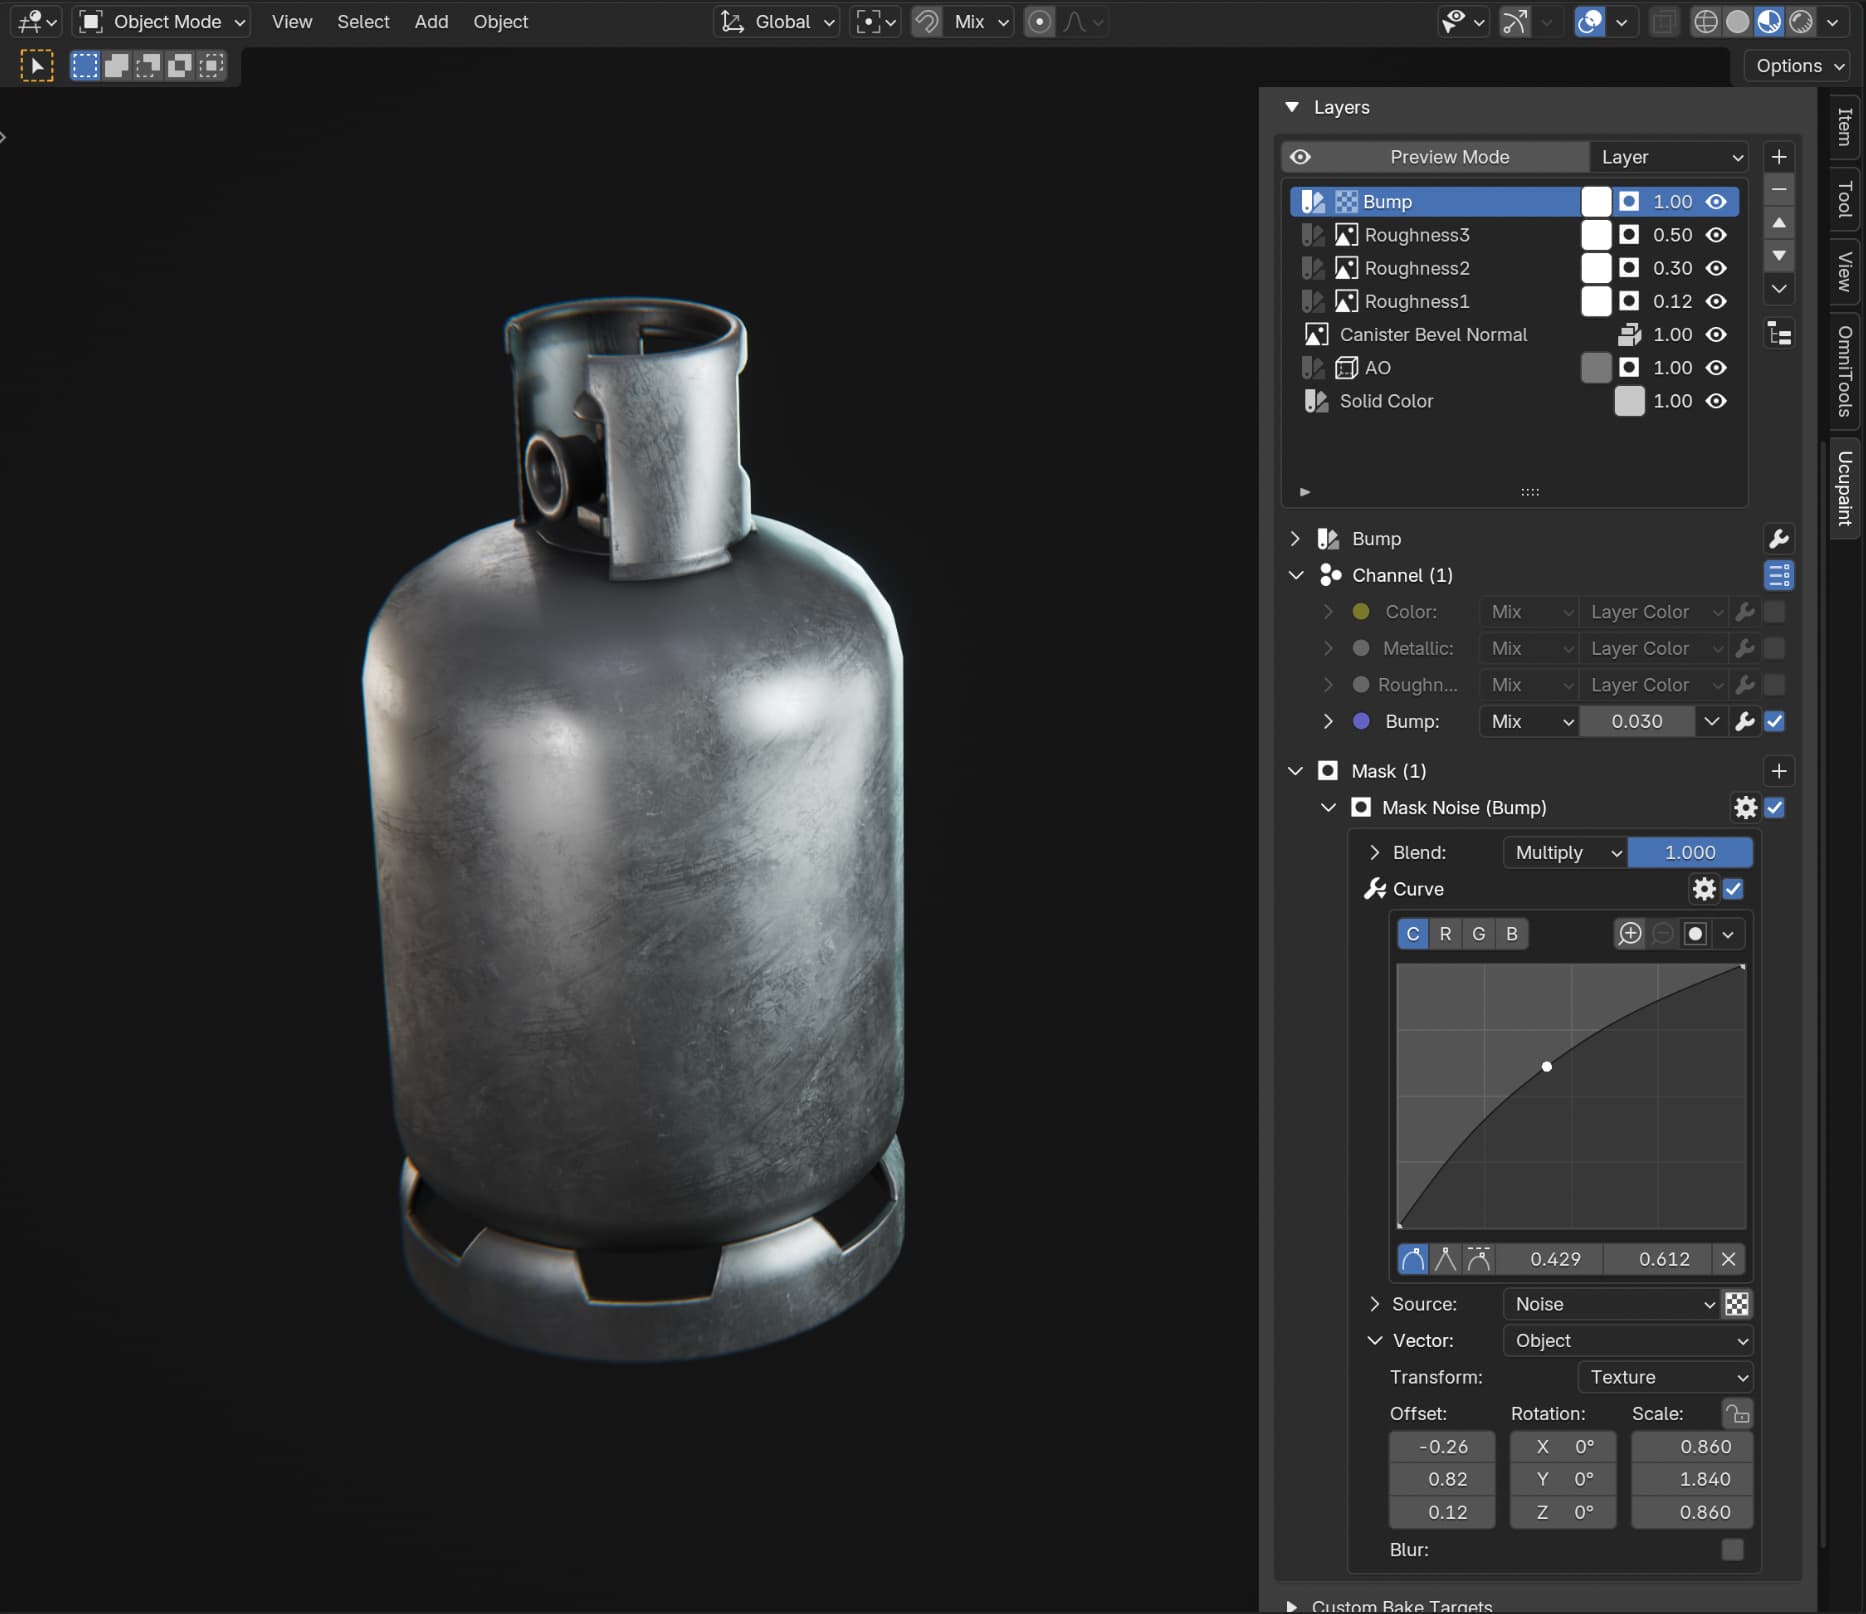
I tweaked the settings until I liked it and made it subtle because I didn’t want it to be super beat up. Sometimes changes can be subtle but they still contribute to the final look.
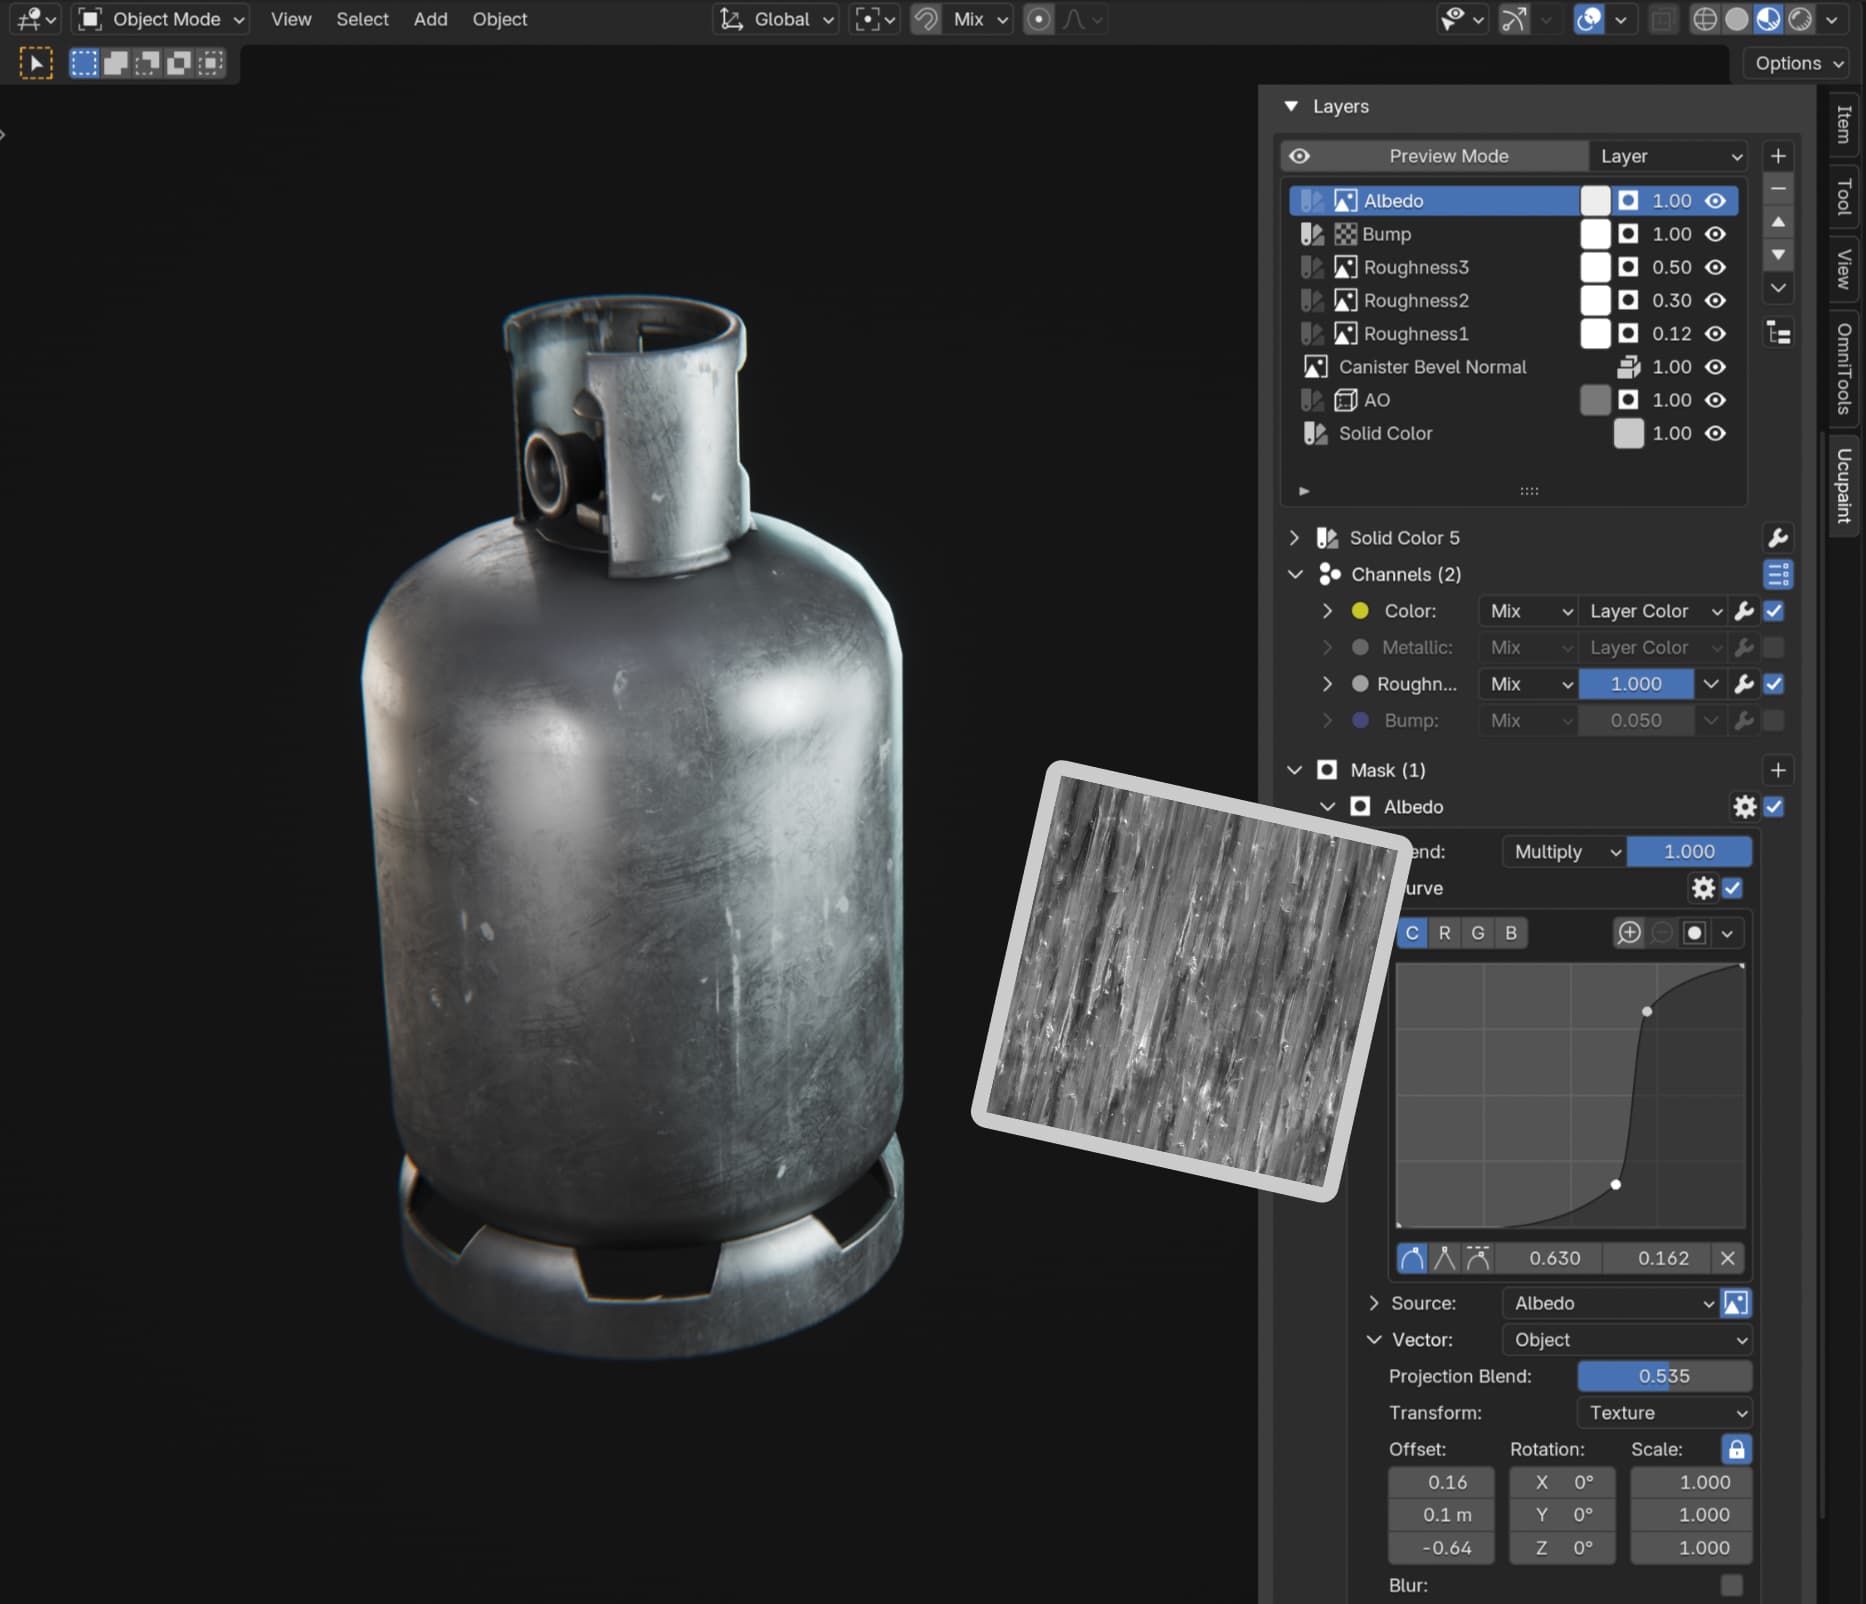
Next I’m adding another grunge layer, this time affecting both Color and Roughness channels, and tweaking the curve in such a way that only a very small range of values from that texture gets through.
This adds some subtle dots and smudges. They could be some paint that the canister got from the environment or smth like that.
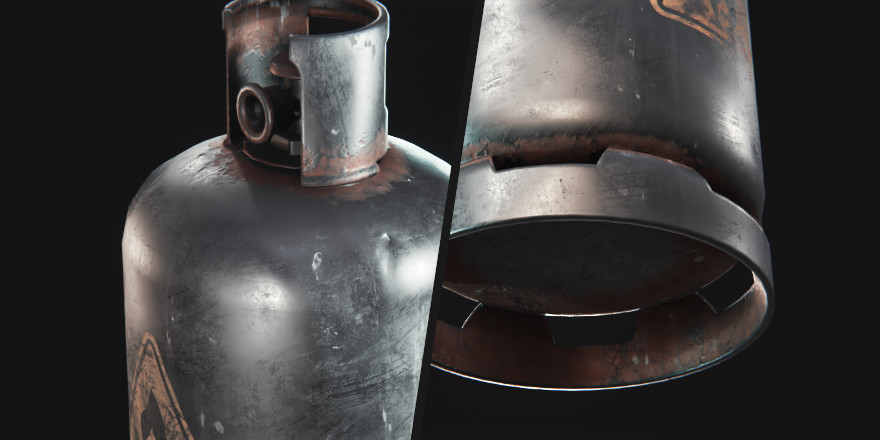
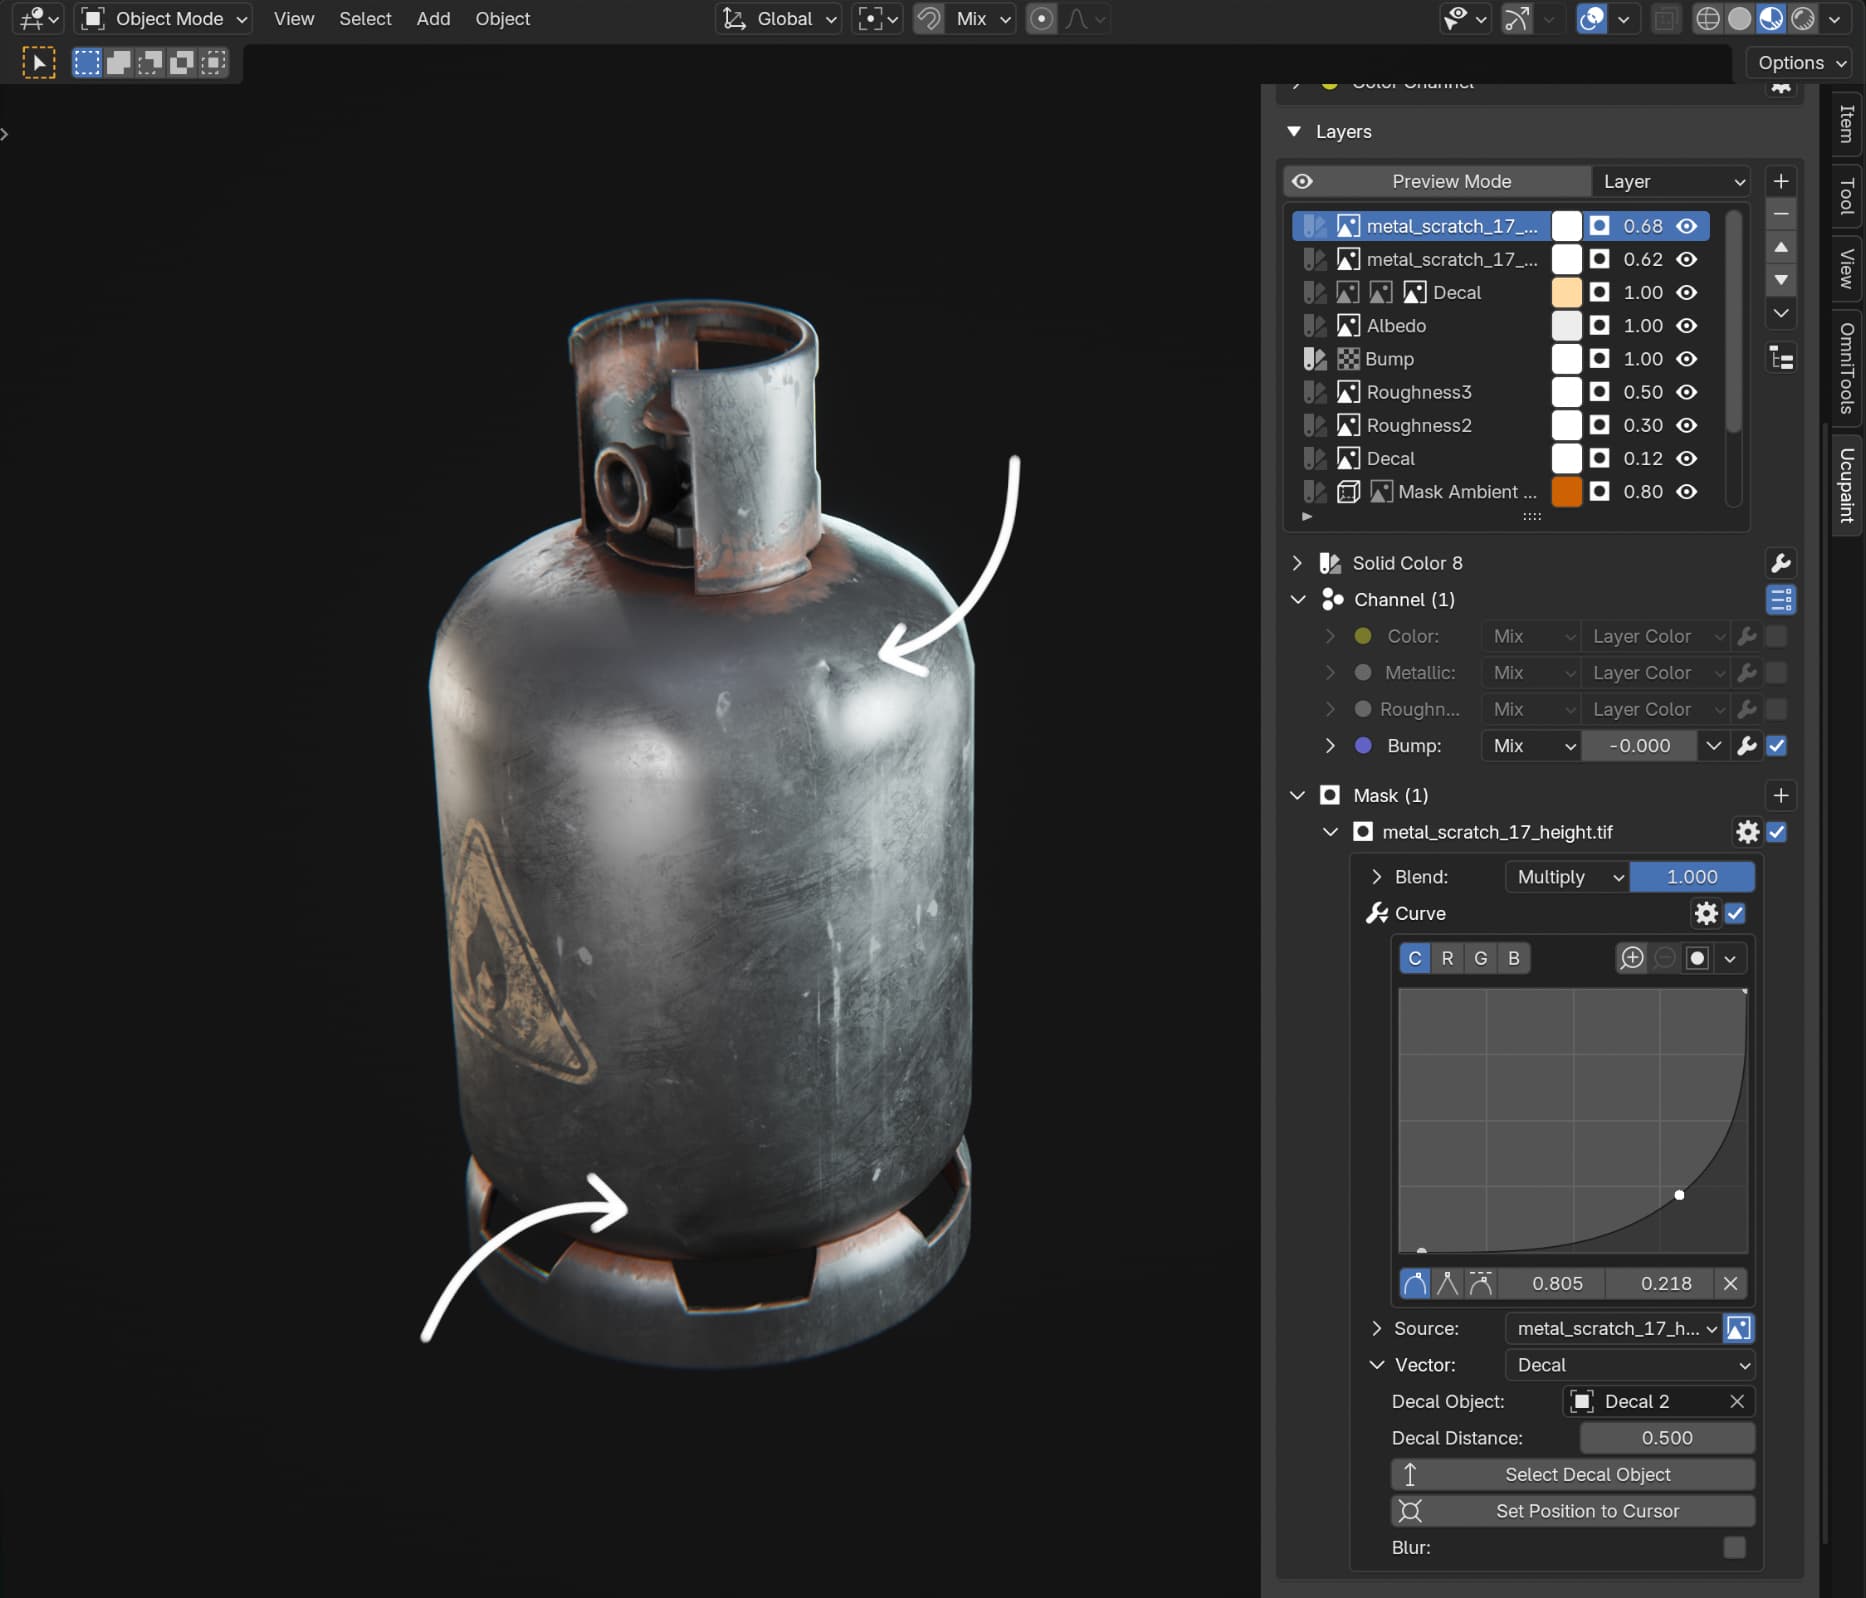
Next I added a rust layer by combining an AO mask with some grungy dots texture that I found. This layer disables metallic by setting its channel value to 0.0 and adds a very very subtle bump (0.003).
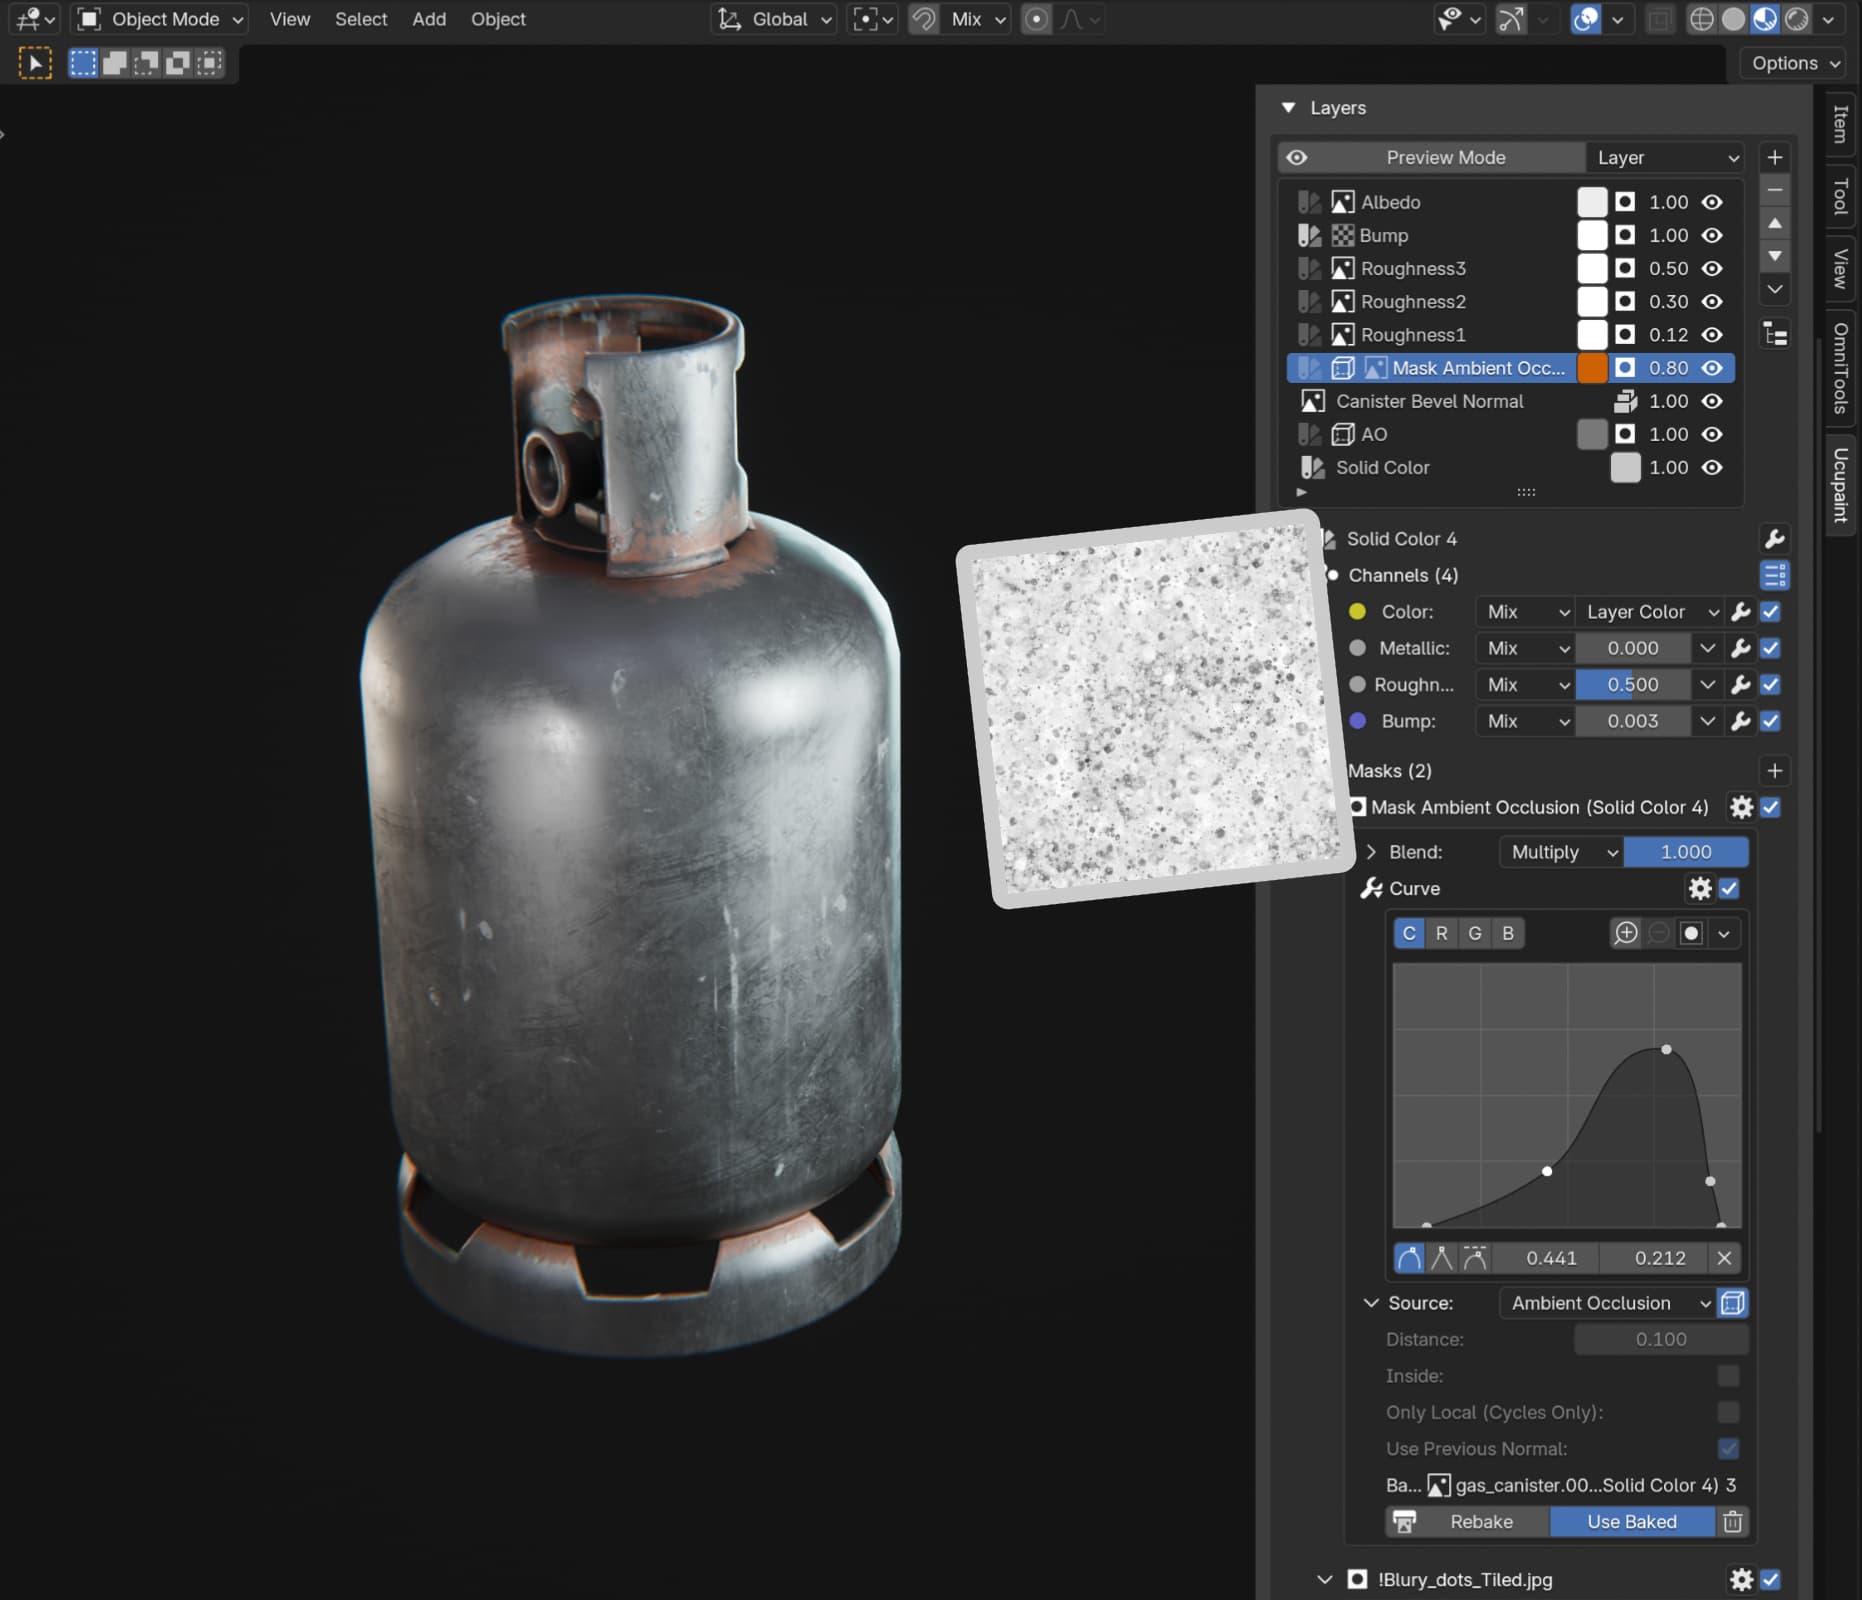
I baked AO using the bake button in the AO mask itself to convert AO from shader to image, because the shader version of AO can be unreliable and not show how it will actually look in the end! So when you’re using AO or Edge Detect as masks, I recommend always baking them, especially if you’re combining them with other masks.
Another important thing to note here is that the grunge mask is added in Burn blend mode. This allows you to get a sharp silhouette for the final mask despite AO being a gradient.
Remember the Burn mode, it will allow you to make good smart masks, everything from dirt to edgewear! Burn is ucupaint’s secret superpower!
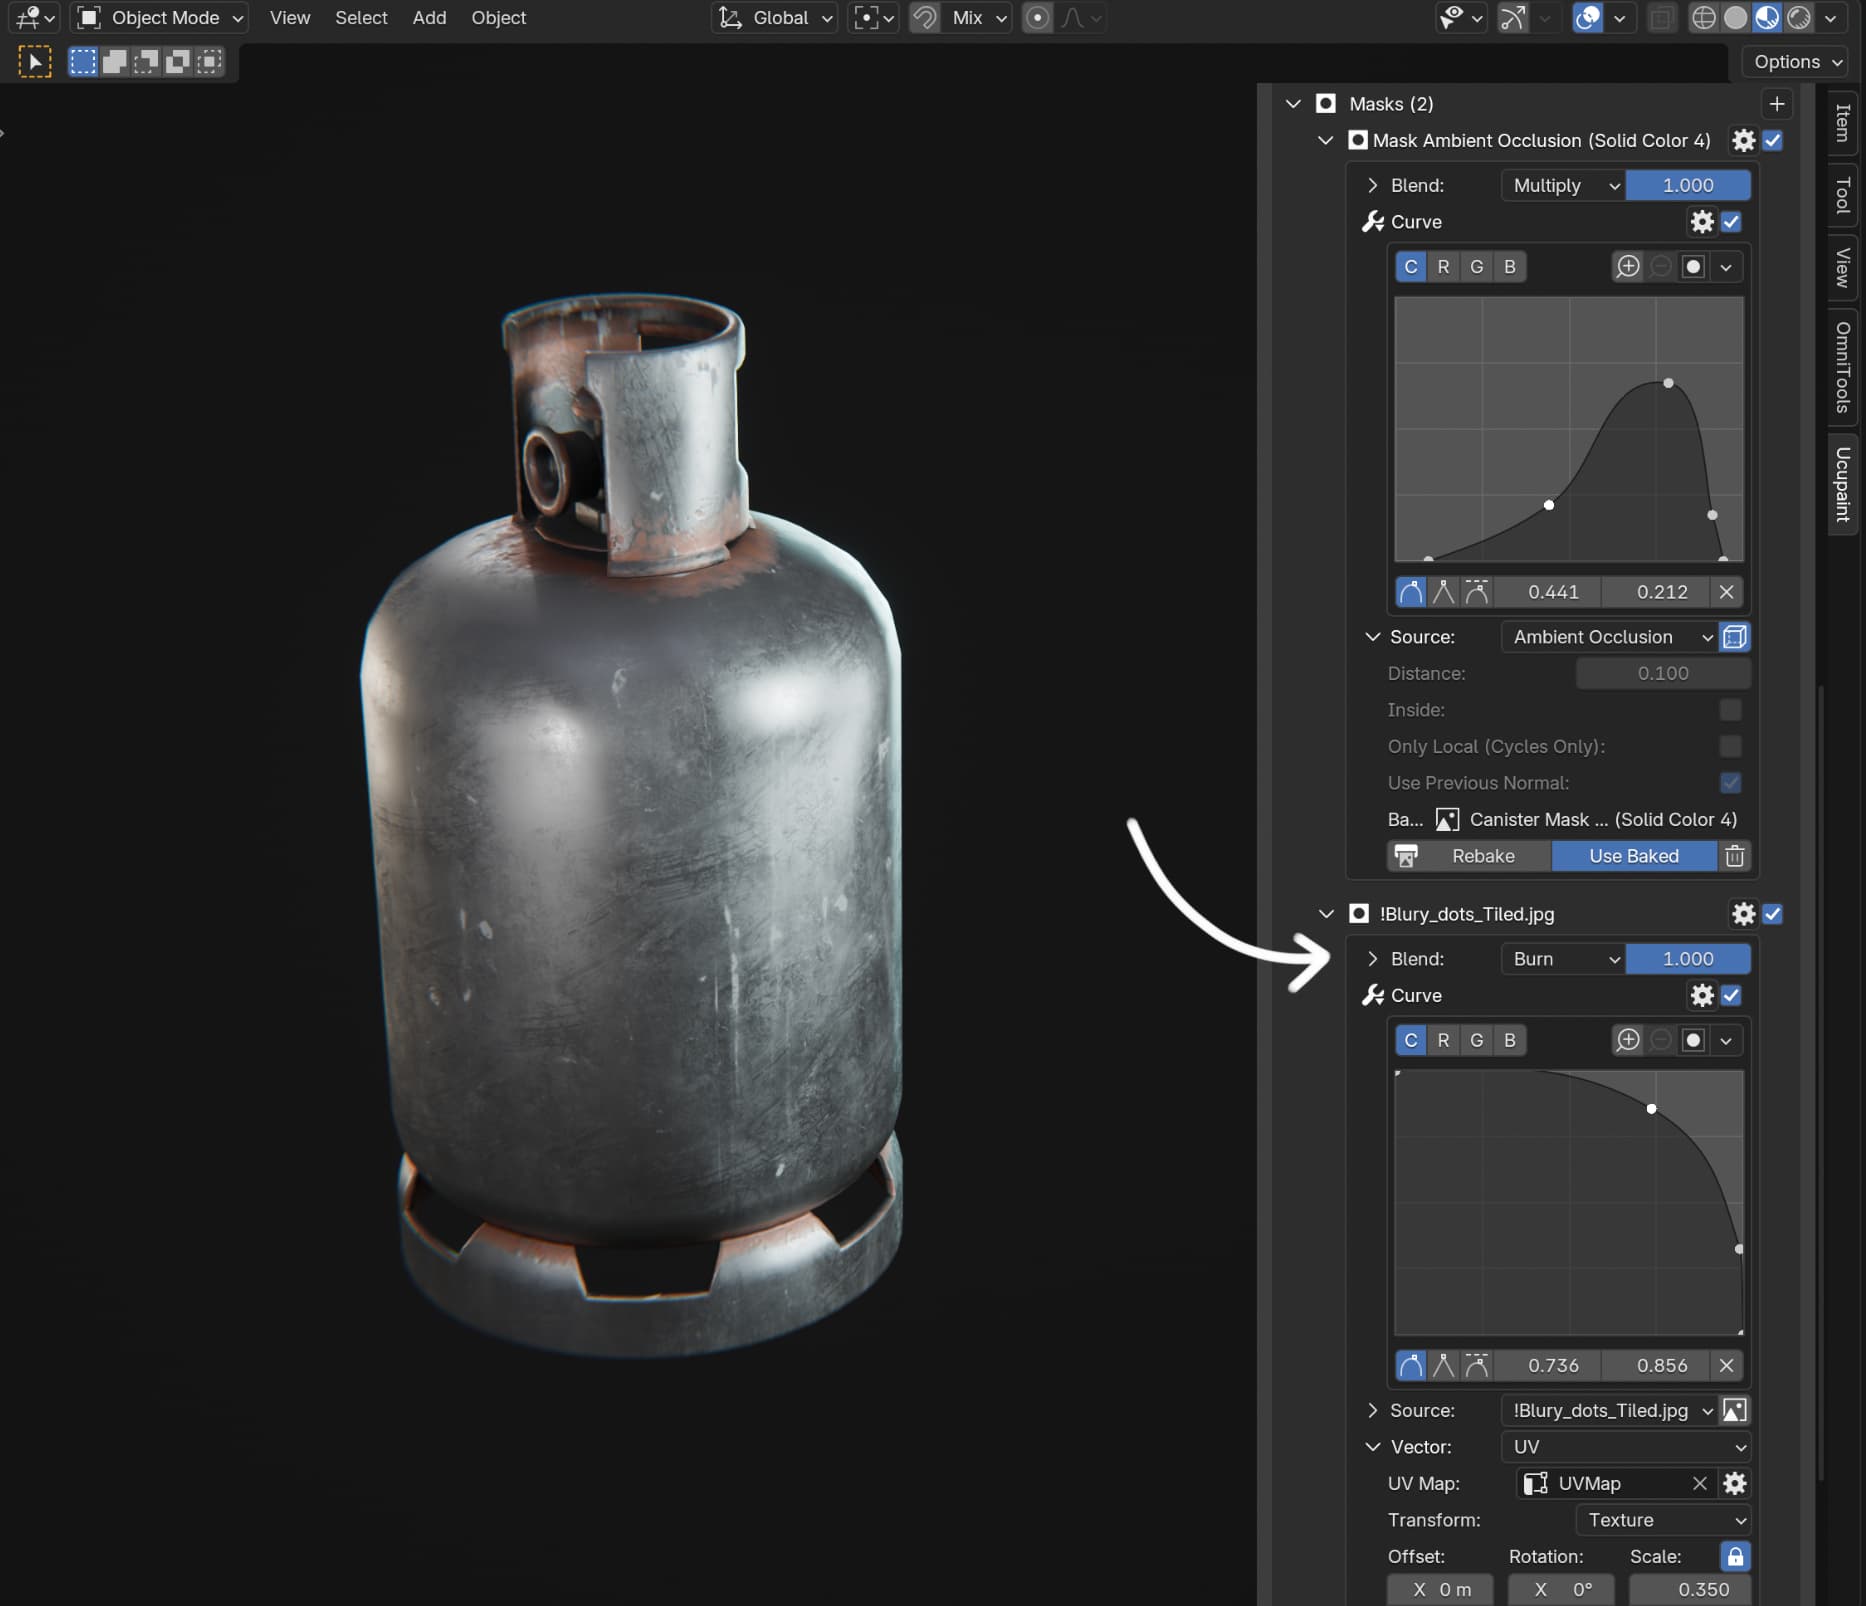
As you can see from the screenshots I make heavy use of curves in most masks. I add curves to most of them, because it’s very rare for the mask value to be what you need, even from AO or Edge Detect, but especially from a random grunge map you found on the internet. You need to shape them into something that fits the material!
You can also use Ramp instead of Curve but they basically do the same thing and it’s just a matter of preference what to use. I find Curve to be more convenient personally.
Pro Tip: Blender supports accelerator keys in all menus. Which means that often instead of hunting menu items with your mouse you can press keys on the keyboard to activate them. For example:
- To add a curve modifier to a mask you can press on the cog and then press “C”
- To remove a mask you can press the cog and press “R”
- To add a Solid Layer you can click on the add layer button (+) and then press “S”
Look at the underlined letters and see which ones you can press with your left hand!
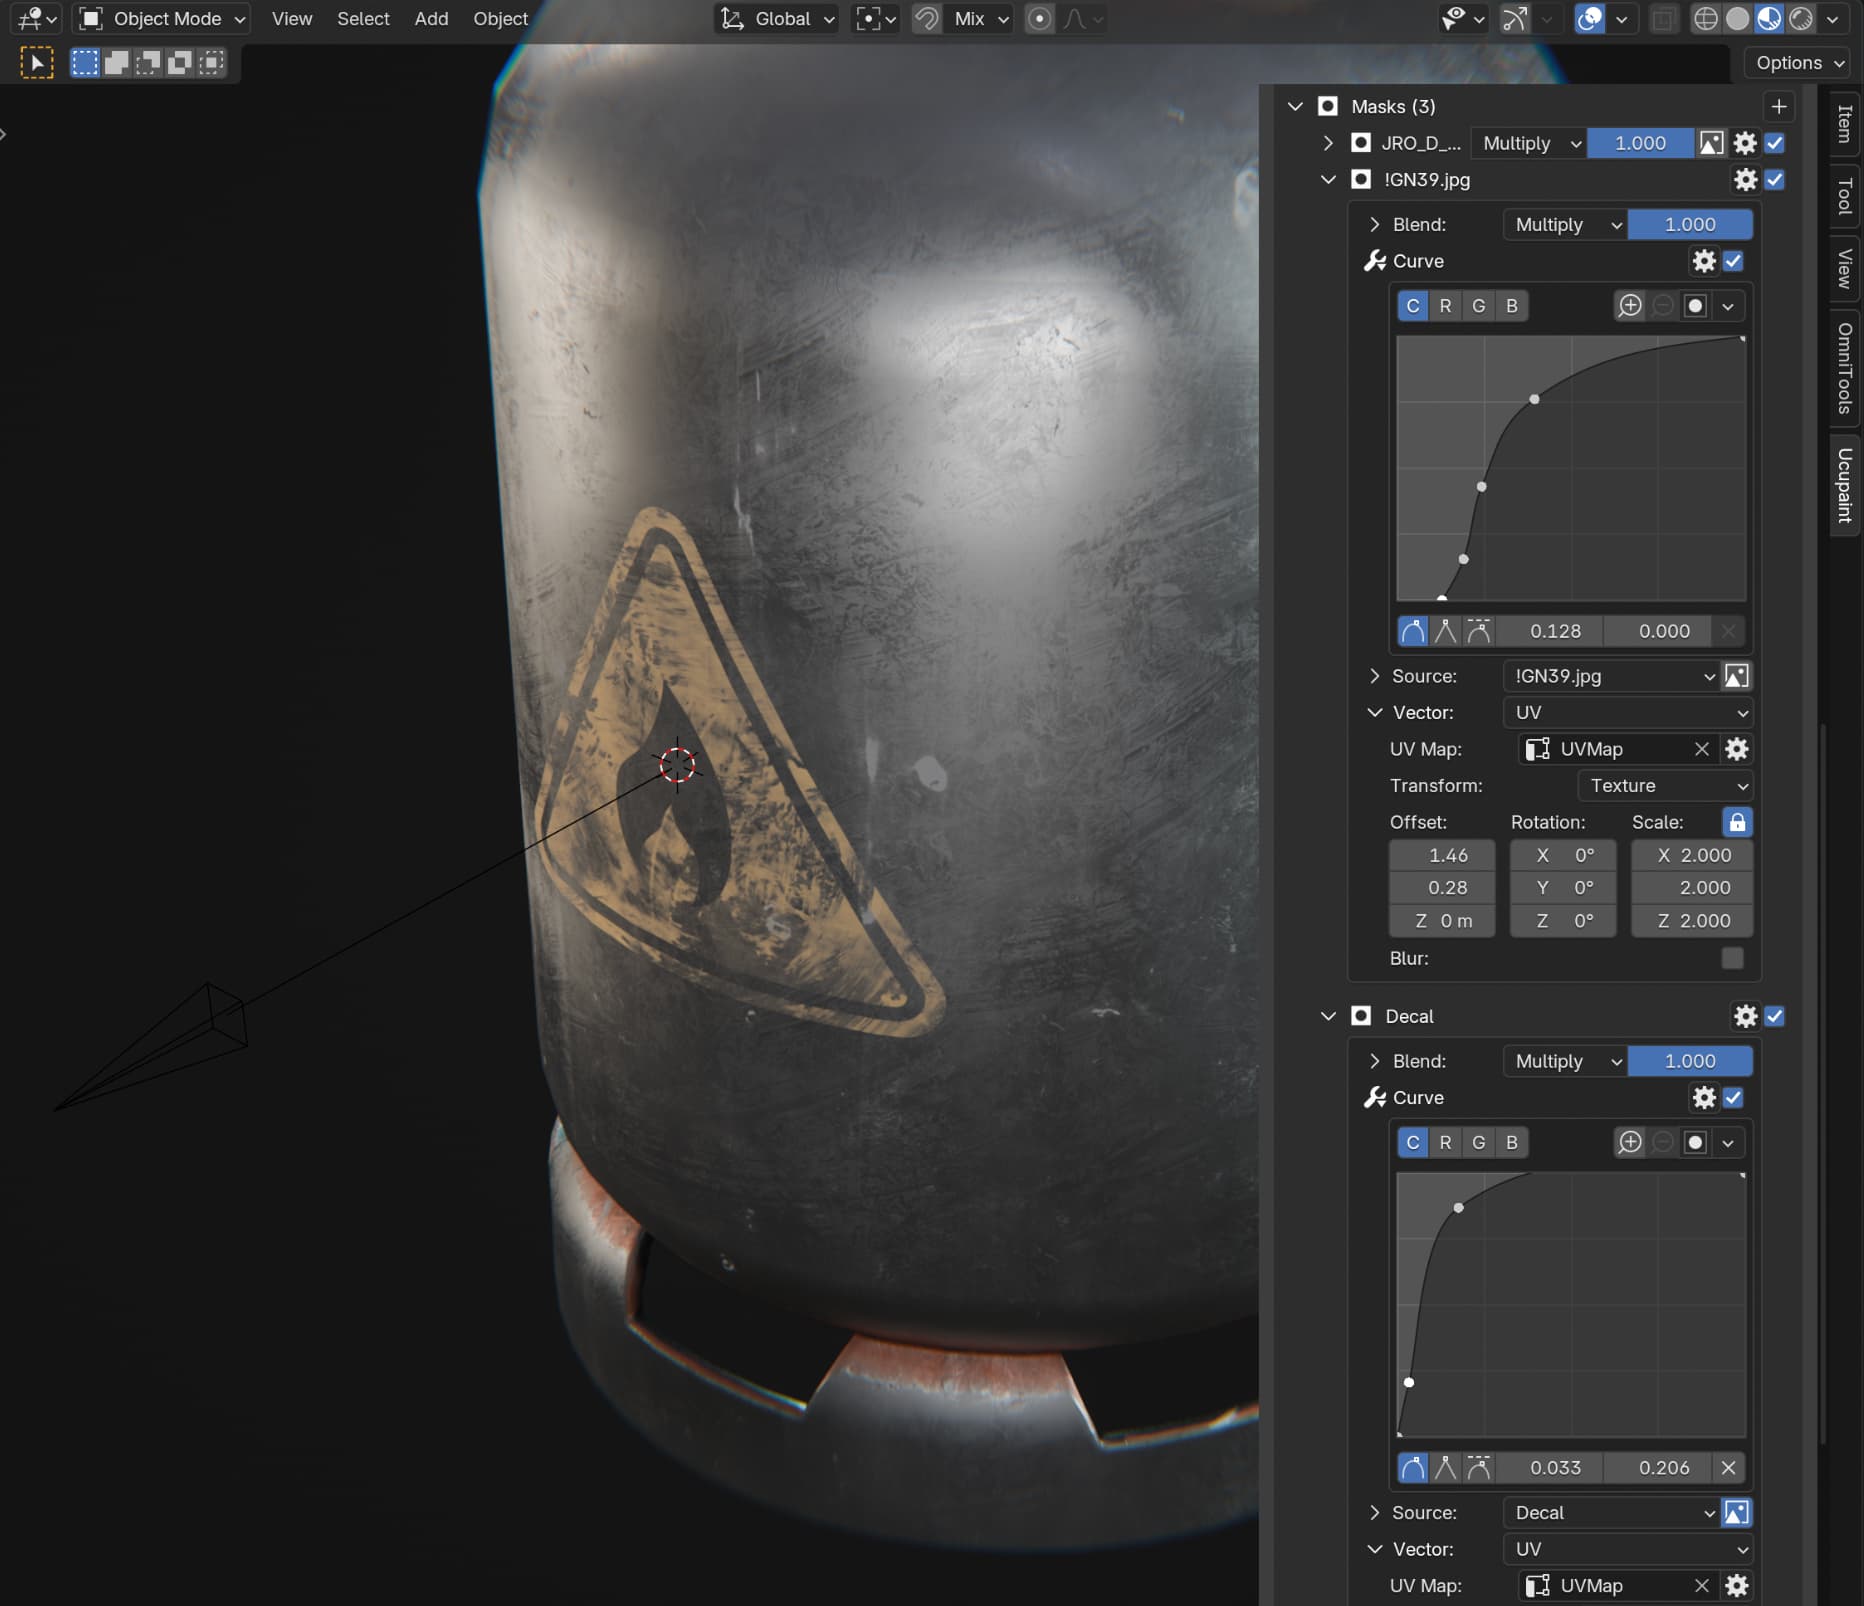
Adding decals
Finally, we’ll add some decals. First, since it’s a gas canister, I’ll add a flammable decal. As a professional hoarder of all things I already happen to have it in my collection of alphas. If you need a unique design, drawing it yourself is also an option.
To add a black and white image as a mask for a new decal there’s a convenient Open Image as Decal Mask for New Layer button in the file browser context menu that will create a new Solid Color layer with the selected image as a mask!
Before clicking it make sure to place the 3D cursor where you want the decal to be. You can move the 3D cursor by holding shift and right mouse button, and 3D cursor will bump into geometry when you do that.
After adding the decal you can move/rotate/scale it just by moving the decal empty that ucupaint created for that decal.
On a curved object like a cylindrical canister you may notice that there’s some stretching near the edges of the projected decal because it’s getting projected in a planar way:

For this tutorial I’ll call it acceptable, but you can also bake masks from meshes as I’ve shown here, in which case you can match the floater geometry to any shape perfectly (not to mention it also opens a lot of other possibilities).
To make the decal blend properly with the surface of the canister I’m using two grunge masks on top of the decal mask to make it scratched in a somewhat believable way. One mask is high scale, another is low scale, to make sure there’s enough variety in the final mask.
Both of the masks have curves on them of course to fine-tune their values:
There’s no method for how to tweak curves, you just go by vibes and gradually develop an intuition for how to change curves to get the values you want. Just play with them and have fun!
Finally, I’m hand-placing two dents by adding two dent decals. Same process as before, except these decals only affect the Bump channel, with an ultra-low value of the bump (-0.0002).
And, you guessed it, it has a curve too! It’s needed to get the desired shape of the dent.
Baking material into PBR textures
Baking is important if you’re working on a lot of different materials in the same blend file, for example an asset pack, because as I mentioned shaders can be quite expensive and with ucupaint you’ll get some very complex shaders. If you have a lot of them you may notice your GPU struggling. So I recommend baking materials when you’re done with them.
You will also obviously need to bake if you’re planning to export the asset to a game engine because game engines don’t understand your blender shaders, and it would be slow af even if they did.
Baking in ucupaint is a completely non-destructive operation! You can easily go back to the initial layer stack with a click of a button.
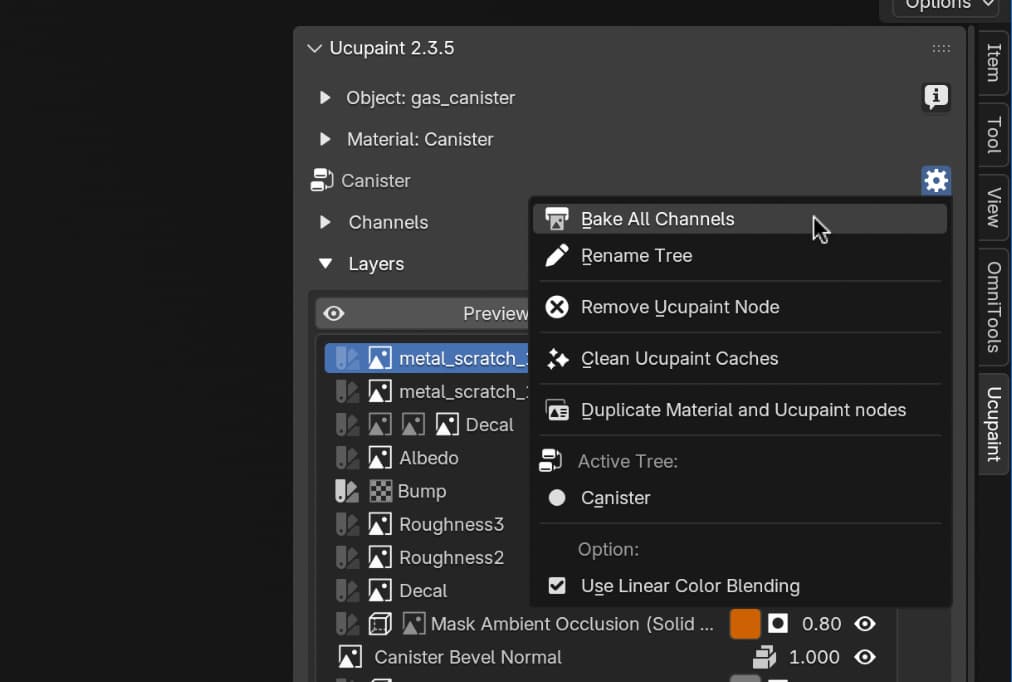
To bake the material, click on the cog button to the right of the tree name on top and click Bake All Channels:
I bake on GPU and have it set as default in ucupaint settings, because it’s much faster and I never had any problems baking on a macbook. However depending on what GPU you have it’s possible that you may encounter issues. Just try switching between CPU and GPU and see which works best on your hardware.
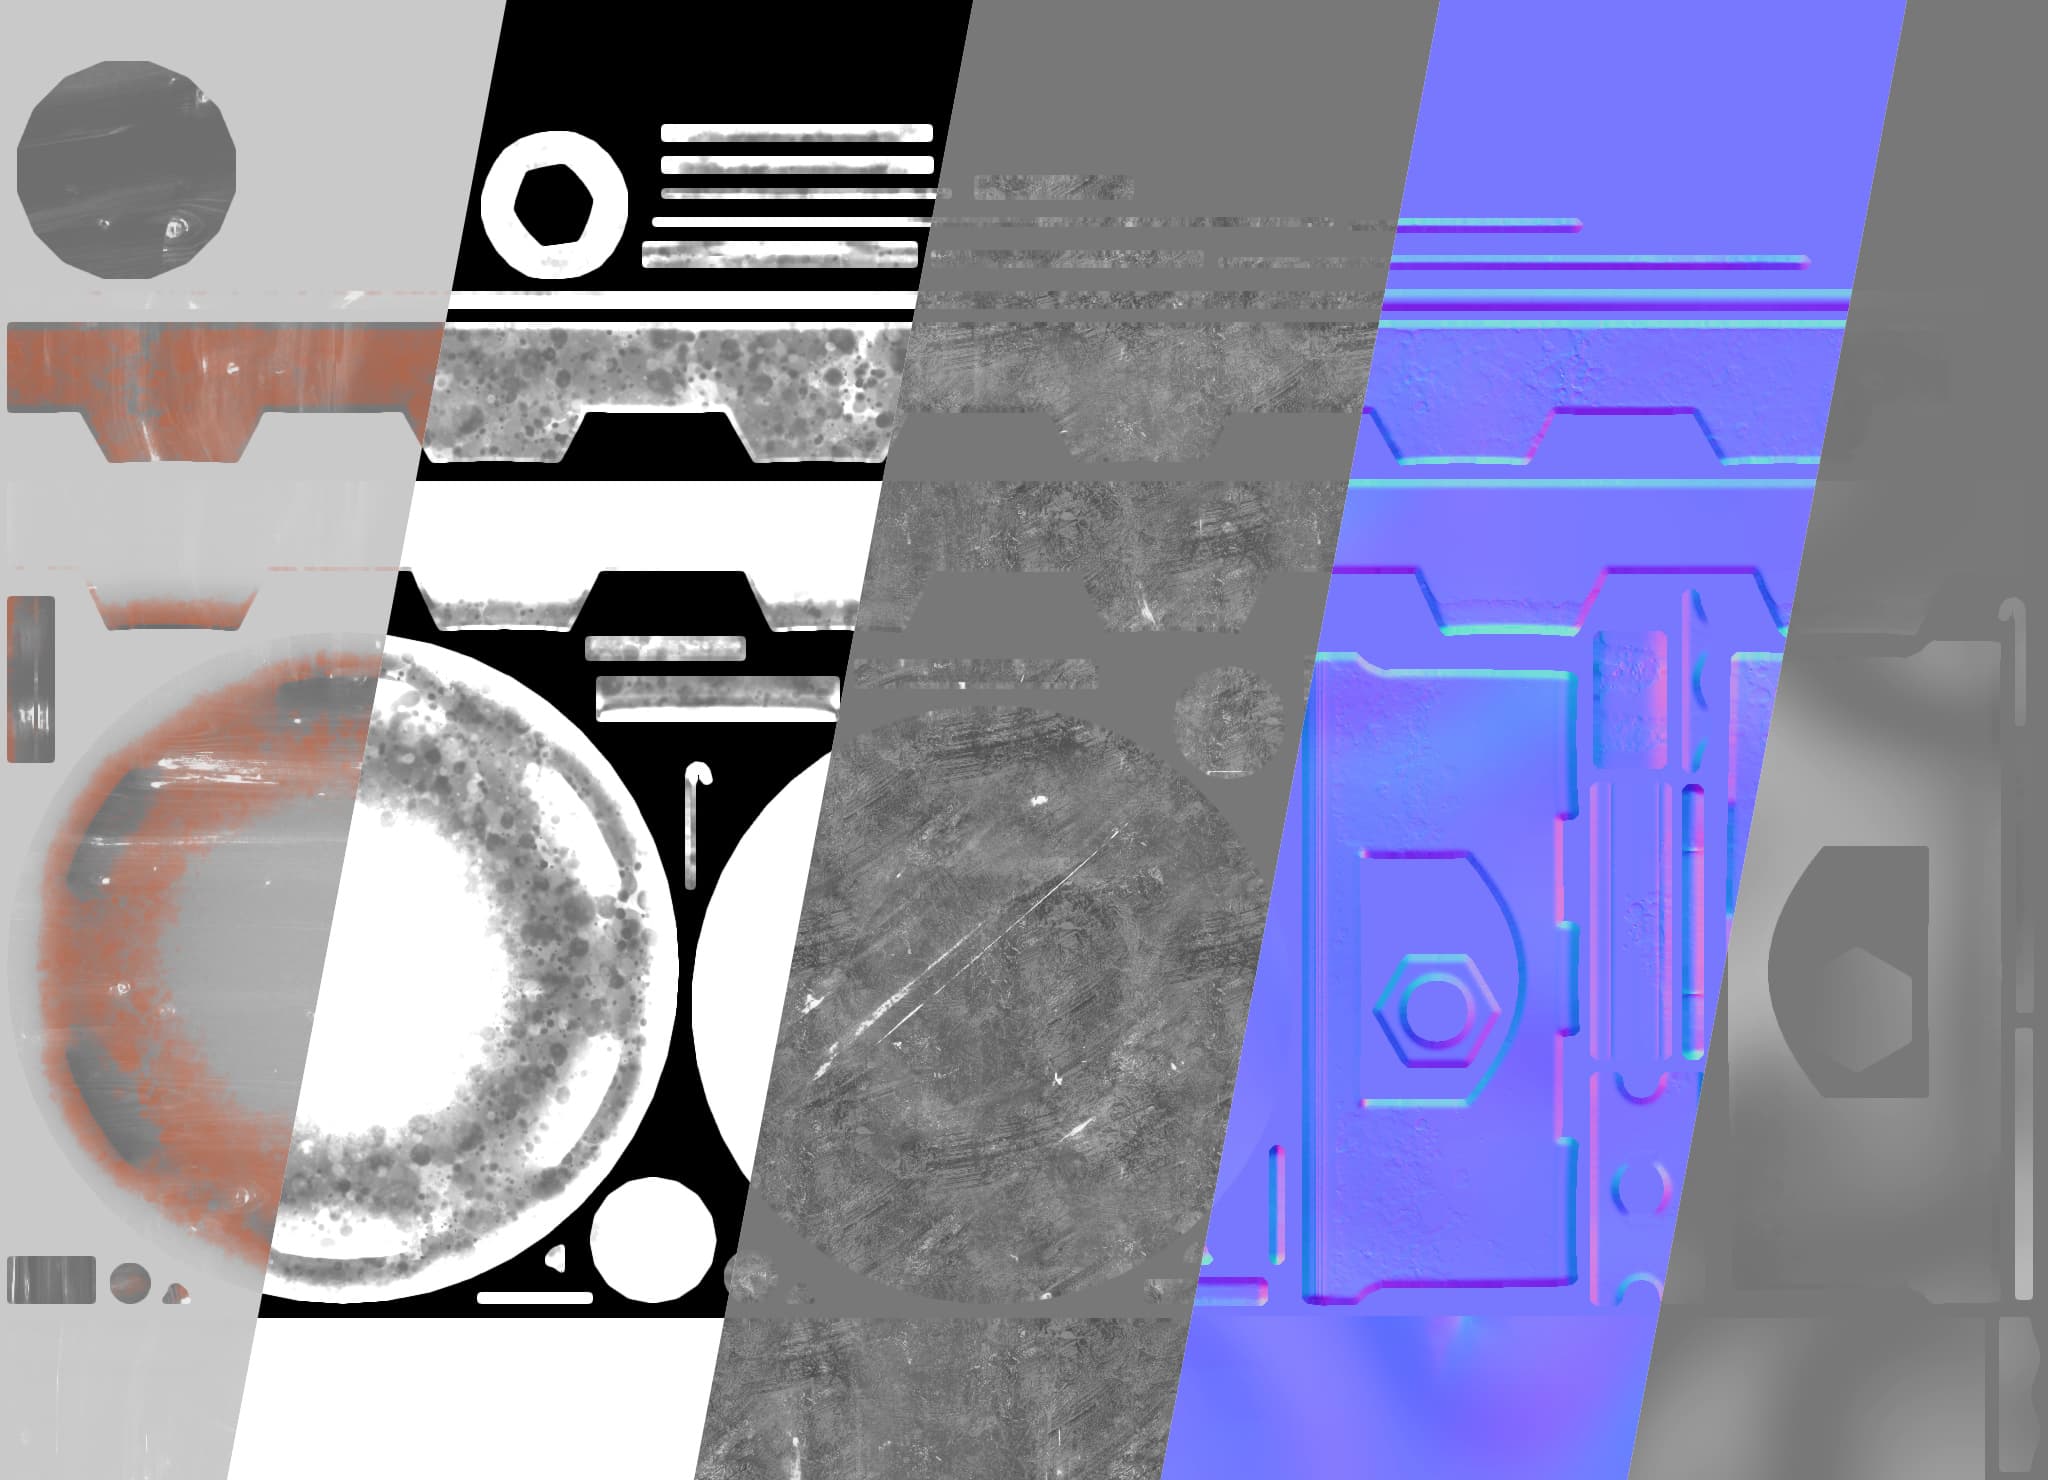
Bake will produce maps for all of the channels:
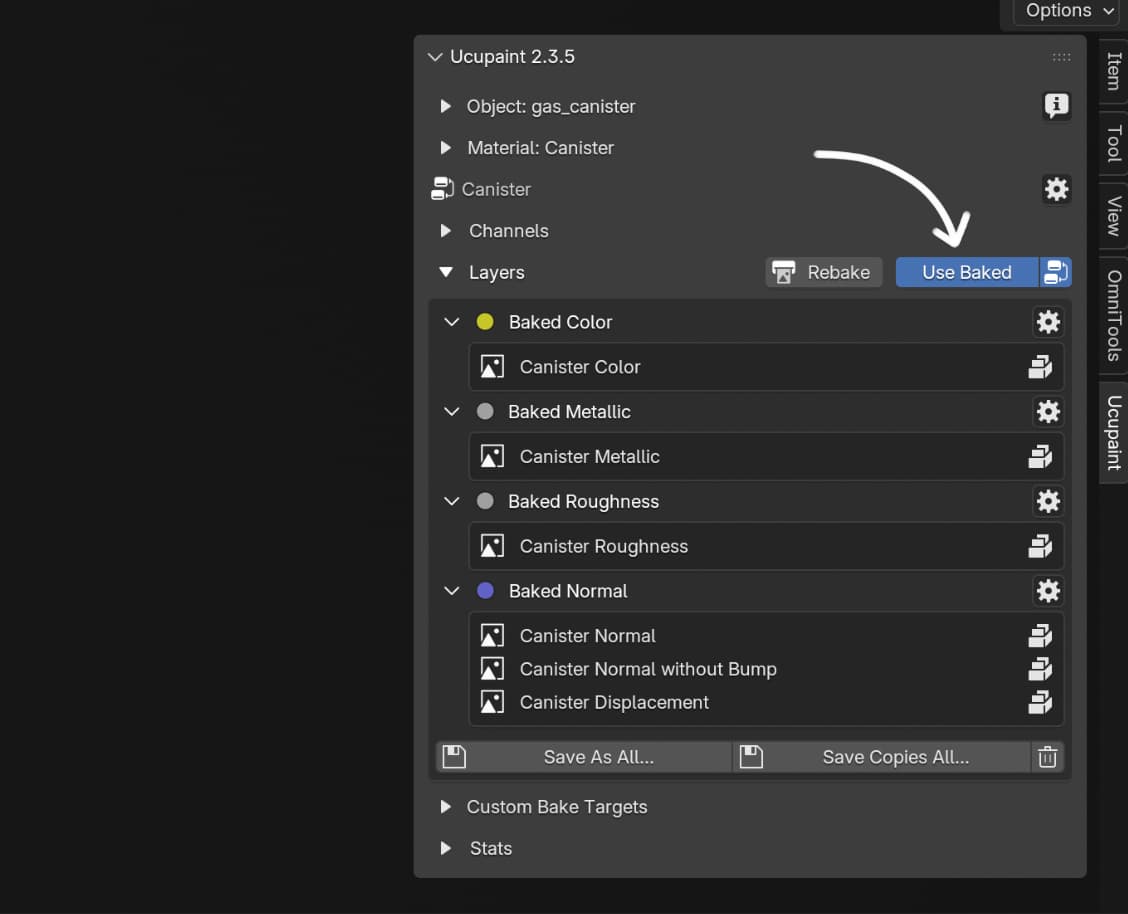
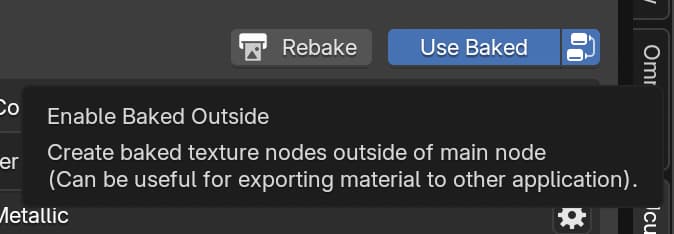
When done baking, ucupaint will connect those images to the Principled BSDF node in the same material and you can seamlessly switch between baked and unbaked material by clicking the Use Baked button:
Since baked material is just your regular blender material with textures plugged into proper channels, it will export properly and you can use it in a game engine:
As you can see the ucupaint node that holds the entire source layer stack is just chilling on the side, waiting to be reconnected by the addon when you need to go back to editing the layers.
For that to be the behavior you need to make sure that the Baked Outside button is enabled, it’s to the right of Use Baked (you can make it enabled by default in ucupaint settings):
Keep in mind that glTF doesn’t support displacement maps, so if you have some complex shader on the game engine side that does for example parallax occlusion mapping, you’ll need to set that up manually by assigning the height texture in engine yourself. Ucupaint will bake it and save it to an image, but blender glTF exporter won’t export it.
About iteration
I wrote this post in a linear way going from one layer to another because it would have been a nightmare to write and read otherwise. But in reality most of the time spent texturing is tweaking different layers all the time trying to make them all work together.
So don’t get discouraged if a material doesn’t look good on the first try. It’s not supposed to. Trust the process and iterate! Try different things and have fun!
Output and presentation
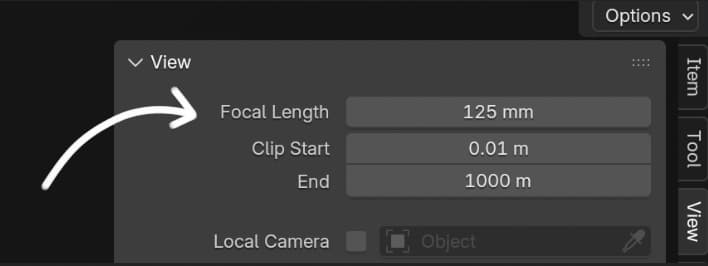
For props I stick to narrow FOV in the viewport, this is what I used throughout this tutorial:
I’m primarily a gamedev so I never render anything, I just take a screenshot of the viewport because I’m lazy and my main machine is around 4k resolution anyway so I always see the final result as I work.
I also have compositor Glare and Lens Distortion in my startup file so I always have a bit of bloom and a touch of chromatic abberation in my viewport:

Bloom has some actual utility when lighting and texturing because it serves as an extra hint for how bright specular reflections are.
There’s also some vignette as a custom node but it’s out of scope of this post.
For final last minute tweaks I still often drop those screenshots into affinity photo. It’s what I find most convenient for me to finalize the look in. It’s easy to test different adjustment layer stacks by simply enabling/disabling layer groups, and it’s also easy to compare different screenshots and see how things evolved over time.
For this particular shot I didn’t do much though, just amplified vignette a bit and made highlights warmer.
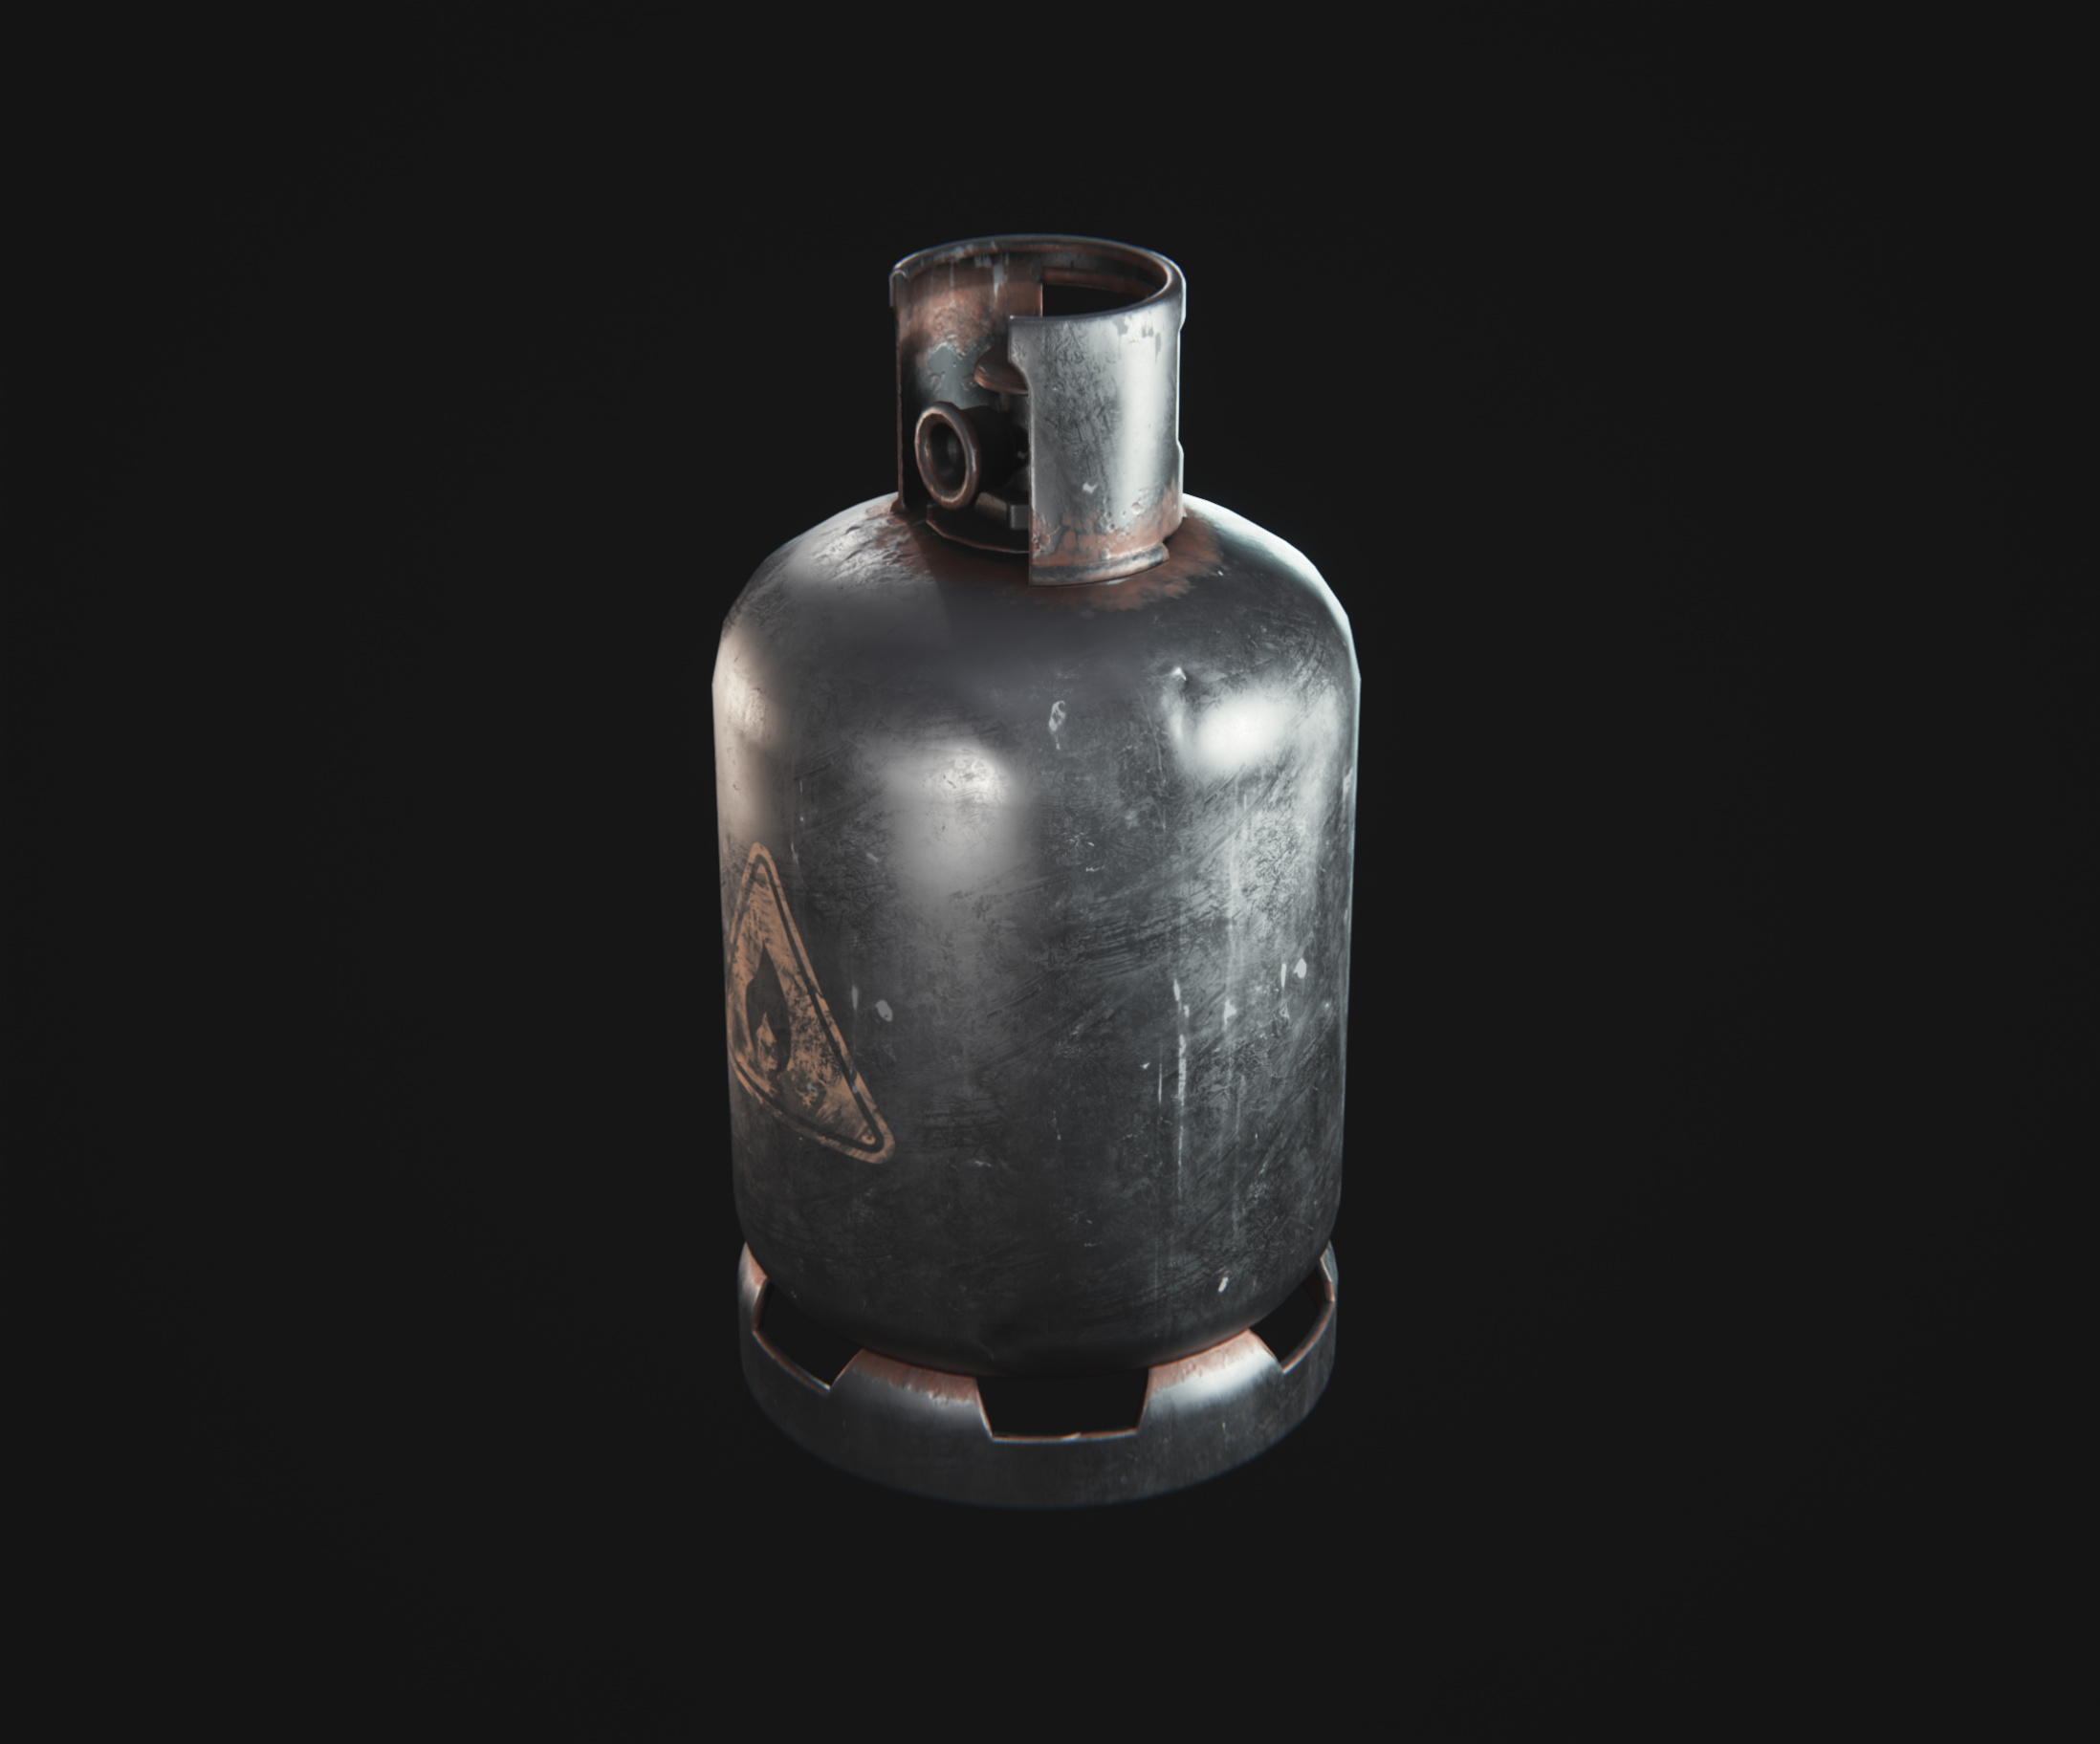
Here’s the final result:
What is ucupaint not?
In the beginning I briefly described what ucupaint is, and then we looked at one of the ways to use it. Now let’s quickly talk about what it’s not.
It’s not a texture painting addon. It will help you hand-paint on layers and masks by creating, managing and blending them, and it’s definitely worth using ucupaint for hand-painting rather than not using it. But blender painting issues such as brushes suddenly not working when you’re too zoomed in or brushes not supporting constant world-space scale are still there. A lot of those issues aren’t even fixable via addons.
It’s also not an image processing software. It uses shader graph which processes individual pixels rather than the entire image at every step. So some complex generators or filters that rely on full image processing that you may have seen in substance painter might not be possible in blender, at least not until blender team implements texture layers in core.
Those things aside, ucupaint will take you far and will let you do some pretty advanced texturing. There’s an upside to ucupaint using regular shaders because there is no “ucupaint engine” process running in background. Materials created with ucupaint will work on anybody else’s computer even if they don’t have ucupaint installed, even if you animate properties on those materials. Because they’re just regular materials.
Why ucupaint rocks
Ucupaint offers something that substance painter can’t - the ability to model and texture in the same app, eliminating the entire import-export roundtrip.
This is invaluable for generalists, but also useful for lookdev artists and art leads, because even if you’re working in a team you may wanna be able to easily sketch out the entire look of a game (or other creative project) in a single app.
Some workflows that it opens aren’t as smooth when using substance painter, such as being able to quickly model a floater geometry on the spot and bake its normals into a layer.
Most importantly, it’s open-source. The whole thing is on github. No need to worry about subscription price changes or losing access to an essential piece of your creative toolkit due to some company deciding to randomly lock you out of your account. Open-source also means that if you know python or have a friend who knows python you can fix issues or add features to ucupaint yourself. Just like any foss software, it gives you freedom, control and peace of mind.
Consider donating to ucupaint to make sure it survives and keeps rocking! Also follow the creator on bsky!
That’s it!
If you find this kind of content helpful let me know and I’ll make more, byeeeeee!!!